Diving into the creative realm of paper folding, origami offers a unique blend of artistry and tranquility. One of the simplest yet most captivating creations in origami is the paper claw. These claws can spark imagination, transforming anyone into a fierce dragon or a mysterious creature from fantastical realms. Perfect for costumes, playtime, or just a fun DIY project, origami claws are an accessible craft for creators of all ages. Here’s a guide to constructing your very own origami paper claws through various techniques, each ranging in complexity and style. Unleash your creativity and let’s fold our way into an adventure!
Classic Origami Claws
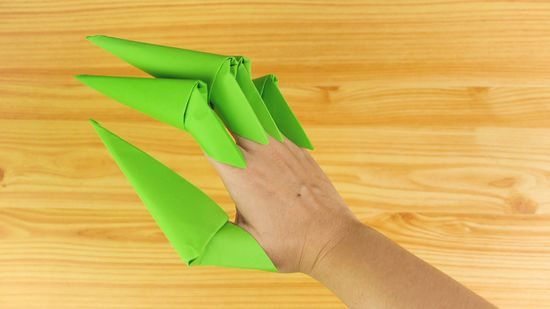
Discover the traditional art of making origami claws with nothing more than a square piece of paper. This method is great for beginners and is a wonderful way to introduce anyone to the world of origami.
Detailed Steps:
- Start with a Square: Take a piece of paper and make sure it’s a perfect square. If it isn’t, fold one corner to the opposite side and trim off the excess to create a square.
- Initial Folds: Position the square so it’s a diamond shape, and fold it in half from bottom to top to create a triangle.
- Create a Guideline: Fold the triangle in half by bringing the left corner to the right corner, creating a smaller triangle. Unfold this to see a crease down the middle.
- Shape the Claw: Take each of the top corners of the original triangle and fold them down to the bottom point, resulting in a square shape with an open bottom.
- Form the Finger Pocket: Fold the two bottom edges of the square upwards to meet the top, flipping the model over after the fold.
- Seal the Claw: Fold the two bottom corners of the triangle upwards, tucking them into the pocket you just created.
- Give It Life: Finally, insert your finger into the pocket, and voilà, your origami claw is complete!
Summary:
The classic origami paper claw is quick and easy to make, requiring only a piece of paper and your hands. They are ideal for children’s craft projects and party fun. However, they are not very durable and might tear after some robust play.
Intricate Folded Claws
Take your paper claws to the next level with intricate folds that add durability and a more realistic look.
Detailed Steps:
- Square Start: Make sure your paper is a perfect square for uniformity.
- Initial Folds: Fold the square into a triangle, then fold the triangle in half to create a smaller triangle, and unfold back to the original triangle.
- Corner Folds: Fold in the top corners of the triangle down to the bottom point to create a smaller square.
- Folding for Texture: Before folding the bottom edges up to form the finger pocket, create small zig-zag folds along these edges to give your claw texture.
- Forming the Pocket and Sealing: Proceed as before by folding the two bottom corners up to form the finger pocket and tucking them in to seal the claw.
- Final Touches: Carefully fold back some of the zig-zag sections to give your claw a spiky appearance.
Summary:
This intricate folding method results in a more durable and visually appealing claw. The added texture may give a more menacing look, perfect for cosplay or decoration. However, the intricate folds may be more challenging for beginners and a bit time-consuming to perfect.
Sturdy Paper Claws
For those who require a more robust option, making claws out of thicker paper can lead to longer-lasting creations.
Detailed Steps:
- Choose Thick Paper: Start with cardstock or any thick paper that will provide more durability.
- Standard Folding: Fold the square of thick paper into a triangle and proceed with the usual steps for creating the claw.
- Reinforcement Folds: After creating the finger pocket, make additional folds along the edges for reinforcement, making sure they’re crisp and tight.
- Final Adjustments: Insert your finger to create the pocket shape firmly and adjust the folds to ensure a snug fit.
Summary:
Utilizing thicker paper allows the claws to stand up to more rigorous use and keeps their shape over time. It can be more challenging to fold due to its rigidity, and getting smooth, neat folds may take some practice. Additionally, thick paper claws can be less comfortable to wear for extended periods.
Multi-Color Claws
Add a splash of excitement to your origami claws by using multi-colored paper or decorating the claws post-folding.
Detailed Steps:
- Choose Colorful Paper: Use origami paper that has different colors on each side, or use markers to decorate plain paper beforehand.
- Follow Standard Claw Folding: Create your claws following the steps outlined for the classic origami claws.
- Custom Design: If using uncolored paper, now decorate your claw using markers, stickers, or any other craft materials.
Summary:
Multi-color claws are visually striking and allow for personal customization. They make great gifts and party favors. However, intricate designs may take additional time and resources, and coloring after folding could lead to smearing if the ink isn’t allowed to dry properly.
Beginner-Friendly Paper Claws
Crafting origami claws made simple for those who are just starting out in their paper-folding journey.
Detailed Steps:
- Initiate with Easy Folds: Choose paper that is not too slippery, allowing for easier manipulation.
- Large Claws: Start with a larger square of paper to make bigger claws, which are easier to handle.
- Simple Folding Technique: Use the classic claw instructions, focusing on making the folds very sharp by running a fingertip or a ruler along each fold.
- Practice Makes Perfect: Don’t be discouraged by initial imperfections; practice will make the process smoother.
Summary:
This method is great for beginners, providing an achievable challenge without overwhelming complexity. The larger claws are easier to work with but may be less nuanced in their appearance and not as practical for wear.
Adhesive-Enhanced Paper Claws
Secure the structure of your origami claws for longevity with the use of simple adhesives.
Detailed Steps:
- Fold Normally: Create your claw by following any of the previous methods suitable for your skill level.
- Add Adhesive: Once the shape is formed, use a small amount of glue or double-sided tape to secure the pocket folds in place.
- Drying Time: Allow sufficient time for the adhesive to dry before wearing or playing with the claw.
Summary:
Adhesive-enhanced claws can withstand more play and handling, and they maintain their form better over time. However, the use of glues might be less suitable for younger children and can take away from the traditional all-paper aspect of origami.
Wearable Origami Claw Set
Create a coordinated set of origami claws designed to be worn on each finger for a complete transformation.
Detailed Steps:
- Uniformity in Paper: Use paper squares of the same size and color for consistency.
- Fold Multiple Claws: Follow the classic claw-making instructions to create a full set of claws, one for each finger.
- Adjust for Different Fingers: Slightly adjust the size of the finger pocket if necessary so that each claw fits the intended finger comfortably.
Summary:
A full set of wearable claws can significantly enhance the dramatic effect and are fantastic for role-playing. However, making multiple claws can be time-consuming, and sizing each claw correctly may be tricky at first.
Custom-Sized Origami Claws
Adjust origami claw sizes to perfectly fit individual fingers for maximum comfort and realistic appearance.
Detailed Steps:
- Precise Measurements: Before folding, measure the finger that will wear the claw and adjust paper size accordingly.
- Tailored Folding: Start the folds as per the classic instructions but keep checking the fit as you fold to ensure a custom fit.
- Fine-Tuning: Once the basic claw shape is achieved, make smaller folds to tighten or loosen the finger pocket as needed.
Summary:
Custom-sized claws provide a more comfortable and realistic fit. They’re great for wearables in costume play. However, this method requires more precision and patience to ensure the right fit for each finger.
Decorative Origami Claw Tips
Enhance the tips of your origami claws to make them stand out and give them an extra edge.
Detailed Steps:
- Normal Claw Foundation: Fold your claws using any of the desired methods outlined previously, but leave a small section at the tip unfolded.
- Tip Customization: Fold the tip in various ways—either a simple straight fold for a squared tip or a diagonal fold for a pointed effect.
- Refinement: Adjust and fold the tips until you achieve the level of sharpness or decoration you prefer.
Summary:
Decorative tips can add personality and flair to each claw, and the possibilities are virtually endless. It’s an opportunity for personal expression but might require a bit more dexterity to execute intricate designs.
Lightweight Paper Claws for Flexibility
Opt for lighter paper to create origami claws that offer ease of movement and dexterity.
Detailed Steps:
- Material Choice: Choose lightweight paper like standard origami paper, which is easier to fold and manipulate.
- Claw Creation: Employ the classic claw folding technique, taking care to make each fold as precise as possible.
- Adjusting the Feel: If necessary, gently curve the paper around your finger to achieve a comfortable fit that allows for flexibility.
Summary:
Light paper claws are easy to make and ideal for those who prioritize comfort and finger movement. However, they’re less durable and can lose their shape more quickly than sturdier designs.
Conclusion:
The art of origami invites you on a journey of creativity and precision, culminating in the simple yet delightful paper claw. Each variation serves a different purpose, from robustness and customization to aesthetics and ease of creation. It is the blend of technical folding and imaginative exploration that makes crafting origami claws a deeply satisfying endeavor. This guide has provided you with the tools to fold, shape, and adapt as you breathe life into paper through your own hands. Now, it’s time to explore, create, and let your paper claws take on a life of their own.
FAQs:
Q: What type of paper is best for origami claws?
A: Origami claws can be made from various types of paper; standard origami paper works well for beginners because of its flexibility and ease of handling, while thicker paper like cardstock can create more durable claws.
Q: Is it necessary to use glue or tape in making origami claws?
A: Not necessarily. Traditional origami relies on precise folding and does not typically include adhesives. However, for added durability or intricate designs, glue or tape can be used.
Q: Can origami claws fit any finger size?
A: Yes, by adjusting the size of the starting paper and the folds made to form the finger pocket, origami claws can be customized to fit any finger size comfortably.