Picture this: You’ve just signed into your iCloud Mail and there it is, an uninvited email from a sender you’d rather not hear from again. Whether it’s unsolicited promotions or a persistent thread you’d prefer to end, iCloud Mail provides you with options to prevent these senders from cluttering your inbox. Managing your inbox shouldn’t be a daunting task, and with a few clicks, you can maintain a tidy, stress-free space. Let’s walk through the various ways to block those unwelcome emails effectively, ensuring your inbox remains a zone of tranquility and relevance.
Use the Block Function in iCloud Mail
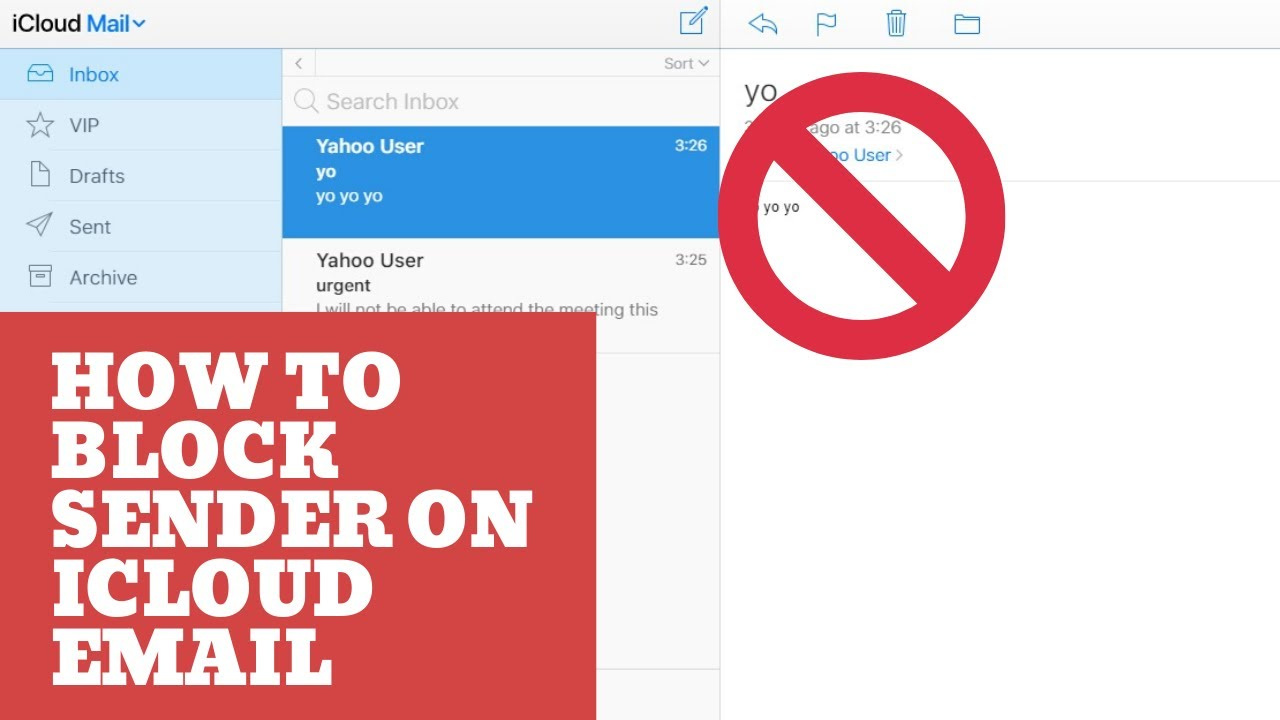
iCloud Mail has a built-in feature that allows you to block emails from specific senders directly. This is an effective way to stop receiving emails from someone without having to leave the Mail interface.
Detailed Steps:
- Open iCloud Mail on your web browser and log in with your Apple ID.
- Find an email from the sender you want to block.
- Click on the email to open it.
- Locate the sender’s email address at the top of the email.
- Click on the small blue arrow next to the sender’s name.
- Select “Block This Contact” from the dropdown menu.
- Confirm that you want to block the sender when prompted.
Summary:
Blocking a sender directly in iCloud Mail is a straightforward solution that can quickly give you peace of mind. Emails from the blocked sender will no longer appear in your inbox, reducing clutter and distractions. However, this method requires you to have an email already in your inbox from the sender you wish to block.
Create a Rule in iCloud Mail
For a more customizable approach, you can create a filtering rule in iCloud Mail. This allows you to direct emails from certain senders straight to the trash or another folder.
Detailed Steps:
- Go to iCloud.com and sign in with your Apple ID.
- Open Mail and click on the gear icon at the bottom left corner to access Settings.
- Select “Rules” from the pop-up menu.
- Click “Add a Rule.”
- Choose “is from” in the first dropdown menu.
- Enter the sender’s email address you wish to block.
- Set the action by selecting “Move to Trash” or another folder of your choice.
- Click “Done” to activate the rule.
Summary:
Creating a rule offers personalized control over how you handle emails from unwanted senders. It’s beneficial as it prevents distracting messages from reaching your inbox. The downside is it takes a few more steps than just hitting the ‘Block’ option, and it may not be as intuitive for those who are less tech-savvy.
Filter Emails on Your iPhone or iPad
Blocking senders isn’t limited to the iCloud website; you can manage your emails directly from your iOS device.
Detailed Steps:
- On your iPhone or iPad, open the “Settings” app.
- Scroll down to “Mail” and tap it.
- Select “Blocked” to view your list of blocked contacts.
- Tap “Add New…” to include a new contact in your blocked list.
- Choose the contact you wish to block or manually enter the email address.
Summary:
Filtering emails on an iPhone or iPad is convenient for users who predominately handle their mail via mobile devices. This method offers immediate relief from unwanted emails while on-the-go. However, if the sender’s contact isn’t already saved in your device, it could be slightly cumbersome to add them manually.
Mark as Junk
You can help iCloud Mail filter out unwanted emails by marking them as junk. This trains the system to redirect similar emails in the future.
Detailed Steps:
- Visit iCloud.com and log into your account.
- Open the Mail application.
- Select the undesired email.
- Click the “Junk” icon, which looks like a trash bin, to move the email to the Junk folder.
Summary:
Marking emails as junk is an easy and quick way to clean up your inbox and improve the effectiveness of the junk mail filter over time. However, this method might not block all emails from the sender, as some might sneak through the filter, especially if the sender changes their email address.
Leverage Third-Party Email Filtering Tools
Consider using third-party email management tools that integrate with iCloud Mail for advanced filtering and blocking features.
Detailed Steps:
- Research and select a reputable third-party email filtering tool that supports iCloud Mail.
- Set up an account with the chosen service and link your iCloud Mail account as directed.
- Use the tool’s features to block or filter emails according to your preference.
Summary:
Third-party tools often provide more robust filtering options and can be particularly effective for managing a high volume of unwanted mail. However, they usually come at a cost and may require a level of trust with your personal information.
Report as Spam to Apple
Reporting unwanted emails as spam can help not just you, but the wider iCloud community, by enhancing Apple’s spam filters.
Detailed Steps:
- Log into iCloud Mail on your web browser.
- Select the unwanted message.
- Click the “Junk” icon to report it as spam.
Summary:
Reporting a message as spam is simple and aids in the improvement of Apple’s overall email filtering. Nonetheless, as with marking emails as junk, it might not entirely prevent all future emails from the same sender.
Notify Your Email Contact
Sometimes, the direct approach works best. Contact the sender and ask them to remove you from their mailing list.
Summary:
Directly requesting removal from a mailing list can be very effective and is a courteous way to handle unwanted emails from legitimate organizations. However, it’s not advisable for unsolicited spam, as it could validate your email to the sender.
Unsubscribe From Mailing Lists
Look for an “Unsubscribe” link within the email, which is typically found at the bottom.
Summary:
Unsubscribing is a quick fix for emails from legitimate commercial senders, but it can sometimes take a few days to take effect, and not all senders honor unsubscribe requests.
Adjust Mail Privacy Settings
Enhance your privacy by adjusting relevant settings within iCloud Mail.
Summary:
Increasing your privacy controls can help reduce unwanted mail; however, it might also filter out emails you wish to receive if not finely tuned.
Educate Yourself on Email Scams
Stay informed about common email scams to better identify and avoid them.
Summary:
Knowledge is power; understanding the tactics used in email scams will help you avoid potential threats. The downside is that it requires continuous learning and vigilance to stay ahead of evolving tactics.
Conclusion
Managing your iCloud mailbox and keeping it free from unwanted senders doesn’t have to be an overwhelming task. With a mixture of iCloud’s built-in features, additional tools, and personal vigilance, you can create a more enjoyable email experience. Remember, your inbox is your own, and you have the power to control what deserves your attention.
FAQs
Q: Can blocked senders in iCloud Mail know they’ve been blocked?
A: No, senders are not notified when you block them in iCloud Mail.
Q: If I block a sender, will I still receive their emails in my iCloud Mail?
A: Once you block a sender, their emails are typically moved directly to the trash or junk folder, depending on your settings, so they won’t clutter your inbox.
Q: Can I unblock a sender later if I change my mind?
A: Yes, you can always reverse the process and unblock a sender in your iCloud Mail settings.