In the interconnected world we live in, wifi has become as necessary as the air we breathe. We need it to connect with family, work from home, stream our favorite shows, and control smart home devices. However, sometimes wifi signals struggle to permeate the walls of our homes, causing frustration and disconnection. If you find that some rooms in your home are wifi dead zones, there are several strategies you can employ to boost your signal and enjoy uninterrupted connectivity. Let’s explore how you can enhance your wifi signal’s journey through barriers and optimize your home network for seamless connectivity.
Reposition Your Router
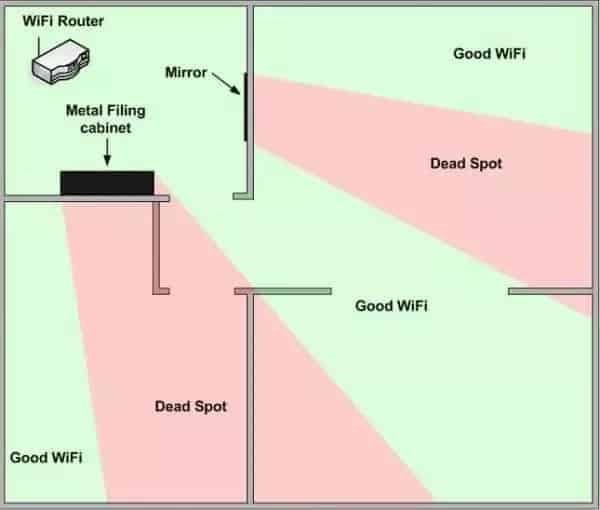
Wi-Fi signals emanate from your router, but walls, furniture, and other obstacles can impede these signals. Moving your router to a more central location can help.
Detailed Steps:
- Identify a central location in your house, ideally on the same floor as your devices.
- Ensure the new location is elevated, such as on a shelf, to spread the signal more effectively.
- Keep the router away from metal objects, microwaves, and cordless phones to minimize interference.
- Reconnect your devices and test the signal strength in previously problematic areas.
Summary:
This is relatively cost-effective and easy to do. Improved signal strength in multiple areas can be expected, although physical limitations like thick walls may still pose a challenge.
Upgrade Your Antenna
The default antenna on many routers is designed to be omnidirectional. Choosing a more powerful antenna can make a significant difference.
Detailed Steps:
- Purchase a high-gain antenna that’s compatible with your router model.
- Unscrew the existing antenna and screw on the new one, pointing in the direction where signal boost is needed.
- Test the wifi signal strength and adjust the antenna’s direction as necessary.
Summary:
This solution offers a simple hardware upgrade that can enhance signal reach. The downside is that directional antennas send the signal in one specific direction, possibly neglecting other areas.
Use a Wi-Fi Extender
Wi-Fi extenders increase the coverage area of your network by receiving the existing signal and re-broadcasting it.
Detailed Steps:
- Choose a wifi extender compatible with your current router and devices.
- Place the extender halfway between your router and the area with a weak signal.
- Follow the manufacturer’s instructions to set up and connect the extender to your network.
- Check the signal strength and adjust the location of the extender if necessary.
Summary:
Extenders can more than double the coverage area, but they can also introduce additional latency and may reduce bandwidth if not set up properly.
Powerline Networking Kits
Powerline adapters use the electrical wiring in your home to extend your internet connection, bypassing the need for signals to travel through walls.
Detailed Steps:
- Purchase a powerline networking kit.
- Plug one adapter into a socket near your router and connect them using an Ethernet cable.
- Plug the second adapter into an outlet in the room with a poor signal and connect it to your device or an additional wifi access point.
- Pair the adapters following the manufacturer’s instructions.
Summary:
Powerline kits can be an elegant solution when walls block wifi signals; however, they depend on the quality of your home’s electrical wiring and may not work well in older homes.
Mesh Network Systems
Mesh network systems consist of a main router and satellite modules to create a powerful and seamless wifi network.
Detailed Steps:
- Choose a mesh network system that suits your home size and budget.
- Place the main router in a central location and satellites evenly around your home for optimal coverage.
- Follow the setup process as per the system’s instructions, using the associated app for easier management.
- Test the wifi connectivity in all your rooms and reposition satellites if necessary.
Summary:
Mesh networks provide widespread, reliable coverage and are easy to manage but tend to be more expensive than other solutions.
Switch to a Different Wi-Fi Band
Modern routers are dual-band, operating on both 2.4 GHz and 5 GHz frequencies. Changing bands can improve your wifi performance.
Detailed Steps:
- Connect to your router’s settings via a web browser or the router’s app.
- Find the wireless settings and adjust your devices to connect to the 5 GHz band which is typically less congested.
- Save the changes and reconnect your devices to the new band.
Summary:
Switching bands can result in a faster connection and can help avoid interference. However, the 5 GHz band may not penetrate walls as well as 2.4 GHz.
Update Your Router’s Firmware
Manufacturers frequently release firmware updates that can improve performance and security.
Detailed Steps:
- Access your router’s admin panel through a web browser.
- Look for a section like ‘Advanced’, ‘Management’, or ‘Firmware Update’.
- Follow the instructions to check for and apply firmware updates.
Summary:
This free solution can potentially improve your wifi signal and router performance, though the process may be intimidating for non-technical users.
Reducing Wireless Interference
Interference from other wireless devices and networks can weaken your wifi signal.
Detailed Steps:
- Relocate devices that could cause interference, like cordless phones and microwaves, away from your router and computer.
- Change your router’s channel via the admin panel to one less crowded.
Summary:
This can enhance your wifi signal for free. It might require trial and error to find the best channel with less interference.
Optimize Router Settings
Adjusting your router’s settings for performance can also help.
Detailed Steps:
- Log into your router’s admin panel.
- Look for ‘Quality of Service’ (QoS) settings.
- Prioritize bandwidth for essential services or devices that you use frequently.
Summary:
Optimization can provide a more consistent signal for important tasks but requires some understanding of your network’s needs and usage.
Install a DIY Signal Booster
A DIY booster, like a parabolic reflector, can help direct your wifi signal more efficiently.
Detailed Steps:
- Create a reflector using aluminum foil and a template from online resources.
- Place the reflector around your router’s antenna to direct the signal.
- Adjust the position to maximize signal boost.
Summary:
It’s a very cost-effective method, but it’s not guaranteed to work and may look unsightly.
In conclusion, enhancing your wifi signal through walls requires a mix of strategic device placement, hardware upgrades, and network optimization. The perfect solution varies from one home to another due to different layouts and construction materials, so it may take some experimentation to find the right mix of strategies that work for you. However, by systematically applying the aforementioned methods, most homeowners should be able to significantly improve their wifi coverage and enjoy robust connectivity throughout their space.
FAQs:
-
Can thick walls really affect wifi signal strength?
Yes, certain materials like concrete and metal can severely weaken a wifi signal as it passes through walls. -
Will upgrading to a new router improve my wifi signal through walls?
It can, especially if your current router is outdated or doesn’t support modern frequencies and technologies. -
Should I always buy the most expensive equipment for the best signal boost?
Not necessarily. The best approach is to assess your specific situation and start with simpler fixes before investing in more expensive solutions.


