Browsing the internet has become more of a daily navigation through a sea of endless information. Just like having a well-organized set of folders for your physical documents, managing your digital space is equally important. Google Chrome on Android offers a feature that can immensely streamline your browsing experience: tab groups. This useful function allows you to cluster related web pages together, making it easier to stay organized and switch between different tasks or topics. Whether it’s for work, research, or leisure, tab groups can help you keep your digital workspace tidy and more efficient. Let’s explore how to harness this feature to its full potential.
Creating Tab Groups
When your browser gets crowded with tabs, it can feel overwhelming. Grouping these tabs can be a lifesaver. It simplifies your browsing experience by categorizing the web pages you’ve opened into distinct sections based on the content or purpose.
- Launch the Chrome app on your Android device.
- Open a website that you want to include in a new tab group.
- Tap on the tabs icon (it looks like a square or two layered squares) next to the address bar.
- Find the tab you want to group and press down on it slightly until it lifts up.
- Drag this tab onto the ‘+ Group’ option that appears.
- Chrome will create a new group with this tab, and you can add more tabs by repeating steps 4 to 5.
Creating tab groups in Chrome not only helps you keep similar pages together but also reduces clutter. The main disadvantage here might be if you create too many groups, which could become just as unwieldy as individual tabs.
Adding Tabs to an Existing Group
Once you have a tab group, you may want to add more related tabs to it. This is how you can continue to keep your browsing organized even as you open new web pages.
- Open Chrome and navigate to the web page you wish to add.
- Tap on the tabs icon to view all your open tabs.
- Tap and hold on the tab you want to add to the group.
- Drag it to the existing group of your choice, which should highlight.
- Release the tab to add it to the highlighted group.
This enhances your ability to maintain a well-organized browsing session, keeping all related information in one spot. The potential downside is that you could accidentally add a tab to the wrong group, but this can easily be rectified.
Knowing how to move around within your tab groups effectively can make your browsing much more seamless and intuitive. Here’s the process to navigate between the tabs in a group.
- Tap on the tabs icon in Chrome to see your open tabs.
- Locate and tap on the group you want to explore.
- Inside the group, swipe left or right across the screen to scroll through the tabs.
- Tap on a tab to select and view it.
Efficient navigation within tab groups will save you time as you won’t have to sift through a jumble of unsorted tabs. However, if you’re not used to this system, it may take some getting used to.
Renaming a Tab Group
Sometimes, it’s helpful to name your tab groups to remember their purpose at a glance. Here’s how to give your group a specific name.
- Open Chrome and access your tab groups by tapping the tabs icon.
- Tap on the tab group you want to rename.
- At the top of the group, you’ll see an untitled box or the current name of the group; tap on it.
- Enter the desired name for your tab group and tap ‘OK’ or ‘Enter’ on your keyboard.
By naming your tab groups, you’ll be able to identify them more quickly, improving your ability to multitask. Just make sure the names are clear and concise to avoid confusion.
Changing Tab Group Color
Color-coding is another way to differentiate your tab groups. Google Chrome allows you to assign colors to your groups for quick identification.
- Access your tab groups in Chrome by tapping the tabs icon.
- Select the group for which you want to change the color.
- Tap the three dots menu (More options) at the top-right of the group.
- Choose ‘Change color’ and select the color you prefer.
Setting different colors for your groups can visually speed up the process of finding the right one. However, with limited color options, you might run out of unique colors for new groups.
Ungrouping a Single Tab
Sometimes, a tab no longer fits within a group or was added by mistake. Ungrouping is straightforward.
- Tap the tabs icon and go to your tab groups.
- Open the group containing the tab you want to ungroup.
- Press and hold on to the tab, then drag it out of the group and release.
Ungrouping tabs helps maintain the relevance of each group. It’s a simple step but must be done with care to avoid disorganizing your workspace.
Disabling Tab Groups
If you find tab groups aren’t suiting your browsing style, Chrome allows you to disable this feature altogether.
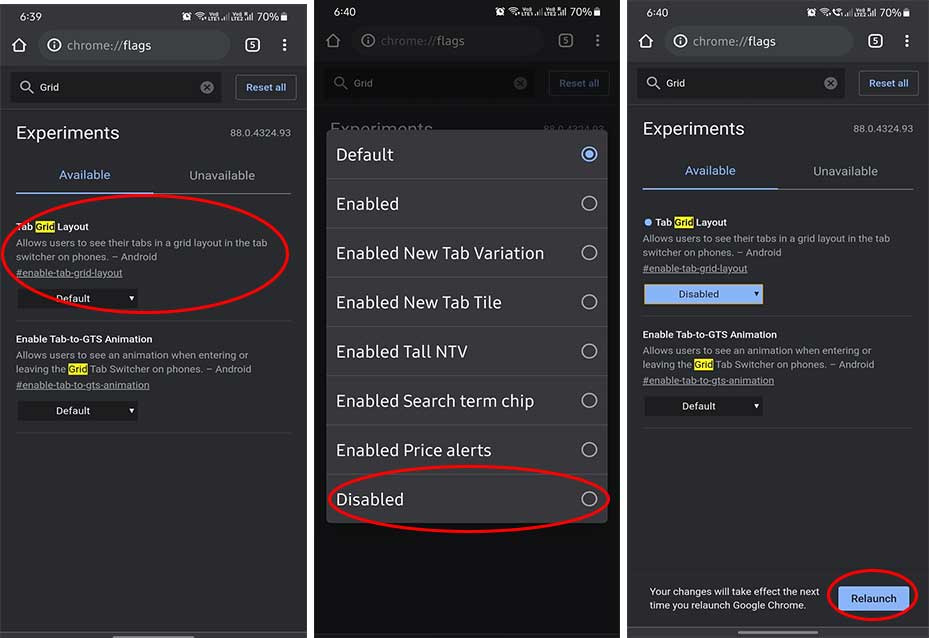
- Open Chrome and type ‘chrome://flags’ into the address bar, then hit ‘Enter.’
- In the ‘Flags’ search bar, type ‘Tab Groups.’
- Select ‘Disabled’ from the drop-down menu next to ‘Tab Groups,’ ‘Tab Groups UI Improvements,’ and any other related flags.
- Restart Chrome to apply the changes.
Disabling tab groups will revert your browser to the traditional tab layout. It’s a good option if you prefer simplicity, but you’ll lose the organization benefits of grouping.
Tips and Tricks for Efficient Tab Group Management
Here are additional insights for making the most out of tab groups in Chrome on Android:
- It’s better to keep groups focused; too many tabs in one group can be counterproductive.
- Regularly review your groups and close tabs that are no longer needed to keep everything manageable.
- If you accidentally close a group, quickly reopen Chrome’s menu and tap ‘Recently closed’ to restore it.
Conclusion
Tab groups in Chrome on Android can significantly enhance your web browsing efficiency. By learning to create, manage, and disable tab groups, you’re equipped to keep your digital workspace neat and tailored to your needs. Embrace the simplicity and organization that tab groups bring to your browsing routine, and don’t hesitate to tweak the system to work best for you.
FAQs
-
Do tab groups sync across my devices?
Yes, if you’re signed into the same Google account and have sync enabled, your tab groups can sync across devices where you use Chrome.
-
What happens to my tab groups if I clear my browsing data?
Clearing browsing data can potentially delete your tab groups, so be cautious when using this function.
-
Can I share a tab group with someone else?
Chrome doesn’t currently support directly sharing a tab group, but you can share individual tabs within a group.


