It’s not uncommon to open a document in Microsoft Word only to find that you can’t immediately make changes. This “read-only” mode is there to protect the document from unintentional edits, but it can be frustrating if you’re ready to dive in and make changes or updates. Similarly, you may want to turn off editing capabilities when you’re done to protect your work. In the guide that follows, we’ll look at various ways you can toggle the editing function on and off, navigating the settings with ease even if you’re not particularly tech-savvy.
Enabling Editing from Protected View
When opening documents from the internet or email attachments, Word often opens them in Protected View. This mode keeps your computer safe from potentially harmful content, but you’ll need to exit this mode to edit the document.
- Open the Word document, and you will see a yellow bar at the top of the window stating that the document is in Protected View.
- Click on the button “Enable Editing” on the right-hand side of the yellow bar.
- The document will now be editable. If Word prompts you with any security warnings, review them carefully to ensure the document’s source is trustworthy before proceeding.
Summary: Enabling editing from Protected View is a straightforward process that ensures the document’s safety. While it’s a minor hiccup for editing, it’s a crucial step for cybersecurity.
Allowing Editing by Removing Read-Only Status
Documents can be set to “read-only” to prevent changes. To make edits, you’ll need to remove this setting.
- If the document is open in Word, click on “File” in the top-left corner.
- Go to “Info” and then click on “Protect Document.”
- Select “Mark as Final” to toggle off the read-only status if it’s enabled.
- Alternatively, if the “Read-Only” attribute is due to file properties: Close Word, right-click the document in File Explorer, choose “Properties,” and then uncheck “Read-only” at the bottom.
- Open the document again, and you should be able to edit it.
Summary: Removing read-only status is another layer of protection that, once addressed, allows for full editing access. However, toggling this off for shared documents may inadvertently allow unwanted changes.
Using Document Inspector to Remove Restrictions
Document Inspector can help find and eliminate hidden data or personal information, as well as restrictions on editing.
- Click “File” and select “Info.”
- Choose “Check for Issues” and then click on “Inspect Document.”
- In the Document Inspector dialog box, check all boxes and click “Inspect.”
- Review the inspection results, and if there are any restrictions, click “Remove All” next to them.
- Close the Document Inspector and save your document if prompted.
Summary: Document Inspector is a powerful tool for both removing hidden data and lifting editing restrictions, but be cautious as it may also remove information you want to keep.
Modifying Restrict Editing Settings
Sometimes, a document will have the editing restricted to certain parts or people.
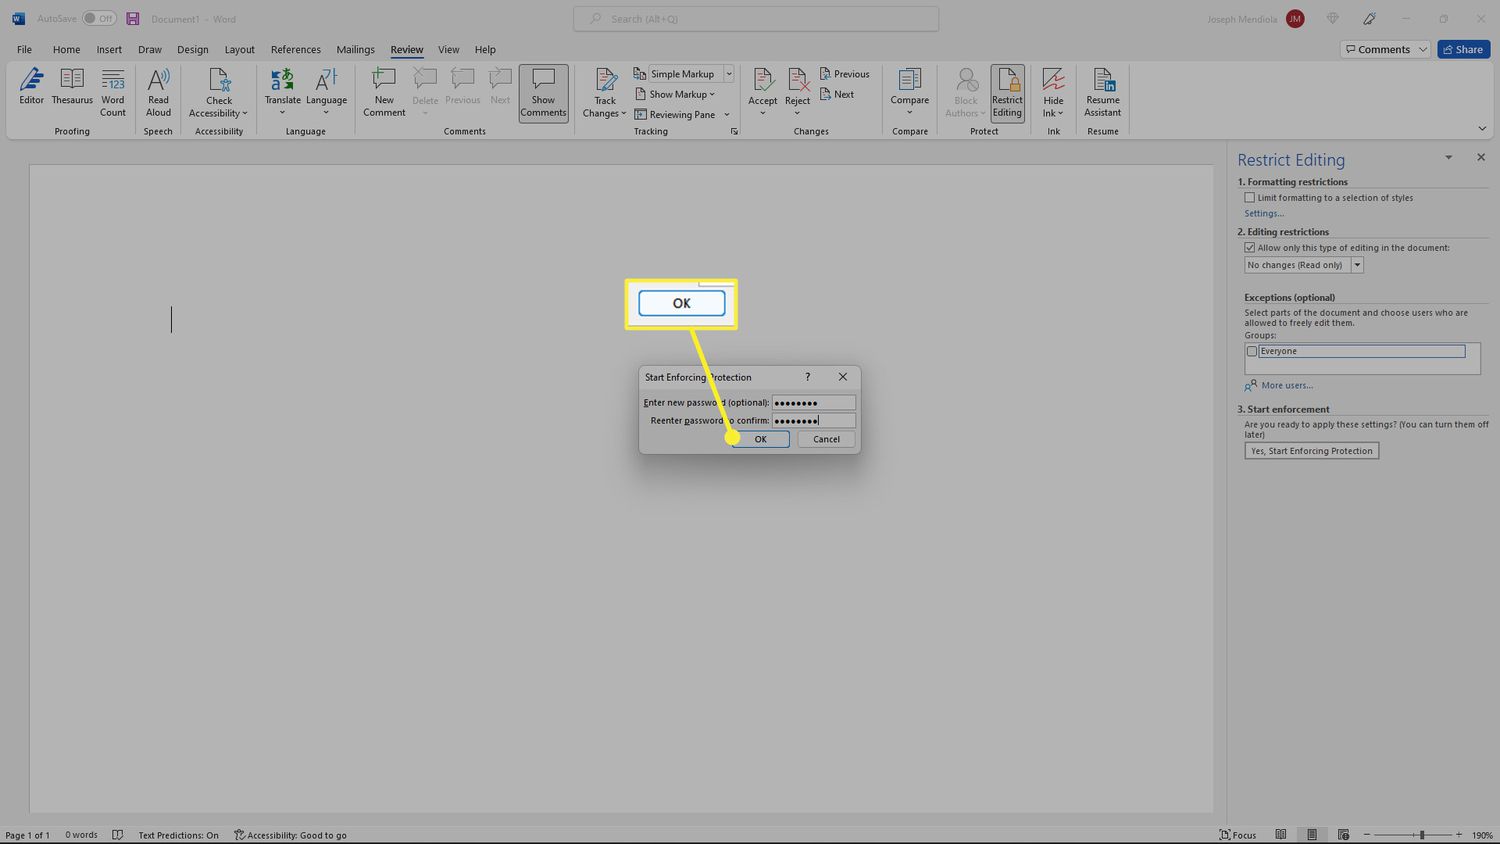
- Open the document, click on the “Review” tab, then click on “Restrict Editing.”
- On the right pane, if you see limitations under “Editing restrictions,” click “Stop Protection” at the bottom.
- You may need to enter a password if one has been set.
- Once the protection is removed, you can make changes to the document.
Summary: Modifying the Restrict Editing settings requires either permission or the correct password, but once accessed, it offers freedom over the document’s content.
Disabling Mark as Final
“Mark as Final” is a status that discourages editing but doesn’t prevent it.
- Click “File,” then “Info,” and look for the “Mark as Final” notice.
- Click on the notice to remove the “Mark as Final” status.
- A message will confirm the status change, and you can now edit the document.
Summary: Disabling “Mark as Final” makes a document editable again with a single click, although users can inadvertently ignore the warning and edit anyway.
Converting PDF to Editable Word Document
PDFs are often non-editable, but Word can convert them into editable documents.
- Open Word and select “File,” then “Open.”
- Navigate to the PDF file and open it. Word will display a message that it’s going to convert the PDF to an editable Word document.
- Click “OK,” and after conversion, you can edit the document.
- Note that complex PDFs may not convert perfectly, requiring some manual adjustment.
Summary: This solution allows editing of PDF content within Word, providing a quick way to modify documents not originally created in Word; however, conversion may not always be seamless.
Editing a Document as an Administrator
If you lack editing permissions, you might need to open Word as an administrator.
- Close Word and navigate to the Word application icon.
- Right-click the icon and select “Run as administrator.”
- Open the document within Word and attempt to edit it.
Summary: Editing as an administrator can bypass certain restrictions, but should only be done when absolutely necessary and with an understanding of the implications.
Using Save As to Make an Editable Copy
Sometimes the best way to enable editing is to create a new, editable copy of the document.
- Open the document, click “File,” and select “Save As.”
- Choose a location and a new file name for your document.
- Click “Save,” and open this new copy, which should be editable.
Summary: “Save As” provides a quick workaround to edit restrictions, creating a new document to work with. However, always ensure you have the right to make copies of the content.
Turning Off Protected View in Trust Center Settings
To disable Protected View entirely for future documents:
- Click “File,” then “Options,” and navigate to “Trust Center.”
- Click on “Trust Center Settings,” then “Protected View.”
- Uncheck the boxes for the sources you trust and no longer want to be opened in Protected View.
- Click “OK” to apply the changes.
Summary: While disabling Protected View can make document editing more seamless, it can increase your risk of encountering harmful content and should be done with caution.
If a document has been shared with you, you may need to request editing permissions from the owner.
- Open the shared document.
- If editing is not permitted, look for a button or link that says “Request Edit Access” or something similar.
- Follow the prompts to request permission from the document’s owner.
Summary: For shared documents, respectful collaboration is key. Requesting permission ensures proper protocol is followed, though it may take time for the owner to respond.
In conclusion, Microsoft Word offers multiple ways to enable or restrict editing. From simple toggles to navigating protective features, these solutions ensure not only the ease of editing documents but also their security and integrity. Each method has its place, whether you’re turning off protected views for a smooth workflow or password-protecting sensitive information. It’s about finding the right balance between protection and productivity to suit your needs.
FAQs:
Q: What should I do if I still can’t edit the document after following these steps?
A: Check if there are any additional restrictions set by the document owner or administrator. You may also try contacting the person who provided you with the document for further assistance.
Q: Is there a risk in turning off Protected View in Word?
A: Yes, disabling Protected View can expose your computer to risks if you open a malicious document. It is generally recommended to keep it enabled, especially when opening files from the internet or email.
Q: Can I edit a Word document on my phone or tablet?
A: Yes, you can edit Word documents on your mobile device using the Microsoft Word app. However, some features may be limited compared to the desktop version.