In the ever-evolving landscape of social media, maintaining privacy and controlling who sees what on your profile can be pivotal. Facebook, as one of the leading platforms, offers nuanced settings to help manage your social circle discreetly. Whether you’re looking to focus on your closest friends or take a breather from others, hiding and unhiding friends is a simple update that can make your Facebook experience more tailored and enjoyable. In the following guide, we will walk you through various ways to manage your friends’ visibility on your profile, ensuring you have the online space you desire.
Adjusting Friend List Visibility
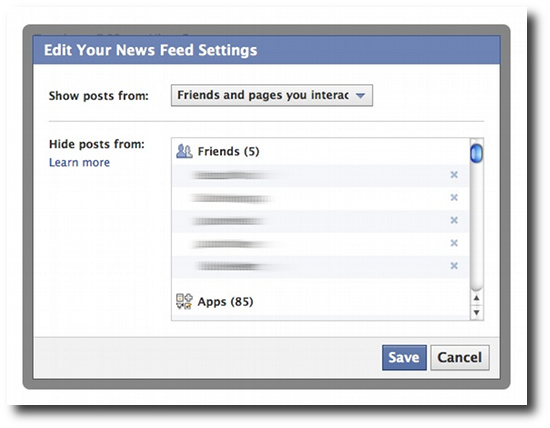
Privacy concerns are paramount when engaging with your social network online. Facebook allows you to control who sees your friend list, which is a useful first step in hiding specific friends without unfriending them.
Detailed Introduction
Having control over who can see your friend list gives you a layer of privacy. This prevents unwanted scrutiny and questions about your connections. It can be helpful for personal or professional reasons, or simply for maintaining a sense of online boundaries.
Detailed Steps
- Log into your Facebook account.
- Click on your profile picture in the top right to go to your profile.
- Click on ‘Friends’ below your cover photo.
- Click on the pencil icon on the right side, then select ‘Edit Privacy’.
- In the ‘Friend List’ section, click on the audience selector next to ‘Who can see your friends list?’ (options range from Public to Only Me).
- Select your preferred level of privacy and click ‘Done’.
Summary
Adjusting the visibility of your friend list can be empowering, as it offers you a simple way to control who sees your connections without altering individual friendships. This does not hide your friends individually, but curtails the accessibility to the entire list. There are no significant downsides to this, unless you want your connections to be visible to everyone for networking purposes.
Customizing Friend Networks
Sometimes, you’re not looking to hide your friends list entirely, but rather to create specific groups for varying levels of interaction and visibility on your timeline.
Detailed Introduction
Facebook’s ‘Custom Lists’ feature allows you to categorize friends based on your real-life social circles or your own criteria. This feature is extremely useful for organizing your friends and ensuring the right people see the right posts.
Detailed Steps
- On your Facebook homepage, navigate to the ‘Friends’ section on the left sidebar.
- Click ‘See More’ if you do not immediately see ‘Friends Lists’.
- Select ‘Manage Friend Lists’ or ‘Create List’.
- Name your new list and add friends to it.
- When posting a status update or photo, click on the audience selector and choose your custom list to restrict who can see the post.
Summary
Customizing friend networks through lists is a proactive way to manage your online presence. It can be particularly beneficial for keeping professional and personal circles separate, ensuring content appropriateness. One downside could be the initial time investment in setting up and maintaining these lists.
The Unfollow Feature
For a less drastic measure that allows you to hide someone’s posts without unfriending them, the ‘Unfollow’ function is your go-to tool.
Detailed Introduction
Unfollowing a friend means their posts won’t appear in your News Feed, but you’ll still remain friends and be able to visit each other’s profiles. It’s a discreet way to manage what you see without hurting anyone’s feelings.
Detailed Steps
- Go to your friend’s profile.
- Hover over the ‘Following’ button (found near their cover photo).
- Click ‘Unfollow’.
Summary
Unfollowing is perfect for when you just need a break from someone’s posts without causing drama. The main perk is decluttering your feed, but the downside is you may miss important updates from those you unfollow.
Hiding Your Posts from Certain Friends
Sometimes, you may not want to hide a friend but instead want to hide your posts from specific individuals.
Detailed Introduction
This strategy enables you to keep your posts visible to most friends while selectively hiding them from others upon posting.
Detailed Steps
- When creating a post, click on the audience selector (usually set to ‘Friends’).
- Click ‘More Options’ and then ‘See All’.
- Select ‘Custom’.
- Under ‘Don’t share with,’ enter the names of the friends you want to hide your post from.
- Click ‘Save Changes’.
Summary
This option provides the freedom to share without overexposing yourself to everyone on your friend list. While it allows for more personal privacy, it does require you to actively manage your audience with each post.
Snooze Feature
If you need a temporary reprieve from a friend’s posts, Facebook’s ‘Snooze’ feature can mute them for 30 days.
Detailed Introduction
Snoozing is a hassle-free, temporary solution to control what fills your News Feed without any long-term impact on your friend connections.
Detailed Steps
- Find a post from the friend you want to snooze in your News Feed.
- Click the three dots in the top right corner of the post.
- Select ‘Snooze [Friend’s Name] for 30 days’.
Summary
Snoozing is ideal for short-term relief from overactive friends. The benefit is a quieter feed for a month, with the downside being it’s not a permanent fix and you’ll need to snooze them again if desired.
Restricting Friends
The ‘Restricted’ list is a way to stay friends with someone while limiting their access to your posts.
Detailed Introduction
When you add someone to your ‘Restricted’ list, they only see your public content or posts you tag them in – a great option when you want to stay connected but limit exposure.
Detailed Steps
- Go to the profile of the friend you want to restrict.
- Click on the ‘Friends’ button (under their profile picture).
- Select ‘Add to another list’.
- Click ‘Restricted’.
Summary
Using the ‘Restricted’ list can maintain professional etiquette or family relations online without sharing all aspects of your life. The main disadvantage is that restricted friends may notice they’re seeing less of your content.
Limit Past Posts
If you’re concerned about what you’ve shared previously, Facebook allows you to limit the audience of your past posts in bulk.
Detailed Introduction
This feature adjusts the visibility of your old posts from ‘Public’ or ‘Friends of Friends’ to just ‘Friends,’ making it simpler to manage your digital footprint retroactively.
Detailed Steps
- Click the down arrow in the top-right corner of Facebook to access ‘Settings’.
- Select ‘Privacy’ from the left sidebar menu.
- Under ‘Your Activity,’ find and click ‘Limit the audience for posts you’ve shared with friends of friends or public’.
- Click ‘Limit Past Posts’, and then confirm by clicking ‘Limit Past Posts’ again in the popup window.
Summary
Limiting past posts can provide peace of mind for those concerned about their online legacy. It’s an efficient way to quickly enhance privacy, but it does not allow for selective visibility of individual posts.
Temporary Profile Picture
Changing to a temporary profile picture can prevent a specific friend from seeing your current profile picture after the temporary period ends.
Detailed Introduction
A temporary profile picture returns to your previous picture after a designated time, which by default remains unchanged even to those who are restricted or unable to see your current posts.
Detailed Steps
- Click your profile picture and select ‘Update’.
- Choose or upload a new image and click ‘Next’.
- Select ‘Make Temporary’ and choose the duration.
- Click ‘Save’.
Summary
This can be a clever workaround if your current profile picture contains sensitive content you wish to restrict. However, it’s not a versatile solution for overall privacy concerns.
Viewing Your Profile as Someone Else
To make sure your privacy settings are working as intended, Facebook allows you to view your profile as someone else.
Detailed Introduction
Previewing your profile from the perspective of the public or a specific friend ensures that you’re only sharing what you want to with who you want to.
Detailed Steps
- Go to your profile.
- Click the three dots below your cover photo and select ‘View As’.
- Choose to view your profile as a specific person by entering their name in the bar at the left of the page.
Summary
This feature reassures you that your privacy settings are effective. It can ease anxiety but could also prompt you to make further changes for desired privacy.
Blocking and Unblocking
Blocking someone is the most definitive way to hide from them on Facebook, but you can also unblock them if you change your mind.
Detailed Introduction
When you block somebody, they can no longer see your posts, tag you, or send you messages. However, should circumstances change, unblocking is just as straightforward.
Detailed Steps
- Click the down arrow in the top-right corner and select ‘Settings’.
- On the left sidebar, click ‘Blocking’.
- Scroll down to ‘Block users’, enter the person’s name, and click ‘Block’.
- To unblock, go to the same section, find their name on the list, and click ‘Unblock’.
Summary
Blocking is optimal for removing someone entirely from your Facebook experience, offering the highest level of privacy. The downside is it’s very conspicuous, and the blocked person could realize they have been blocked if they try to interact with you on Facebook.
Understanding the multiple approaches to managing your social presence on Facebook allows for a customized experience that meets your need for privacy and interaction control. From adjusting who sees your friend list to using features such as unfollowing or snoozing, you can curate your News Feed and overall Facebook experience without severing connections. Whether you choose a soft approach like limiting past post visibility or decide to use the block function for total separation, each method provides various levels of discretion and control.
In conclusion, social media can sometimes feel like navigating a public space with a personal diary in hand. It’s important to manage your privacy in a way that feels right for you, and thankfully, Facebook offers a bouquet of options to tailor your social interaction. Whether it’s a temporary adjustment or a more permanent move, the steps outlined here aim to grant you the authority in managing who sees your friends and how your content is viewed. Keep these tips in hand for whenever you need them, and remember, your Facebook experience is yours to control.
FAQs
How do I hide my Facebook friend list from certain people?
You can hide your friend list by going to your profile, clicking on ‘Friends’ below your cover photo, then clicking on the pencil icon and selecting ‘Edit Privacy’. From here, you can customize who can see your friend list.
What’s the difference between unfollowing and blocking someone on Facebook?
Unfollowing someone allows you to stop seeing their posts in your News Feed without unfriending them. Blocking someone completely restricts them from seeing your posts, tagging you, or sending you messages.
Can a friend tell if I add them to my ‘Restricted’ list?
No, Facebook does not notify someone if you add them to your ‘Restricted’ list. They will only be able to see your public posts and posts they are tagged in.