Imagine you’ve just finished a lovely stuffed toy or a delicate pillow but there’s an unsightly seam gaping open, revealing the stuffing inside. This is where the ladder stitch comes to the rescue! Often referred to as an invisible stitch, slip stitch, or hidden stitch, it magically seals seams with a thread ‘ladder’ that becomes invisible once pulled tight. This stitch is invaluable for completing your sewing projects with a professional appearance, leaving no trace of the entry point for stuffing or the final thread. Now, let’s explore how to master the ladder stitch with simple instructions and handy tips.
Getting Started with Ladder Stitch
Before diving in, understanding the ladder stitch’s role is crucial. It’s primarily used to close the opening left for turning or stuffing an item while making that seam appear seamless. Ideal for the final touches on soft toys, pillows, or even garment repairs, learning this stitch is a useful addition to your sewing arsenal.
Steps for the Ladder Stitch:
Prepare Your Materials:
- Gather the fabric pieces that need to be joined.
- Choose a thread that matches the fabric color.
- Thread your needle and tie a knot at the end.
Position the Fabric:
- Align the edges of the fabric where the seam will be closed.
- If necessary, press the seams with an iron for easier handling.
Start the Stitch:
- Hide the knot by inserting the needle from the inside of the fold to the outside on one side of the fabric, pulling until the knot catches.
- Position the needle directly across from the exit point on the opposite fold.
Continue the Ladder:
- Create small stitches, moving back and forth between folds, resembling a ladder.
- Keep each stitch even and pull the thread through carefully to maintain tension.
Closing the Seam:
- Once you reach the seam’s end, pull the thread to tighten the ladder, making the stitches disappear.
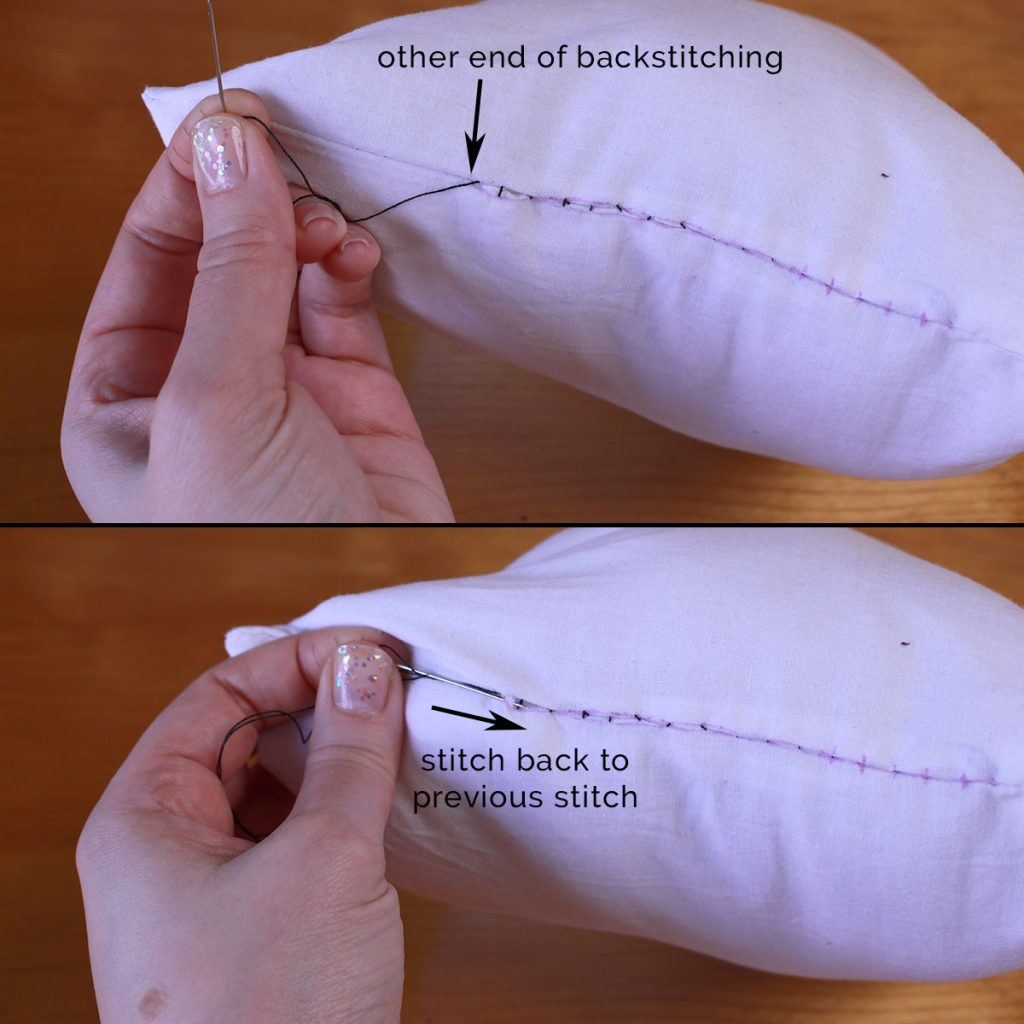
- Secure the end with a few small back stitches and hide the tail of the thread within the folds.
Summary:
The ladder stitch is a fantastic tool that gives your sewing projects a clean, finished look with invisible seams. While it’s a straightforward technique, precision and even spacing are key to a seamless appearance. One potential downside could be the time it takes to get each stitch perfect, but the result is well worth the effort.
Perfecting Your Ladder Stitch
Even if you follow instructions well, practice makes perfect. Here are additional tips and advice to hone your ladder stitch technique:
Achieving Invisible Seams:
- Use fine thread that matches your fabric to help the stitches blend in.
- Keep your stitches small and even for less visibility.
Maintaining Tension:
- Don’t pull too tight after each stitch or you could pucker the fabric.
- Periodically check the tension by gently pulling the thread to close the ladder.
Securing the Stitch:
- Finish by weaving the needle through the last few stitches before cutting the thread.
- Avoid cutting the thread too close to the fabric to prevent it from unraveling.
Working with Different Fabrics:
- Adjust the needle size according to the fabric’s thickness.
- Be extra gentle with delicate fabrics to prevent tearing.
Practice on Scraps:
- Use scrap fabric to practice your ladder stitch before attempting it on the final project.
- Attempt different tensions and stitch lengths to find what works best for you.
Patience is Key:
- Take your time with each stitch to ensure they are even and hidden.
- Pace yourself, especially on larger seams, to maintain consistent quality.
Needle Handling:
- Use a thimble if you find pushing the needle through the fabric tough on your fingers.
- Keep the needle perpendicular to the fabric for more control.
Thread Length:
- Avoid using too long a thread to prevent tangles.
- If the thread is too short, it could run out before the seam is closed.
Knotting the Thread:
- Make sure your starting knot is small enough to hide easily in the fabric.
- A larger knot can be trimmed after fastening to eliminate any bulk.
Storing Your Work:
- If pausing your work, place the needle in the fabric to avoid losing your place and protect from accidents.
Summary:
Improving your ladder stitch takes practice, but following these guidelines can help you achieve invisible seams with ease. Remember, the stitch is not just useful for closing openings but also for delicate repairs where stitching should not be visible. The patience required and time investment is minor compared to the professional results you can achieve.
Conclusion
Mastering the ladder stitch can elevate your sewing projects from homemade to professionally finished creations. It adds that seamless and polished touch that distinguishes quality workmanship. With patience, practice, and a careful hand, this simple stitch will become a go-to in your sewing skills repertoire. Remember, the invisible seam you create with the ladder stitch might just be the most visible sign of your sewing expertise.
FAQs
Q: Can I use the ladder stitch on any type of fabric?
A: Yes, the ladder stitch can be used on most fabrics, but be sure to adjust your needle and thread accordingly. Delicate fabrics require a finer needle and lighter thread, while heavier fabrics may need a stronger needle and thicker thread.
Q: How do I avoid puckering the fabric when pulling the ladder stitch tight?
A: To prevent puckering, pull the thread with gentle, even tension, and periodically check the seam as you work. Ensure the stitches are not too tight or too loose.
Q: What should I do if my ladder stitch is visible after pulling the thread tight?
A: If stitches are visible, they may be too large or the thread may not closely match the fabric. Try using smaller stitches and thread that blends in better with the fabric to achieve the desired invisibility.