In today’s digital age, mastering the art of document editing is an essential skill. Whether you’re collaborating on a project, drafting a proposal, or compiling research, Microsoft Word is often the go-to software. Within this powerful tool lies a trove of features for tracking, reviewing, and altering documents. However, before sharing your final work, it’s crucial to tidy it up by removing comments and accepting changes. This might seem daunting, but fear not! This guide will walk you through the process, step by simple step, ensuring your Word documents are polished and presentable.
Track Changes Feature
Microsoft Word’s Track Changes feature is extremely useful when it comes to editing documents. It provides a clear visual of what’s been changed, who made the change, and any comments from reviewers. Understanding this feature is the first step before you can clean up your document.
- Open your Word document and navigate to the ‘Review’ tab at the top of the window.
- Here, you’ll see the ‘Track Changes’ button. Simply click it to toggle the tracking feature off if it’s still on. This prevents any additional changes from being marked.
- Now that no more changes are being tracked, you’re ready to accept all changes and remove comments.
Summary: The Track Changes feature is handy for document collaboration, but turning it off is crucial before finalizing your document, so further alterations aren’t marked.
Accept All Changes
Once you’ve got the hang of Track Changes, the next step is to incorporate all suggested edits into your document, a process also known as accepting all changes.
- Click on the ‘Review’ tab again if you’re not already there.
- Find the ‘Changes’ section within the ‘Review’ tab.
- Click on the dropdown arrow next to ‘Accept’ and select ‘Accept All Changes’ from the dropdown menu.
Summary: Accepting all changes cleans up the markup and provides a clear view of your document. However, make sure all changes are exactly how you want them, as this step cannot be easily undone.
Remove All Comments
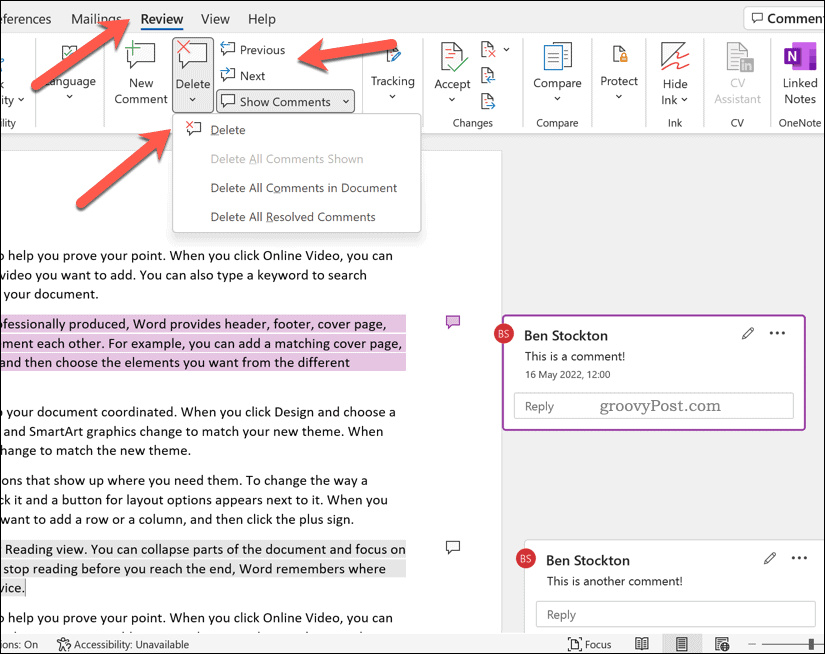
After accepting the changes, you can proceed to remove any lingering comments.
- Stay on the ‘Review’ tab.
- Locate the ‘Comments’ section.
- Here, click on ‘Delete’ and from the dropdown menu, choose ‘Delete All Comments in Document.’
Summary: Removing all comments leaves your document free of any editorial notes—ideal for the final version. Just be certain you’ve addressed all feedback prior to deletion.
Sometimes comments are scattered throughout the document. The Navigation Pane can help you find and remove each one manually.
- Click on the ‘View’ tab at the top.
- Check the ‘Navigation Pane’ box in the ‘Show’ group.
- The Navigation Pane will appear on the left side, click on the ‘Comments’ tab. This displays all comments within the document.
- Right-click on each comment you wish to remove and select ‘Delete Comment.’
Summary: The Navigation Pane is great for managing comments individually. This method is ideal if you only need to remove specific comments rather than all at once.
Advanced Track Changes Options
You might want to get more granular with the settings of Track Changes, like deciding which changes to accept or customize how they’re displayed.
- On the ‘Review’ tab, locate ‘Tracking.’
- Click on ‘Track Changes Options.’
- Here, you’ll find a variety of settings you can adjust according to your preferences.
- After adjusting settings, close the options and return to your document to apply them.
Summary: Advanced options provide greater control over tracking and changes. However, this might be overwhelming for new users, so it might require some time to get acquainted with.
Reviewing Pane
The Reviewing Pane provides a different view of all changes and comments, which can be useful for a quick overview.
- Click on the ‘Review’ tab.
- In the ‘Tracking’ group, click on ‘Reviewing Pane.’ You can choose between a vertical or horizontal layout.
- The Reviewing Pane will open showing all changes and comments. You can navigate through them in this pane.
Summary: The Reviewing Pane is an effective way to review changes and comments thoroughly. It’s a bit more technical but gives you a comprehensive overview.
Accept Changes and Stop Tracking
Once you’re comfortable with accepting changes, you may want to ensure that no more changes are tracked in your document.
- On the ‘Review’ tab, click on ‘Accept’ and then ‘Accept All Changes and Stop Tracking’ to finalize your document.
- This will accept all changes and ensure that any further edits won’t be marked as changes.
Summary: This step is the finishing touch that ensures all changes are included, and your document exits the review stage.
Remove Personal Information
Before sharing the document, it might be wise to strip it of any personal information that’s been collected during the review process.
- Go to ‘File’ and click on ‘Info.’
- Click on ‘Check for Issues’ and then ‘Inspect Document.’
- In the Document Inspector dialog, check ‘Comments, Revisions, Versions, and Annotations.’
- Click ‘Inspect’ and after the inspection, choose ‘Remove All.’
Summary: Removing personal information is crucial for privacy and professionalism. However, always double-check what information is being removed so you don’t lose vital data.
Save a Copy Without Comments or Changes
It’s a good practice to save a separate copy of your document without comments or tracked changes.
- Accept all changes and delete all comments as described in previous steps.
- Go to ‘File’ and then ‘Save As.’
- Save your document with a new filename to distinguish it from the original review copy.
Summary: Saving a clean copy ensures you maintain the original edited document while having a presentable version for distribution.
Using the Document Inspector
The Document Inspector is a comprehensive tool to clear various hidden data from your document, including comments and changes.
- Access the Document Inspector as previously described in ‘Remove Personal Information.’
- Select all items you wish to inspect.
- Click on ‘Inspect’ and then ‘Remove All’ to clear any selected metadata or hidden content.
Summary: Comprehensive cleaning is performed with the Document Inspector, which is great for protecting your document’s integrity before sharing.
In conclusion, whether you’re finalizing a collaborative piece or preparing a solitary work for publication, the ability to remove comments and accept all changes in Word is a valuable skill. Through these detailed steps, you now have a toolkit to ensure that the documents you share are clean, professional, and void of any distracting markup or commentary. By following the guidelines provided, you can confidently polish your Word documents to their utmost clarity and presentability.
Frequently Asked Questions:
-
How do I ensure I don’t lose any important information when accepting all changes?
Before accepting all changes, always review each suggestion carefully. Also, consider saving a separate copy of the document in its original form, with all changes and comments intact for future reference. -
Can I undo accepting all changes or deleting all comments once I’ve done it?
If you haven’t closed the document, you can usually undo recent actions by using the Undo command (Ctrl + Z). However, it’s safer to work on a copy of the document or keep the original separate before making bulk changes. -
What if I only want to accept changes from one reviewer?
In the ‘Review’ tab, click on ‘Show Markup’ and filter the changes by the reviewer. Then you can accept changes individually or collectively by that specific reviewer.


