If you’re the proud owner of a Keurig coffee maker, you know the joy of a quick, delicious cup of coffee at the push of a button. To keep your brews tasting their best, it’s essential to regularly replace the water filter in your Keurig. This might seem like a daunting task if you’re not familiar with the inner workings of your machine, but fear not! This guide is designed to walk you through each step to ensure you can easily replace the water filter, enhancing your coffee experience and prolonging the life of your Keurig.
Check Water Filter Replacement Schedule
Before diving into the process of changing the water filter, find out if it’s time for a replacement. Keurig recommends changing the filter every 2 months or every 60 tank refills to maintain the quality of your coffee.
Detailed Steps:
- Track the number of tank refills or mark the calendar from the last time you changed the filter to keep up with the recommended schedule.
- Notice any changes in the taste of your coffee or water flow from the machine, as these can also indicate a need for a filter change.
Summary:
Regularly replacing your Keurig’s water filter ensures your coffee tastes fresh and the machine operates efficiently. While it might be easy to overlook, sticking to a schedule prevents build-up of minerals and contaminants.
Identifying Your Keurig Model
Before you can replace the filter, you need to know which Keurig model you own since the filter location and type might vary between models.
Detailed Steps:
- Locate the model number usually found on the bottom or side of your Keurig machine.
- Go to the Keurig website or refer to the user manual for model-specific instructions if available.
Summary:
Knowing your Keurig model is vital as it dictates which replacement filter you’ll need and how to properly install it. This ensures a proper fit and function of the water filtration system.
Gathering Necessary Materials
To perform the filter replacement efficiently and effectively, you need to have the right materials on hand before you begin.
Detailed Steps:
- Purchase the correct water filter cartridge that is compatible with your Keurig model.
- Set aside a reusable filter holder if it’s your machine’s first filter change or ensure the existing one is clean.
Summary:
Having the correct materials at the ready simplifies the replacement process and avoids any mid-procedure hiccups that might arise from missing or incorrect parts.
Preparing the Water Filter Cartridge
New filters must be prepared before their first use to remove any dust or residue from manufacturing and ensure they work correctly.
Detailed Steps:
- Soak the new filter cartridge in fresh water for 5 minutes.
- Rinse the filter under running water for 60 seconds.
- Wash your hands thoroughly before handling the filter to avoid contamination.
Summary:
Preparing the filter through soaking and rinsing removes any potential contaminants and primes it for use, resulting in cleaner water and a better tasting beverage.
Removing The Old Water Filter
You must first remove the old filter before placing a new one. Doing so carefully will prevent any damage to the filter holder.
Detailed Steps:
- Turn off your Keurig and unplug it from the outlet.
- Remove the water reservoir and take off or open the filter holder.
- Discard the old filter and rinse the holder if necessary.
Summary:
The careful removal of the old water filter prevents damage and sets the stage for a clean installation of the new filter, contributing to the overall maintenance of the machine.
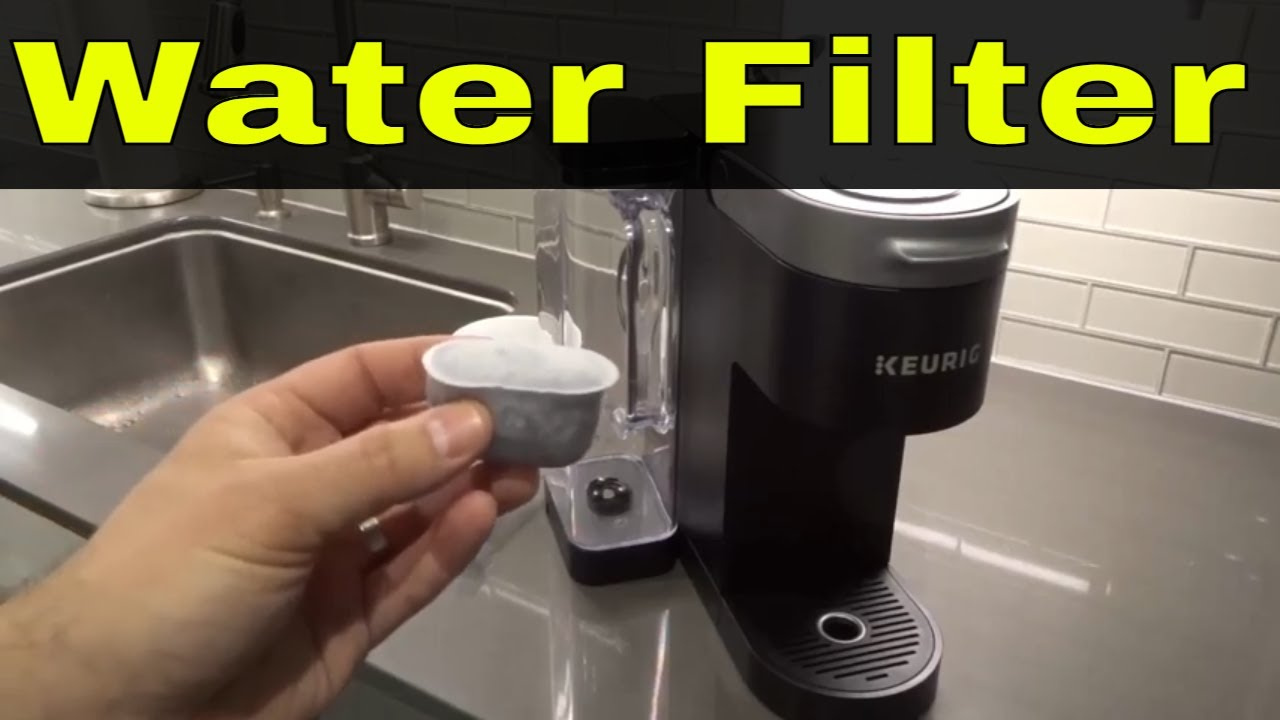
Inserting the New Water Filter
With your new filter prepared and the old one removed, it’s time to install the new water filter cartridge into the holder.
Detailed Steps:
- Place the new filter cartridge into the filter holder.
- Ensure that it fits snugly without forcing it into place which may damage the cartridge.
Summary:
Properly inserting the new water filter cartridge into the holder is crucial for optimal filtration. It prevents unfiltered water from bypassing the cartridge, ensuring your coffee will taste its best.
Reassembling the Water Reservoir
After the filter cartridge is securely in place, the next step is to reassemble the water reservoir and return it to the Keurig machine.
Detailed Steps:
- Put the filter holder back into the water reservoir, ensuring it’s correctly seated.
- Fill the reservoir with water and reattach it to your Keurig.
Summary:
Reassembling the water reservoir with the new filter ensures a seamless transition back to brewing coffee. It’s a simple step that brings you closer to a fresh-tasting cup of coffee.
Flushing the New Water Filter
Once the new filter is installed, it’s important to flush water through it to ensure that it’s ready for use.
Detailed Steps:
- Run a water-only brew cycle without a K-cup.
- Repeat 2-3 times to ensure activated charcoal particles are removed.
Summary:
This step helps to remove any excess charcoal particles from the new filter, ensuring that your next cup of coffee is clear and free of any possible debris.
Resetting the “Change Filter” Reminder (If Applicable)
Some Keurig models feature a reminder to change the water filter. After replacing the filter, you should reset this reminder.
Detailed Steps:
- Find the “Menu” or “Settings” options on your Keurig display.
- Navigate to the “Water Filter Reminder” or equivalent option and reset it according to the instructions in your manual.
Summary:
Resetting the change filter reminder ensures you’ll be prompted to replace the filter at the correct time, maintaining the taste and quality of your brews.
Regular Maintenance Advice
Lastly, keeping your Keurig in good working condition involves more than just changing the water filter. Regular cleaning and descaling are vital.
Detailed Steps:
- Clean removable parts like the drip tray and K-cup holder regularly.
- Follow Keurig’s recommended descaling procedure approximately every 3-6 months.
Summary:
Regular maintenance of your Keurig will enhance its operation and extend its lifespan, offering you many more mornings of delicious, hassle-free coffee.
In conclusion, caring for your Keurig and changing its water filter might seem like a minor detail, but it’s an important step in enjoying the perfect cup of coffee every time. Not only does it ensure the flavor of your coffee remains pure, but it also extends the life of your machine. Following the detailed steps provided will make the replacement process quick and straightforward, even if you’re not technically inclined. So next time you sip your fresh brew, you can take pride knowing that a little maintenance goes a long way.
FAQs
How often should I replace my Keurig water filter?
Replace your Keurig water filter every 2 months or after 60 tank refills to ensure the best coffee flavor and machine performance.
Can I use any water filter in my Keurig coffee maker?
No, you should use the water filter cartridge that is specifically designed for your Keurig model to ensure proper fit and function.
How do I know if my water filter is working correctly?
If installed correctly, your water filter should provide clear, great-tasting coffee. If you notice changes in taste or flow rate, check to ensure the filter is properly seated or if it needs to be replaced.