Have you ever wanted to add a quirky twist to your videos by reversing them? Snapchat, the popular social media app known for its engaging filters and short video ‘Snaps’, gives you that ability. This feature can transform your content into something fun and unique, providing a new perspective on seemingly ordinary moments. While the reversal of a video might sound like a complex editing task, Snapchat simplifies the process, making it accessible even if you’re not a tech wizard. With a bit of guidance, you’ll be able to reverse your videos directly within the app.
Using Snapchat’s Built-In Reverse Filter
Snapchat includes a variety of filters that can significantly alter your video content, including one specifically designed to play your video in reverse. Here’s how you can make use of this fun feature:
- Open the Snapchat app on your smartphone.
- Hold down the circular record button to capture a video Snap. Make sure your video includes movement for the reverse effect to be noticeable.
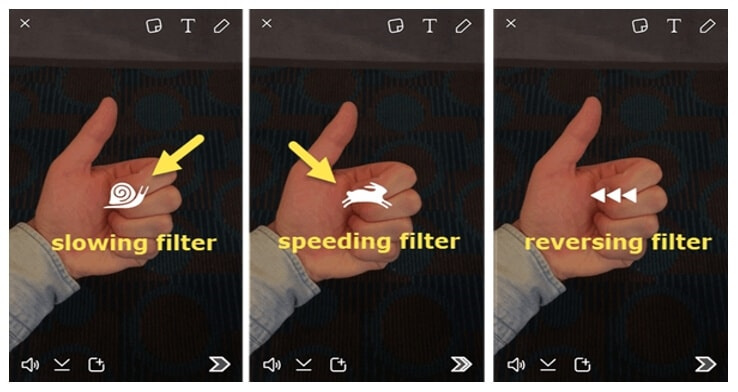
- Once you’ve finished recording, swipe left or right across the screen to browse through the filters until you find the ‘Reverse’ filter, which is represented by three backward-facing arrows.
- After applying the reverse filter, you can watch your video play in reverse immediately. If you’re happy with it, you can then send it to your friends or post it to your story.
Summary:
Using Snapchat’s built-in reverse filter is a straightforward way to create reversed video content. There’s no need for additional apps or tools, and the process can be completed in a few simple steps. The only downside is the limitation in control over the speed and specific sections of the video you wish to reverse.
Pre-Recording Before Reversing
Planning ahead can make reversing your Snapchat videos even more entertaining. Here’s what to consider when pre-recording:
- Before opening Snapchat, think about actions that would look particularly amusing or interesting when reversed, like bursting a balloon or jumping into a pool.
- Open Snapchat, and keep your planned action in mind as you record your Snap.
- Apply the reverse filter by swiping through the options and preview the result.
- If it doesn’t look as you expected, you can always record a new Snap with a different action or angle.
Summary:
Pre-recording with the reverse filter in mind allows you to create more captivating content. However, it may take a few attempts to get the perfect shot, which could potentially lead to missed spontaneous moments.
Editing After Posting
If you’ve posted a Snap and then decide you want to reverse it, you might wonder if it’s still possible—here’s a workaround:
- Find the Snap you posted that you want to reverse.
- Save the Snap to your camera roll by pressing and holding on to the Snap and selecting ‘Save’.
- Delete the original Snap from your story by clicking on it, then tapping the trash icon.
- Re-upload the saved video by swiping up on the main camera screen to access Memories, then select the saved Snap, and apply the reverse filter.
- Repost the reversed Snap to your story.
Summary:
Editing a Snap after posting is a bit cumbersome and requires you to delete and repost your content. While it’s useful if you change your mind after posting, the process can be time-consuming and you might lose the original views and interactions your Snap had garnered.


