When you’re navigating your Chromebook, there’s a handy little feature that can streamline your multitasking and give you a quick overview of your digital workspace. It’s called the ‘Show Windows’ button, and it might just become your new best friend for productivity. By harnessing this function, you can easily switch between apps and manage open windows with a single tap. Let’s explore some ways you can make the most of this feature and some additional tips to enhance your Chromebook experience.
Overview
The ‘Show Windows’ button on a Chromebook is akin to the F5 key on a traditional keyboard. It’s a nifty shortcut that reveals all your open windows at a glance, allowing you to hop between tasks and manage your workflow efficiently. Whether you’re a student, a professional, or simply a casual user, understanding how to use this function can greatly improve your productivity and ease of use.
Viewing All Open Windows
Detailed Introduction
Sometimes, you might find yourself swamped with too many open applications, and it can get overwhelming to keep track of them all. This is where the ‘Show Windows’ button comes in.
Detailed Steps
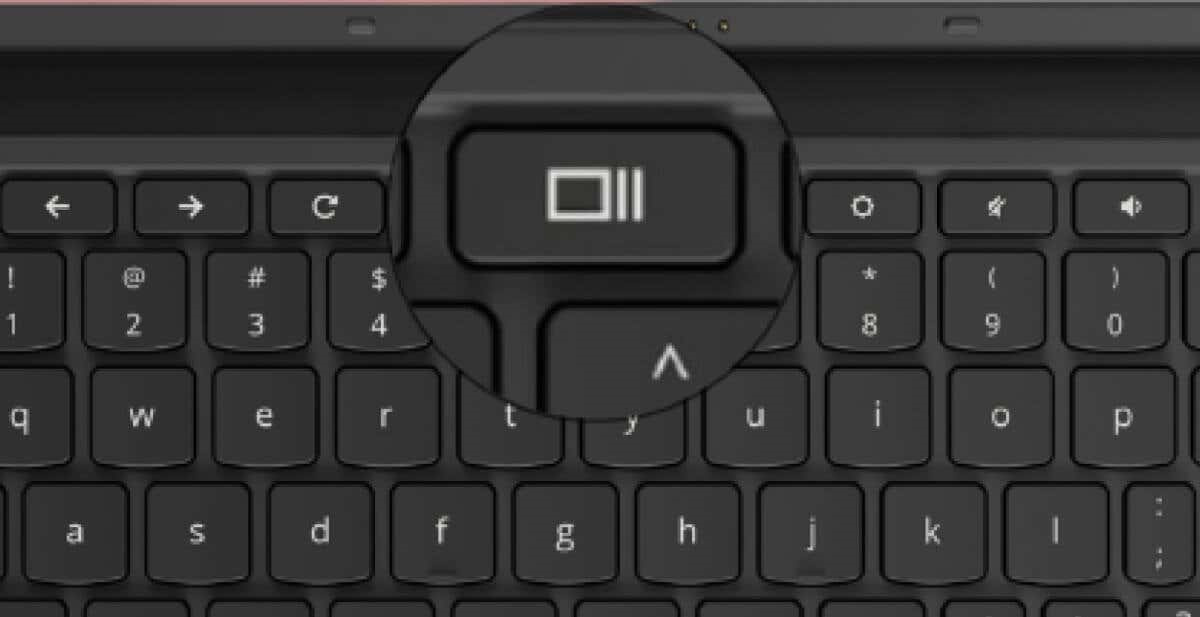
- Locate the button on your keyboard that looks like a rectangle with two lines on the right side, usually found on the top row between the full-screen and brightness keys.
- Press this ‘Show Windows’ button once.
- All your open windows will now be displayed in a tiled view on your screen.
- Simply click on the window you wish to focus on, and it will become the active window.
Summary
This function is excellent for getting a bird’s-eye view of your tasks. However, if you have an excessive number of windows open, it might be less efficient at providing a clear picture of each one.
Snapping Windows to Either Side
Detailed Introduction
Multi-tasking is made easier when you can view two applications side by side. This method will show you how to ‘snap’ windows to the left or right half of your screen.
Detailed Steps
- Open the two windows/applications you want to view simultaneously.
- Use the ‘Show Windows’ button to view all open windows.
- Drag one window to the left or right edge of your screen until it ‘snaps’ into place, filling half of the screen.
- Do the same with another window on the opposite side.
Summary
Snapping windows boosts productivity, especially for comparison tasks. Some users might find the 50/50 split screen limiting if they need one application to have more space than another.
Closing Unwanted Windows Quickly
Detailed Introduction
Occasionally, you might want to close several windows without navigating to each one separately. This quick-closing technique is efficient and easy.
Detailed Steps
- Press the ‘Show Windows’ button to reveal all open windows.
- Hover your cursor over the window you wish to close.
- Look for a small ‘X’ in the top-right corner of the window preview.
- Click the ‘X’ to close the window immediately.
Summary
This method is perfect for decluttering your screen quickly, although it can be risky if you accidentally close something important since there’s no confirmation prompt.
Creating Virtual Desktops
Detailed Introduction
For those who need more organization, virtual desktops offer a way to group related tasks together without having everything on one screen.
Detailed Steps
- Press the ‘Show Windows’ button.
- In the top-right corner of the screen, click ‘New Desk’ to create a new virtual desktop.
- You can then drag windows from your current desktop to the new one, or open new applications directly on that desktop.
Summary
Virtual desktops are highly beneficial for organization and focus but require a little practice to navigate between them efficiently.
Minimizing All Windows
Detailed Introduction
Clear your screen quickly to get to the desktop without closing any applications using the ‘Show Windows’ button.
Detailed Steps
- Swipe down on your trackpad with three fingers; or
- Press the ‘Show Windows’ button and hit the ‘Minimize’ option that appears at the top of the screen.
Summary
This is a great way to instantly access your desktop, though some users may find the trackpad gesture difficult to remember or perform.
Accessing the Right-Click Menu
Detailed Introduction
While not directly related to the ‘Show Windows’ button, knowing how to right-click on your trackpad is essential for overall navigation.
Detailed Steps
- Tap the trackpad with two fingers to simulate a right-click.
- Alternatively, if you have a mouse connected, simply perform a regular right-click.
Summary
The two-finger tap is a convenient trick, but some may prefer the tactile feel of a mouse for precision right-clicking.
In conclusion, mastering the ‘Show Windows’ button on your Chromebook can significantly enhance your computing experience, giving you faster access to what you need and keeping your digital workspace organized. While there may be a small learning curve for some features, the boost in productivity is worth it.
FAQs
Q: Does using the ‘Show Windows’ button affect the performance of my Chromebook?
A: Generally, no. The ‘Show Windows’ button is designed to help you manage already open windows and shouldn’t impact the overall performance of your device.
Q: Can I use the ‘Show Windows’ button to switch between virtual desktops?
A: Yes, once you have multiple virtual desktops open, you can use the ‘Show Windows’ button to display them and click on the desktop you want to switch to.
Q: Is there a way to customize what the ‘Show Windows’ button does?
A: The functionality of the ‘Show Windows’ button is set by default and cannot be customized to perform other actions on a standard Chromebook setup.