Released on December 1, 2015, Tom Clancy’s Rainbow Six Siege, most commonly known as R6, is an online game based on tactical shooting. This game, however, is available on many famous platforms, including Xbox. Over the years, gamers have enjoyed playing this game during their free time, but a proper gaming experience involves more than precise aiming and strategic thinking.
Continuing this, optimizing your audio settings can make a significant difference, helping you to pinpoint enemy movements and communicate effectively with your team. So, in this guide, we will discuss how to change the audio settings of the game and that of Xbox to help you track even a single step taken by the enemy.

Best Audio Settings for R6 Xbox with Steps
Adjusting audio settings in R6 for Xbox can greatly impact your gaming experience. One of the key benefits of this is to communicate better with the team. For example, you will be able to hear callouts and instructions clearly, leading to better coordination and teamwork. With that, let us find out how to change your audio settings within the game and that of your Xbox console.
Method 1: In-Game Audio Settings
To help you accurately track and locate enemies based on the direction of their footsteps or gunfire, you will need to adjust the audio settings following the steps below:
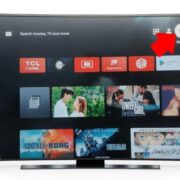
Step 1: First, launch the game using Xbox and wait for it to load completely. After that, once you are on the game’s main interface, start playing the game and note the audio adjustments you need to make. Pause your game and head to the “Settings” menu.
Step 2: Following this, choose the “Gear” icon for options and head to the “Audio” tab. There, first select the “Audio Input Device,” such as any headset connected to your console. Likewise, change the “Audio Output Device” to communicate better with teammates.
Step 3: Moving on, you can adjust “Subtitle” and language settings, but the main adjustments are to be made in “Master Volume,” “Music Volume,” “Dialog Volume,” and “Voice Chat Volume” via slider. Moreover, you can even set each setting to “Default” to restore the original settings. After making changes, press “X” on your controller to “Apply” the settings.

Method 2: Xbox Audio Settings
After you have made the audio changes within the game and are still unsatisfied, you might need to change the audio settings of the Xbox itself. For that, there are a variety of audio adjustments that you can do. So, let’s discuss these settings individually and see whether they improve the gaming experience:
1. General Settings
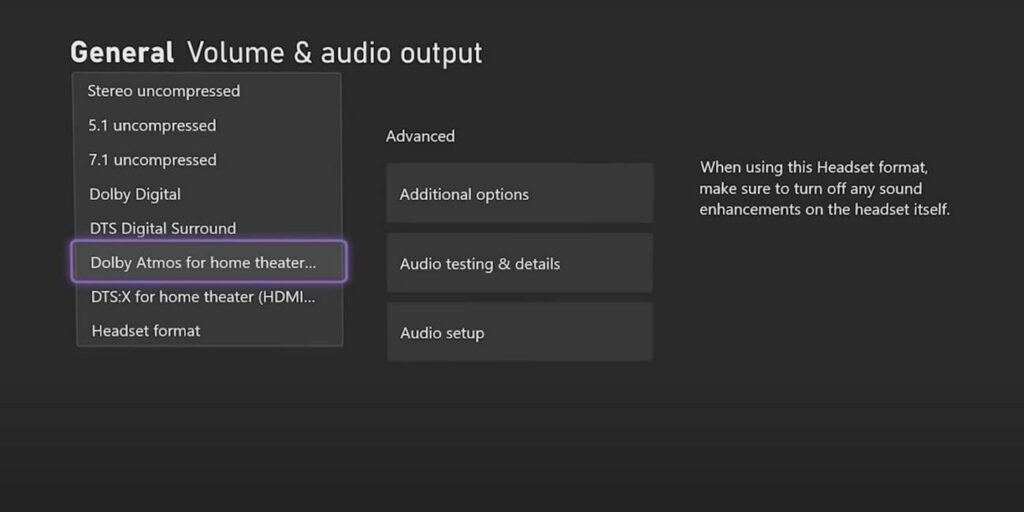
Step 1: First, on your controller, press the “Xbox” button to access the guide. Then, select the “Profile” icon to access the “Profile and System” settings. Afterward, head to “Settings” and press the “A” button on your controller. Now, in the “General” section, select the “Volume & Audio Output” option to explore further settings.
Step 2: Now, under the “Speaker Audio” section, pick “Stereo Uncompressed” from the “Optical Audio” drop-down list if the game audio is coming through TV speakers. Otherwise, for a surround sound setup, if you have 5.1 surround sound, choose “5.1 Uncompressed,” and if your system supports 7.1 surround sound, pick “7.1 Uncompressed.”
Step 3: Moreover, there are other settings like “Dolby Digital,” “Dolby Atmos for Home Theater (HDMI Only),” and “DTS:X for Home Theater (HDMI only).” So, if you do not have special audio systems like these, it’s better to leave these settings the same.
2. Headset Audio Settings
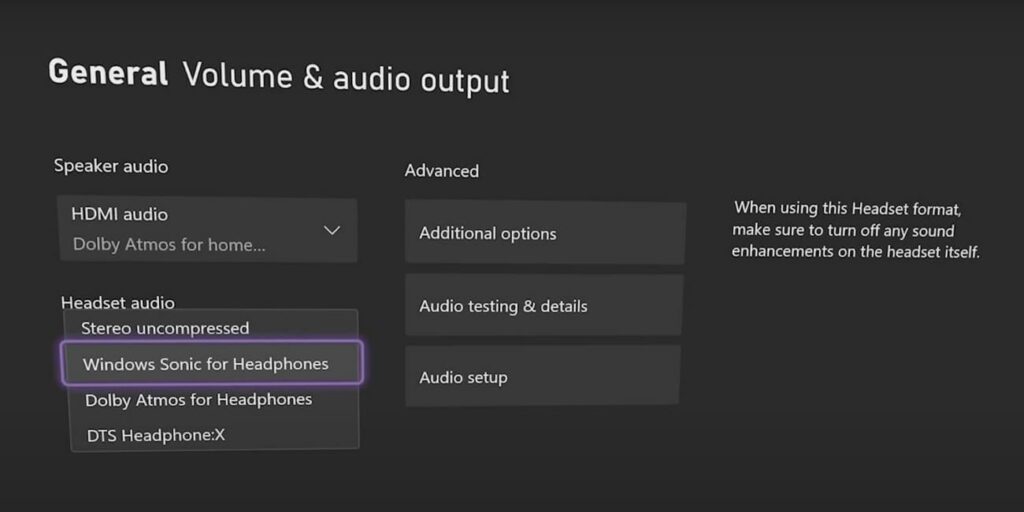
Step 1: When you connect your headset to Xbox for the first time, it starts with a regular sound called “Stereo Uncompressed.” However, this doesn’t make the sound feel like it’s all around you.
Step 2: However, the console has an amazing sound setting called “Windows Sonic for Headphones,” the 3D-like sound that comes in built-in headsets. You can also customize this feature from the “Headset Audio” drop-down menu. Moreover, if you pay for “Dolby Atmos for Headphones” or “DTS Headphone:X,” you get even better sound options.
3. Customizing Headset Audio Mixer
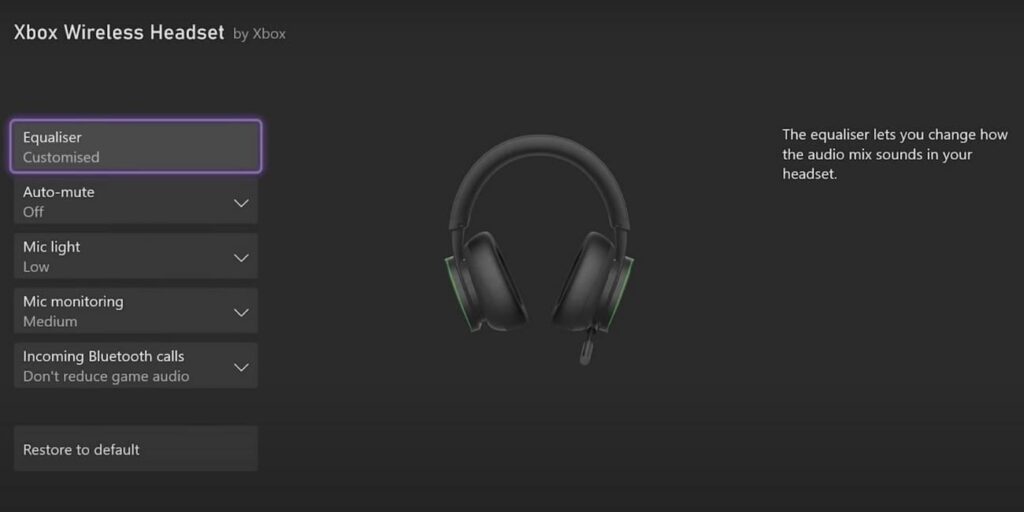
Step 1: You can also decide if you want to make the “Bass Boost” stronger by turning it on. Also, you can choose if phone calls on Bluetooth should make the game sound quieter.
Step 2: To do this, press the “Xbox” button on your controller to access the Guide. Once you are in the Guide, move to the “My Games & Apps” section and choose the “See All” option right there. After that, press the “Apps” option and choose the “Xbox Accessories” icon. After that, scroll down to find your headset and press “Configure” to customize its audio.
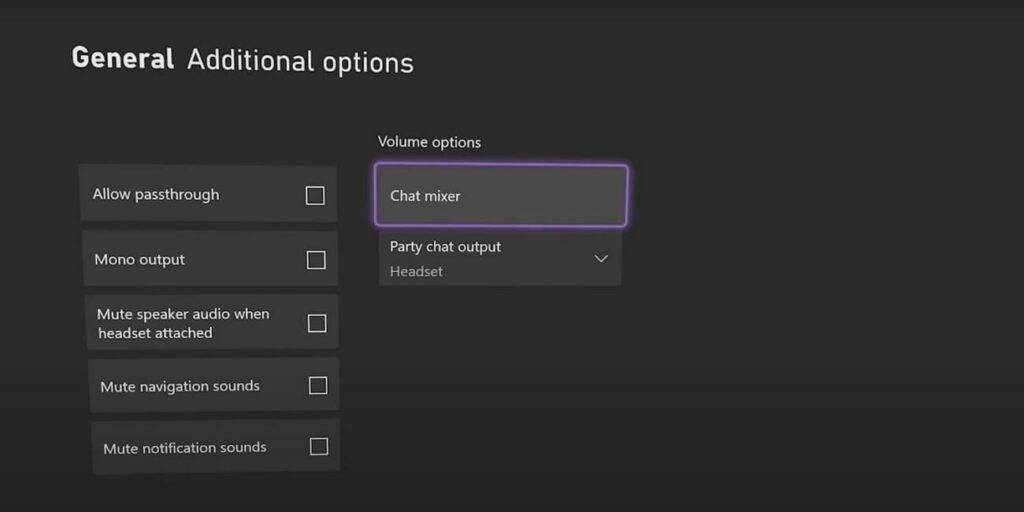
4. Chat Mixer Customization
Step 1: You can even change how loud your teammate’s voices are while you are playing R6. Make them quieter to hear the game better or louder to really enjoy their talking.
Step 2: To do this, go to your “Volume & Audio Settings” in the “General” section. Click on “Additional Options,” choose “Chat Mixer” under the “Volume Options ” section, and enable the required options for a better gaming experience.
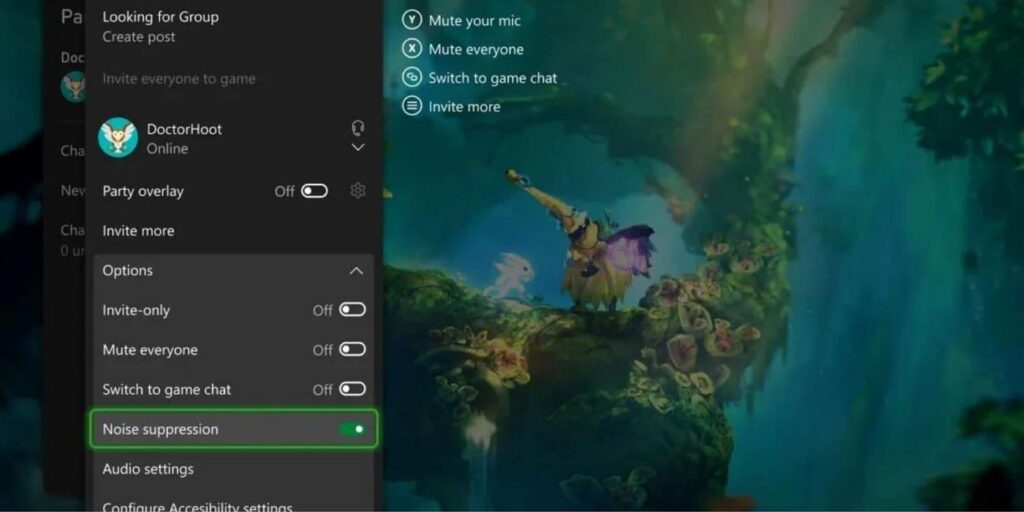
5. Enabling Noise Suppression
Step 1: If you are finding it hard to concentrate because of noises in your headset while chatting with friends, there’s a way to fix that. You have the option to turn on “Noise Suppression” on your Xbox, as this makes the background noise go away quickly.
Step 2: Explore the “Guide” first, then look for “Parties & Chats” and press that option. Proceeding further, in the “Options Menu,” enable the “Noise Suppression” option for a better audio experience.
Ending Note
In the end, sound plays a very necessary role in bringing video games such as R6 to life. That is why it’s important to ensure that the audio settings on your Xbox are optimized for the best experience. If you have faced a problem with the sound quality previously, now is the time to resolve it. Using the detailed steps outlined in this guide, customize the audio within the game and in Xbox to enjoy the game even more.
Frequently Asked Questions About R6 on Xbox
Q1. Can Xbox play Rainbow Six Siege with a PC?
Yes, Rainbow Six Siege offers crossplay features that enable gaming interactions between different platforms. You can enjoy crossplay between PC, Stadia, and Luna. Additionally, R6 supports crossplay between Xbox and PC and between Xbox and PlayStation. This fantastic feature means you can engage in R6 battles with friends across various platforms as long as they are compatible with each other.
Q2. Is Rainbow Six Siege becoming free to play on Xbox?
As of the current year, like in 2023, Rainbow Six Siege is not available as a free-to-play game. It still comes with a price that varies depending on the Xbox model you choose to play it on.
Q3. How large is the Rainbow Six Siege game on Xbox?
The size of the Rainbow Six Siege game on Xbox can vary due to updates and additional content. As of now, the approximate size of the game is around 61.94 GB. This size includes the base game and any patches or updates that have been released up until the current date.