Have you ever felt the need to tidy up your Facebook timeline while preserving memories you’re not ready to let go of? Just like decluttering your physical space, your digital life may also need some occasional organization. That’s where archiving comes in – it’s like putting your valuable but currently unnecessary items into storage. We all have posts that for one reason or another we don’t want front and center on our Facebook timeline, but we’re not quite prepared to permanently delete them. Archiving allows you to hide these posts from public view without removing them entirely. Let’s dive into some methods and tips to help you archive your Facebook posts seamlessly.
Using the Facebook Archive Feature
Facebook has a built-in archive feature that allows you to hide posts from your timeline and from anyone else, without permanently deleting them. This is great for when you want to make a post invisible to everyone else but still want to keep it for yourself.
Steps:
- Open Facebook and go to your profile.
- Scroll to the post you want to archive.
- Click on the three dots in the top right corner of the post.
- Select ‘Move to archive’.
Summary:
Archiving posts this way keeps them accessible to you while hidden from others’ view – a perfect middle ground. The main advantage is the simplicity and quick access. The downside is that only you can view your archived posts, which might not be ideal if you want certain people to still have access.
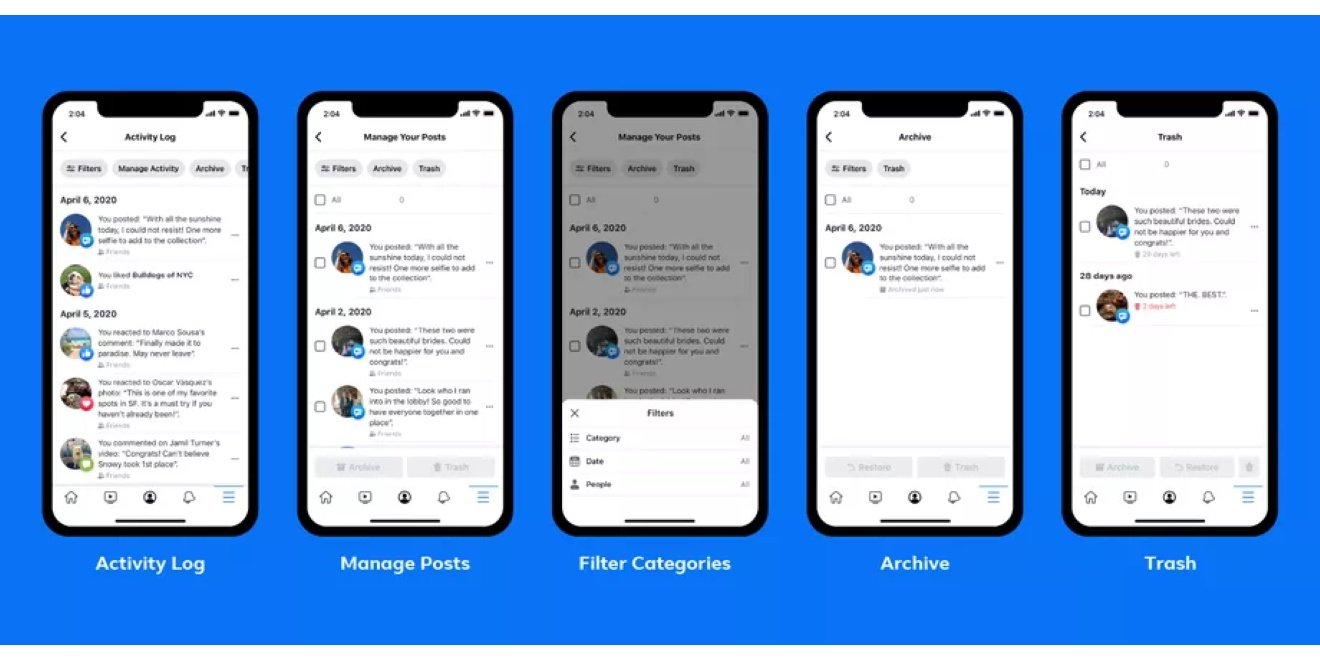
Activity Log Archiving
Your activity log is a comprehensive record of all your actions on Facebook, including the posts you’ve made. You can use it to archive multiple posts at once.
Steps:
- Go to your Facebook Settings.
- Click on ‘Activity Log’.
- Select ‘Your Posts’.
- Choose the posts you want to archive.
- Click on ‘Move to Archive’.
Summary:
This method is helpful, especially if you’re looking to archive in bulk. It is slightly more time-consuming than the first method, but it’s beneficial when handling many posts. The drawback is it can be tedious if you only need to archive a single post.
Hiding Posts on Timeline
If you don’t want to use the archive feature but still want to keep posts off your timeline, hiding them is an option.
Steps:
- Navigate to the post on your timeline.
- Click the three dots for the menu.
- Choose ‘Hide from timeline’.
Summary:
Hiding posts keeps them in the timeline sequence, viewable in the activity log but not on the timeline itself. It’s a quick one-off solution. The downside is these posts are still visible to certain audiences, unlike archived posts.
Managing Posts via Facebook Mobile App
Archiving posts isn’t limited to the desktop version of Facebook; you can also manage them through the mobile app.
Steps:
- Open the Facebook app.
- Visit your profile and find the post.
- Tap the three dots in the corner of the post.
- Select ‘Move to Archive’.
Summary:
This method is straightforward and convenient for those who primarily use Facebook on their phones. However, the small screen size might make the process more fiddly for some users.
Download Your Information Before Archiving
If you are concerned about losing data, you can download all your Facebook information before beginning the archiving process.
Steps:
- Go to Facebook Settings.
- Click on ‘Your Facebook Information’.
- Select ‘Download Your Information’.
- Choose the data you want to download.
Summary:
Downloading your information ensures you have a backup before archiving. The process can take a while, depending on how much data you have, which is the only real drawback.
Third-Party Archiving Tools
There are various third-party tools available that can help you manage your Facebook posts, including archiving options.
Steps:
- Research and select a reputable third-party tool.
- Connect it to your Facebook account, following the tool’s instructions.
- Use the tool to select and archive your posts.
Summary:
Third-party tools may offer more features than Facebook’s native options, like archiving to different formats or platforms. Always ensure you’re using a secure and reputable service, however, as there are privacy risks involved with giving third-party tools access to your account.
Filtering Posts by Year for Archiving
Looking to clean up posts from specific years? Facebook’s timeline feature lets you do just that.
Steps:
- Go to your profile.
- Click on ‘Filters’.
- Select the year from the dropdown menu.
- Use the archive feature for the posts from that year.
Summary:
Filtering by year can simplify the process when you want to focus on older posts. It is user-friendly but may be less practical for archiving recent posts scattered throughout your timeline.
Using a Desktop Browser
Sometimes the desktop version of Facebook can be easier to navigate than the app when it comes to managing your posts.
Steps:
- Open Facebook on your browser.
- Go to your profile.
- Follow the archiving steps as mentioned earlier.
Summary:
The desktop interface offers a larger view and can be more user-friendly. However, it’s not as convenient if you tend to use Facebook on the go.
Archiving for Facebook Page Admins
If you manage a Facebook page, you can archive posts on your page as well.
Steps:
- Go to your Page.
- Find the post to archive.
- Click the three dots and select ‘Move to Archive’.
Summary:
This is useful for Page admins looking to clean up their page without losing content permanently. The disadvantage is that like personal profiles, only the page admins will be able to see these archived posts.
Temporary Post Archiving
Facebook Stories offer the option for temporary posts that disappear after 24 hours, but if you want to keep them longer, you can archive them.
Steps:
- Go to your Facebook Story.
- View your story and click on the three dots.
- Select ‘Save…’ to save it to your archive.
Summary:
This method allows for the ephemeral nature of stories while giving you the option to revisit them. One con might be that it’s specific to content shared as a story that not all users utilize.
In conclusion, Facebook offers multiple ways to archive your posts, whether you prefer to clean up your personal profile, manage a page, or just save your stories for a bit longer. Archiving allows for a more curated online presence while keeping those memories or important posts just a few clicks away. Remember, it’s always sensible to ensure you have a backup of your information for peace of mind.
Conclusion
Archiving Facebook posts is a handy way to curate your digital space without losing precious memories or important information. We’ve covered several methods that cater to different needs, whether you’re a casual user or a page admin, ensuring you have the knowledge to tidy up your timeline while keeping your posts safe. As we adapt to an increasingly online world, knowing how to manage your digital footprint is essential, and archiving is a key part of this process.
FAQs
Q1. Will archiving a post on Facebook remove it from any timelines it’s been shared on?
Yes, archiving a post on Facebook removes it from your timeline and any other places it has been shared on Facebook, making it visible only to you.
Q2. Can I unarchive a Facebook post if I change my mind?
Yes, you can unarchive a Facebook post. Simply go to your ‘Archive’ section, find the post you wish to unarchive, and select the option to ‘Show on Timeline’ or ‘Restore’.
Q3. Is archiving the same as deleting a post on Facebook?
No, archiving is not the same as deleting. When you archive a post, it is hidden from view but still exists in your account. Deleting a post removes it permanently from Facebook.


