Navigating social media can sometimes become overwhelming, especially when dealing with unsolicited friend requests on platforms like Facebook. Whether it’s from strangers or simply people we prefer not to connect with, managing these requests is an essential aspect of maintaining our online privacy and comfort. It’s important to take control of who can send you these invitations to connect. Here’s a guide that walks you through various methods to help you block friend requests and customize your Facebook experience to suit your personal preferences.
Adjusting Privacy Settings
Facebook offers privacy settings that allow you to control who can send you friend requests. Tailoring these settings can significantly reduce unwanted requests.
- Open Facebook and log in to your account.
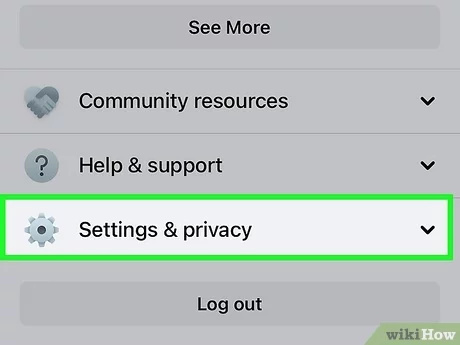
- Click on the small triangular ‘dropdown’ icon at the top right corner of the page.
- Select ‘Settings & Privacy’, then click ‘Settings’.
- On the left sidebar, click on ‘Privacy’.
- Look for the section ‘How People Find and Contact You’.
- Click on ‘Edit’ next to ‘Who can send you friend requests?’.
- Choose ‘Friends of Friends’ from the dropdown menu.
Summary:
By adjusting this setting, only people who have mutual friends with you will be able to send friend requests. This reduces the likelihood of receiving requests from complete strangers, but keep in mind that it won’t completely eliminate them, especially if you have a wide network.
Marking Friend Requests as Spam
If you receive an unwanted friend request, marking it as spam can not only remove the request but also help Facebook identify and prevent similar requests in the future.
- Click on the ‘Friend Requests’ icon at the top of the Facebook page.
- Hover over the ‘Friend Request’ from the person you want to block.
- Click on the ‘Delete Request’ option.
- After deleting the request, you will get the option to ‘Mark as Spam’. Click that.
Summary:
Marking requests as spam swiftly removes them from your list and informs Facebook of the issue. However, it doesn’t prevent the person from sending another request in the future, unless they are blocked.
Blocking Users Directly
Directly blocking a Facebook user prevents them from sending you friend requests or interacting with your profile.
- Click on the profile of the person you wish to block.
- Click on the three dots (ellipsis) under their cover photo.
- Select ‘Block’.
- Confirm your decision by clicking ‘Block’ on the popup window.
Summary:
Blocking is effective in completely cutting off someone from sending requests, but it is a radical step that might seem excessive in some situations.
Ignoring Requests
Silently ignoring friend requests is an uncomplicated solution that doesn’t involve adjusting settings or blocking people.
- Click on the ‘Friend Requests’ icon.
- Click ‘Delete Request’ next to the person’s name.
- Choose ‘Done’.
Summary:
Ignoring requests is hassle-free and does not alert the sender, but the sender can send you a new request in the future.
Report Fake Accounts
Reporting fake accounts helps keep Facebook safe and can also stop unwanted requests.
- Go to the profile of the account you suspect is fake.
- Click on the three dots (ellipsis).
- Choose ‘Give feedback or report this profile’.
- Follow the prompts to report the account.
Summary:
This method helps improve community standards but requires that you be able to spot fake accounts accurately.
Customized Reporting
In more severe cases, such as harassment or unwanted contacts, you can report an account with unique reasons that Facebook reviews personally.
- Visit the user’s profile.
- Click the three dots (ellipsis).
- Select ‘Report’.
- Follow the on-screen instructions to customize your report reasons.
Summary:
Customized reports get special attention from Facebook but require a clear and honest explanation of the situation.