In our interconnected world, having easy access to all our emails is crucial, no matter where we are or what device we’re using. For those who rely on Apple’s iCloud email but prefer the Android ecosystem for their smartphones and tablets, this might seem like a mismatch at first glance. However, it’s entirely possible, and fairly straightforward, to bring your iCloud email over to your Android device. By doing so, you keep all your essential communications within arm’s reach, even on a non-Apple device. Let’s go through how you can set up iCloud email access on your Android device with some simple step-by-step instructions.
Add Your iCloud Email to the Gmail App
For many Android users, the Gmail app is the go-to email client. It’s user-friendly and it comes pre-installed on most Android devices. Adding your iCloud email account to the Gmail app will allow you to manage your emails conveniently.
Detailed Introduction
Gmail is not just for Google accounts. It can handle various email services and adding your iCloud account is a breeze. It’s a matter of inputting the correct settings so that Gmail can retrieve and send emails from your iCloud account.
Detailed Steps
- Open the Gmail app. Tap on the app icon on your home screen or app drawer.
- Go to Settings. Tap on the three horizontal lines in the upper-left corner of the screen, and scroll down to find ‘Settings’.
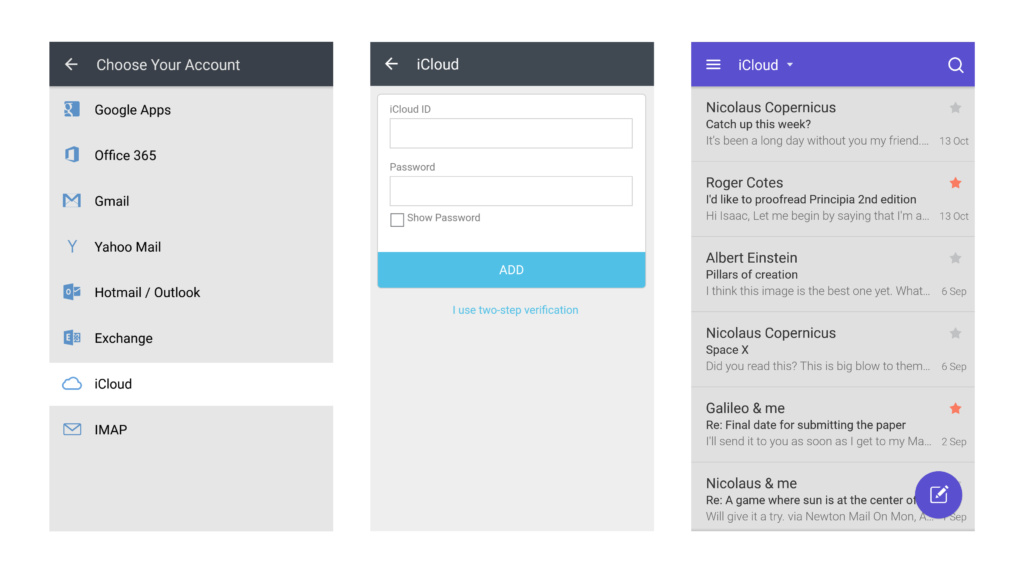
- Add Account. Tap on ‘Add account’, then select ‘Other’ on the list of email providers.
- Enter Your iCloud Email Address. Type in your full iCloud email address and tap ‘Next’.
- Select IMAP. Choose the ‘Personal (IMAP)’ option when prompted.
- Enter Your Password. Key in the password associated with your iCloud email account. If you have two-factor authentication enabled on your Apple ID, you’ll need to generate an app-specific password on the Apple ID website to use here.
- IMAP Server Settings. Enter the following information:
- IMAP server: imap.mail.me.com
- Port: 993
- Security type: SSL/TLS
- SMTP Server Settings. On the next screen, you’ll need to provide the outgoing SMTP server information:
- SMTP server: smtp.mail.me.com
- Port: 587
- Security type: STARTTLS
- Account Options. Choose your sync frequency and other options according to your preference, then tap ‘Next’.
- Complete Setup. Give this email account a name (if you want) and finish the setup.
Summary
Setting up your iCloud email on the Gmail app allows for a centralized location for all your email accounts. It’s advantageous as it merges the familiarity of the Gmail interface with the access to your iCloud messages. One downside might be that certain Gmail features might not work perfectly with your iCloud account, as it is optimized for Google services.
Use a Third-Party Email App
Many third-party email applications are capable of handling multiple email accounts from different providers, which includes iCloud.
Detailed Introduction
If you find the Gmail app isn’t to your taste, or if you want a dedicated app just for your iCloud email, you can opt for third-party email clients. Apps like BlueMail, MailDroid, or K-9 Mail offer flexible email management and can be a good alternative.
Detailed Steps
- Download a Third-Party Email App. Visit the Google Play Store and choose an email app you prefer, then download and install it.
- Open the App and Add a New Account. Most apps will prompt you to add an email account the first time you open them. If not, you should find an ‘Add Account’ or similar option in the settings.
- Enter Your iCloud Email and Password. Just like with Gmail, type in your iCloud email address and either your password or an app-specific password if you have two-factor authentication enabled.
- Manual Setup. Choose ‘Manual setup’ if the app doesn’t automatically detect the iCloud settings, and input the following:
- For IMAP:
- IMAP server: imap.mail.me.com
- Security type: SSL
- Port: 993
- For SMTP:
- SMTP server: smtp.mail.me.com
- Security type: TLS
- Port: 587
- For IMAP:
- Complete the Rest of the Setup. Follow the rest of the prompts, which usually involve setting your sync frequency and any notifications settings.
Summary
Using a third-party email app can provide more features and flexibility than the Gmail app, especially if it’s one tailored to fit your needs. However, the downside may include more complicated settings, additional cost for premium features, and varying degrees of security and privacy that differ from the native Gmail application.
Generate an App-Specific Password
For those with Two-Factor Authentication enabled on their Apple ID, accessing your iCloud email on other devices requires an extra step.
Detailed Introduction
Apple’s security system includes a feature known as two-factor authentication, which adds an extra layer of protection. When you use your iCloud email on a non-Apple device, you can’t use your regular password; instead, you are required to generate a specific password for that app or device.
Detailed Steps
- Sign in to Your Apple ID Account. Go to appleid.apple.com from a web browser and log in with your Apple ID and password.
- Go to the Security Section. Scroll down until you see the ‘Security’ section.
- Generate Password. Click on ‘Generate Password’ under the ‘App-Specific Passwords’ section.
- Label the Password. You’ll be asked to give the password a label (such as “Android Email”), which helps you identify it later.
- Use the App-Specific Password. The generated password will appear, and that’s what you’ll use in place of your standard iCloud password in the email app on your Android.
Summary
This step is necessary for users with extra security measures in place on their Apple account. While it adds a layer of complexity to the setup process, it ensures that your iCloud email remains secure when accessed from your Android device. The main downside is that it’s an additional password to manage, but this is minor in comparison to the security benefit it provides.