If you’ve ever tried to shift towards a healthier lifestyle, chances are you’ve come across Noom, an app designed to help you lose weight by focusing on behavior change. However, if you’ve found that Noom isn’t the right fit for you, or your goals have changed, it may be time to cancel your subscription. While the app is helpful for many, navigating through the cancellation process can be less than intuitive. That’s why it’s essential to have a clear, user-friendly guide to help you through every step of the process.
Via the Noom App
Canceling directly through the Noom app is often the most straightforward method for many users. The app is designed with user experience in mind, yet canceling your plan might not be as prominent as other features.
- Open the Noom app on your smartphone or tablet. Make sure you’re logged in to your account.
- Tap on the ‘Settings’ icon, usually shaped like a gear, found in the top-right corner of the main screen.
- Scroll down to find the ‘Subscription’ section.
- Select ‘Cancel Subscription’ or ‘Manage Subscription’ depending on the version of the app you have.
- Follow the instructions provided to finalize the cancellation of your subscription.
Summary: This method is quite direct and can be done within a few minutes. The advantage here is the convenience of using the app you already have installed. On the downside, some users may find difficulty navigating through settings or might not see the cancellation option due to different app versions.
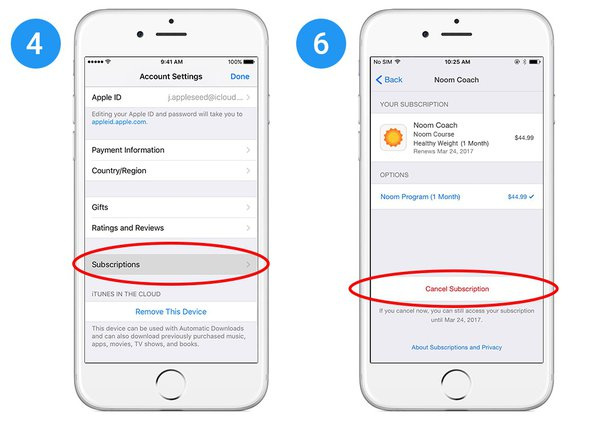
Through Your Apple ID (For iOS Users)
For those who subscribed to Noom via an Apple device, the subscription is likely managed through your Apple ID.
- Open the ‘Settings’ app on your iOS device.
- Tap on your name at the top to access your Apple ID settings.
- Select ‘Subscriptions’ to see a list of all your current and past subscriptions.
- Find and select ‘Noom’ from the list.
- Tap on ‘Cancel Subscription’ and confirm your decision if prompted.
Summary: This method gives you control over all your subscriptions in one place, which is very convenient. The downside is that if you’re not familiar with iOS settings, it might take some time to locate the Subscriptions section.
Via Google Play Store (For Android Users)
If you subscribed to Noom using your Android device, the Google Play Store is where you would manage your subscription.
- Open the Google Play Store app on your Android device.
- Tap on the hamburger icon (three horizontal lines) to open the menu.
- Go to ‘Subscriptions’.
- Look for ‘Noom’ on the list and tap on it.
- Choose ‘Cancel Subscription’ and follow the prompts to confirm.
Summary: This is an easy process for Android users to follow, with the benefit of managing all subscriptions through Google Play. However, like with iOS, those unfamiliar with the platform may find it a challenge to navigate to the right option.
Through the Web (Noom Portal)
This method requires you to use the Noom portal through a web browser, which can be a good alternative if you cannot access your mobile device.
- Go to the Noom website and log in to your account.
- Once logged in, navigate to your account settings or profile.
- Look for a section labeled ‘Subscription’ or ‘Membership Details’.
- Choose the option to cancel your subscription.
- Follow the on-screen instructions to complete the cancellation process.
Summary: Using the web portal gives you the advantage of a larger screen and potentially easier navigation than a mobile device. The main drawback here could be remembering website credentials if you primarily use the app.
Contacting Noom Support
When other methods fail, reaching out to Noom’s customer support can be the solution.
- Visit the Noom support page on their official website.
- Many times, there is a chat feature available. If so, use it and type in that you wish to cancel your subscription.
- If there is no chat feature, look for a ‘Contact Us’ option.
- You will likely find an email or a form to fill out to get in touch with support.
- Explain that you want to cancel your subscription and provide necessary details, such as your account information.
Summary: Direct contact with customer support can be reassuring, providing personal assistance. However, it can take longer than the self-service options, and you may need to wait for a response.
Checking Bank Statements for Unrecognized Charges
- Review your latest bank statement for charges from Noom.
- If you notice charges after you believed you had canceled, gather this information.
- Contact Noom’s customer support with proof of the charges and request a cancellation and possibly a refund.
Summary: This is a reactive method, useful when you’re unaware that your subscription wasn’t canceled correctly. It’s less about preventing charges and more about rectifying unexpected ones.
Reading Noom’s Cancellation Policy
- Go to Noom’s website.
- Scroll down to the bottom of the page and find the Terms and Conditions or similar link.
- Read the section on subscription cancellations to understand your rights and Noom’s policies.
Summary: Knowing the policy can protect you from any hidden fees or misunderstood terms of service. It may take time to read through the documentation and is a preventive measure rather than a direct solution to canceling.
Monitor Your Email for Cancellation Confirmation
- After canceling, watch your email inbox for a cancellation confirmation from Noom.
- If you don’t receive a confirmation, check your spam or junk folders.
- If after a reasonable time there’s no email, get in touch with Noom’s customer support for confirmation.
Summary: Email confirmation is an excellent way to have proof of cancellation. The downside is that sometimes emails don’t come through, leading to potential confusion and further follow-up.
Removing Payment Information
If you’re wary of future charges, consider removing your payment information from Noom.
- Access your Noom account settings.
- Navigate to the payment information section.
- Remove your credit card or PayPal details.
Summary: This can offer peace of mind by creating a barrier against erroneous future charges. However, this is not a cancellation method and should only be used in conjunction with formal cancellation.
Regularly Review Subscription Status
- Log in to the platform you used to subscribe (App, iOS, Android, Web).
- Regularly check your subscription status to ensure it remains canceled.
- Keep an eye out for any updates from Noom that may affect subscription statuses.
Summary: Frequent checks can keep you on top of any accidental re-subscriptions. However, this requires diligence and an understanding of how subscription statuses are displayed.
Conclusion
Canceling a Noom subscription may involve a few steps, but understanding your options makes the process manageable. Whether you opt for the convenience of in-app cancellation or the certainty of contacting customer service, you now have a comprehensive toolkit to navigate the process.
FAQs
Q: How long does it take for Noom to confirm cancellation?
A: Noom should send a confirmation email shortly after cancellation, but it can sometimes take a few business days.
Q: Can I get a refund after canceling my Noom subscription?
A: This would depend on Noom’s refund policy at the time of cancellation, as well as the terms of your subscription. Contact customer support for specific inquiries.
Q: What happens to my data on Noom after I cancel?
A: Your personal data may still be stored according to Noom’s privacy policy. Review their policy or contact support to understand how to manage your data post-cancellation.


