Have you ever experienced slow gameplay, graphical glitches, or trouble running certain software? These issues might be related to your video RAM or VRAM. VRAM is a special type of memory used to store image data that your computer displays. It’s different from regular RAM, and it’s specifically for graphics. Checking how much VRAM you have could help you understand whether it meets the requirements of your games or graphic-intensive applications, ensuring a smoother experience.
Using Windows Settings
A straightforward way to check your VRAM is through the Windows Settings. This method provides a quick glimpse of your graphics hardware without the need to download additional software.
- Press the Windows key on your keyboard.
- Click on the “Settings” icon (shaped like a gear).
- In the settings menu, select “System.”
- On the sidebar, click “Display.”
- Scroll down and click on “Advanced display settings” at the bottom of the page.
- Underneath your display’s information, click on “Display adapter properties for Display 1.”
- A new window will pop up with multiple tabs. Click the “Adapter” tab to find your VRAM listed under “Dedicated Video Memory.”
In this section, you will easily see the amount of VRAM that your system has. It’s a great way to quickly check without needing additional resources, but it lacks the depth of information that other methods might provide.
Using DirectX Diagnostic Tool
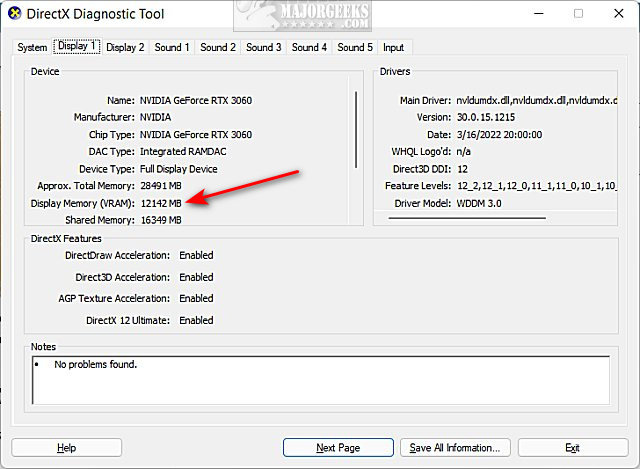
DirectX Diagnostic Tool is a helpful utility built into Windows that can give you information not just about your VRAM but also other essential graphics details.
- Press the Windows key + R to open the “Run” dialog box.
- Type “dxdiag” and hit enter to launch the DirectX Diagnostic Tool.
- Navigate to the “Display” tab.
- Here, under the “Device” section, you will see your VRAM next to “Display Memory (VRAM).”
Checking VRAM through DirectX Diagnostic Tool can be slightly more technical for users but also offers a detailed view of your system’s capabilities.
Using CPU-Z
CPU-Z is a third-party software that offers comprehensive details about your hardware, including your VRAM.
- Download and install CPU-Z from the official website.
- Launch CPU-Z after installation.
- Go to the “Graphics” tab.
- Here, you will see details about your graphics card and the available VRAM.
Using CPU-Z allows you to dive deeper into your hardware specifications, but it may be overwhelming for users unfamiliar with additional hardware terms and information.
Using GPU-Z
Similar to CPU-Z, GPU-Z is a program designed specifically for graphics-related information, including VRAM.
- Download and install GPU-Z from the official website.
- Open the application after installation.
- The “Graphics Card” tab will open by default, displaying your VRAM under the “Memory Size” heading.
This solution is excellent for users who want a detailed analysis of their graphics card, but it requires comfort with downloading and installing third-party software.
Using Command Prompt
If you’re comfortable with command-line interfaces, the Command Prompt can also provide VRAM information.
- Type “Command Prompt” in the Windows search bar and run it as an administrator.
- Type the following command:
wmic path win32_videocontroller get name,adapterramand press Enter. - The output will display your VRAM in bytes.
The Command Prompt is a powerful tool for experienced users, but the information is provided in a less user-friendly format and may require conversion from bytes to MB/GB.
Looking at BIOS/UEFI
Some computers allow you to view VRAM information in the BIOS/UEFI firmware.
- Restart your computer and enter the BIOS/UEFI by pressing the key indicated on the boot screen (usually F2, F10, F12, DEL, or ESC).
- Navigate through the menus to find your graphics settings.
- Locate the entry that lists your VRAM.
This method may vary greatly depending on your motherboard’s brand and firmware and is generally recommended for advanced users.
Consulting Your Graphics Card Documentation
The documentation that comes with your graphics card or integrated graphics often lists the VRAM.
- Find the manual or specifications sheet for your graphics card or motherboard.
- Look for the section that discusses memory or graphics specifications.
- The VRAM should be listed in this section.
This non-technical approach is ideal for users who are less comfortable navigating their computer’s internal settings but does require keeping the documentation handy.
Checking Via the Manufacturer’s Website
Most manufacturers list detailed specifications, including VRAM, on their websites.
- Identify your graphics card or processor model.
- Visit the manufacturer’s website and locate your product’s page.
- Find the specifications or downloads section to view your VRAM information.
This method is user-friendly and does not require any changes to your system, but it does necessitate knowing the exact model of your graphics hardware.
Using Online Benchmarking Tools
Online benchmarking tools like UserBenchmark can provide detailed information about your computer’s hardware, including VRAM.
- Navigate to a benchmarking website like UserBenchmark.
- Download and run their detection tool.
- Analyze the results to find information about your VRAM.
Online benchmarking tools offer detailed performance data, but the results are dependent on a stable internet connection and the willingness to download external software.
Via PC Games Settings
Many modern PC games include system requirement checks or settings menus that display VRAM information.
- Open the settings or options menu in your game.
- Look for the video or graphics settings.
- VRAM information may be displayed or implied based on selectable graphics settings.
While this method provides real-world VRAM usage data in the context of gaming, it may not provide the most complete picture of your hardware capabilities.
These methods offer a variety of ways to check VRAM, catering to different levels of technical expertise and preference for using built-in tools, third-party software, or external resources.
In terms of benefits, knowing your VRAM can ensure you are operating within the capacities of your system and help troubleshoot performance issues. The downsides might include misinterpreting technical data or taking unnecessary steps if unfamiliar with more advanced methods.
In conclusion, understanding and checking your VRAM is key to ensuring your computer runs smoothly, especially when you’re gaming or using graphic-intensive applications. Whether you prefer quick, built-in tools or detailed third-party applications, there’s a method suited for everyone. It’s about choosing the one that you’re most comfortable with and that meets your needs.
FAQs
Q: What is VRAM?
A: VRAM, or Video Random Access Memory, is a type of memory used by your computer’s graphics processing unit (GPU) to store image data that is displayed on your screen.
Q: Can I increase my VRAM?
A: Dedicated VRAM on a graphics card cannot be increased as it is hardware. However, integrated graphics in processors use a portion of the system’s RAM as VRAM, which can sometimes be adjusted in the BIOS/UEFI. Additionally, adding more system RAM can indirectly increase available VRAM for integrated graphics.
Q: Does more VRAM mean better performance?
A: Not always. While having enough VRAM is important to handle high-resolution textures and avoid bottlenecks, other factors such as GPU architecture, clock speed, and system RAM also play significant roles in overall performance.