Food delivery services like Uber Eats have revolutionized the way we enjoy our meals, offering convenience with just a few taps on a screen. However, there comes a time when you might want to declutter your digital life or simply take a break from the endless options of restaurant foods. Deleting your Uber Eats account might seem daunting, but it can be a straightforward process with the right guidance. Here’s how you can say goodbye to those tempting food deliveries and take control of your digital footprint.
Deactivating Through the App
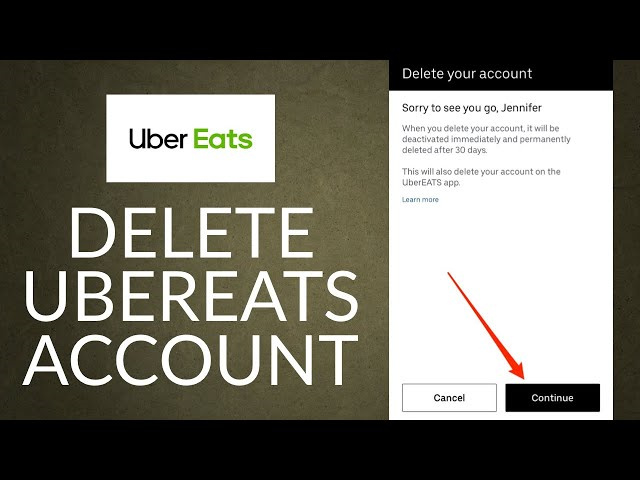
The Uber Eats app may not directly allow you to delete your account, but it does let you begin the process of deactivation which leads to deletion.
- Open the app: Start by launching the Uber Eats app on your device.
- Access your account: Tap on the profile icon in the bottom right corner.
- Get help: Navigate to the ‘Help’ section, which is often found in the account settings.
- Account and Payment Options: Within the Help section, select ‘Account and Payment Options.’
- Changing my account settings: Look for a section named ‘Changing my account settings.’
- I want to delete my account: Find an option that says ‘I want to delete my account’ and select it.
- Follow the prompts: The app will likely guide you through several prompts to ensure you understand the consequences of deleting your account.
After you have requested account deletion through the app, your account will be deactivated. For a period, you’ll have the chance to reactivate it before it’s permanently deleted, in case you change your mind.
Summary: This process is convenient if you prefer using your mobile device. The downside is that account deletion is not immediate, and there is a waiting period before your account is permanently deleted.
Contacting Support via Email
For those who prefer a more direct approach or have already deleted the app, reaching out to Uber Eats support via email might be a suitable method.
- Compose an email: Open your preferred email service and create a new email.
- Recipient address: Address the email to [email protected] or the support email specific to your country.
- Clear subject line: Use a subject line such as “Request for Uber Eats Account Deletion.”
- State your request: In the email, clearly state that you wish to have your Uber Eats account deleted. Include any relevant information such as your full name and the email or phone number associated with the account.
- Send and wait for confirmation: After sending the email, wait for a response confirming that your request is being processed.
Summary: Emailing support gives you a written record of your request, which could be beneficial. However, response times can vary, which means it may not be the fastest method.
Contacting Customer Support via Phone
If you prefer talking to someone directly, calling Uber Eats customer support is a viable option.
- Find the support number: Look up the Uber Eats customer support number for your region. This can typically be found in the app’s Help section or on the Uber Eats website.
- Prepare your details: Have any necessary information ready, such as your account details and the reason for deleting your account.
- Call during working hours: Make the call, preferably during customer service working hours for your region.
- State your reason: Clearly communicate to the support representative that you want to delete your Uber Eats account.
Summary: This method provides immediate interaction and the possibility to get instant feedback. However, you may have to wait on hold, and it requires verbal communication.
Utilize the Account Deletion Page
For a more straightforward online approach, you can use the dedicated account deletion page provided by Uber.
- Visit the deletion page: Go directly to the Uber Eats account deletion page on your web browser. You may need to log in to your Uber Eats or Uber account if not already logged in.
- Verify your identity: You’ll often need to verify your identity by entering a code sent to your email or phone.
- Confirm deletion request: Follow the site’s instructions to confirm that you want to delete your account.
Summary: This is a quick online method without needing to download the app, yet you need to remember your login details, and waiting times for the account to be permanently deleted apply.
Checking the Terms of Service
Before you delete your account, it’s wise to check Uber Eats’ Terms of Service to understand the implications and any conditions that apply to account deletion.
- Find the Terms of Service: These can usually be found at the bottom of the Uber Eats website or in the app’s settings.
- Read the deletion section: Focus on the sections that talk about account termination and deletion.
- Understand your rights: Pay attention to any conditions about data retention and what happens to your data after deletion.
Summary: This step ensures that you are fully aware of your rights and the delete process. However, legal jargon can be confusing, and you may need to consult customer support for clarification.
Clearing Personal Information Before Deletion
To ensure your personal information is not retained unnecessarily, you may choose to remove it before deletion.
- Log into your account: Enter the app or website and access your account settings.
- Edit your information: Remove or edit your personal details, such as your delivery address and payment information.
- Save changes: Confirm any changes before proceeding with the deletion process.
Summary: This proactive step provides an extra layer of privacy. Yet, you may still need to trust that Uber Eats will handle your deleted data properly as per their policies.
Reconsidering Account Deletion
Consider the impact of account deletion carefully; it is irreversible and you will lose your order history and any remaining credits.
- Reflect on your usage: Think about how often you use Uber Eats and the benefits it brings you.
- Consider alternatives: If you’re deleting for budgeting reasons, consider simply removing the app from your device or disabling notifications.
- Impact on shared accounts: If you share your account with family members, discuss the deletion with them first.
Summary: This pause for thought can prevent regret later on. Yet, it might delay the process if you’re set on deletion for privacy or other serious reasons.
Email Account Removal Confirmation
Once you’ve taken steps to remove your account, you should receive an email confirming your account deletion request.
- Check your inbox: Keep an eye on your email associated with your Uber Eats account.
- Look for the confirmation email: This email will outline the steps Uber Eats will take to delete your account.
- Save for your records: It’s good practice to keep this email until you’re sure your account has been deleted.
Summary: The confirmation email acts as a receipt for your request, confirming that action is being taken. However, if you don’t receive an email, it could mean your request wasn’t processed, requiring further action from you.
Final Verification from Uber
In some cases, Uber may contact you to verify that it was indeed you who requested the account deletion.
- Be responsive: If Uber reaches out via email or phone, respond promptly to confirm your request.
- Provide necessary verification: You may be asked to provide additional details to prove your identity.
- Confirm deletion: Once verification is complete, reaffirm that you want your account deleted.
Summary: This step assures that your account is being deleted securely, protecting you from potential fraud. However, it can lengthen the account deletion process.
Check for Cancellation Confirmation
After you’ve confirmed your account deletion request, you should monitor for a cancellation confirmation from Uber Eats.
- Regularly check email: Monitor the email associated with your Uber Eats account for confirmation of cancellation.
- Be patient: It can take a few days for your account to be fully cancelled.
- Contact support if necessary: If you don’t receive a confirmation in a reasonable timeframe, reach back out to Uber Eats customer support.
Summary: This conclusive step provides peace of mind that your account is no longer active. A potential downside includes waiting for final confirmation, which can vary in time.
In conclusion, deleting your Uber Eats account is a relatively simple process that can be approached in a few different ways—whether through the app, email, or customer support. It’s a decision that can help in simplifying your digital presence and potentially reducing unnecessary spending or distractions. It’s critical, however, to consider the consequences, such as losing your order history and any unused credits. Make sure to follow the steps carefully to ensure your personal information is removed appropriately and that the deletion is confirmed.
Here are some frequently asked questions that might help further:
-
What happens after I delete my Uber Eats account?
Once deleted, you will not be able to access your order history or any remaining balance. Your account will not be recoverable. -
Can I delete my Uber Eats account and keep my Uber account?
As of the knowledge cutoff in 2023, Uber and Uber Eats share account information. Deleting one will affect the other. Check the latest from Uber support for updates on this policy. -
Will deleting my account remove all my personal information from Uber Eats?
Uber Eats is expected to remove your data in accordance with its privacy policy and local laws regarding data retention. Some information may be kept for certain periods for legal or regulatory reasons.