Chromebooks are renowned for their simplicity and security, but sometimes users need to unlock their device’s full potential. Developer mode is a special function built into Chromebooks that allows advanced users to access the core features of the Chrome OS. Enabling developer mode can allow you to install Linux, use advanced Google commands, or even try to load other operating systems. However, it’s important to approach this with caution, as it can make your device less secure and void warranties. This guide will walk you through the process step-by-step, ensuring you can harness the capabilities of developer mode while understanding the risks involved.
Enabling Developer Mode
To unlock the capabilities of your Chromebook beyond its default settings, enabling Developer Mode is the key. This mode allows you to run software and commands that aren’t part of the standard Chrome OS experience.
Detailed Steps:
- Back up your data. Enabling Developer Mode will erase all local data on your Chromebook. Make sure any important files are backed up to Google Drive or another cloud service.
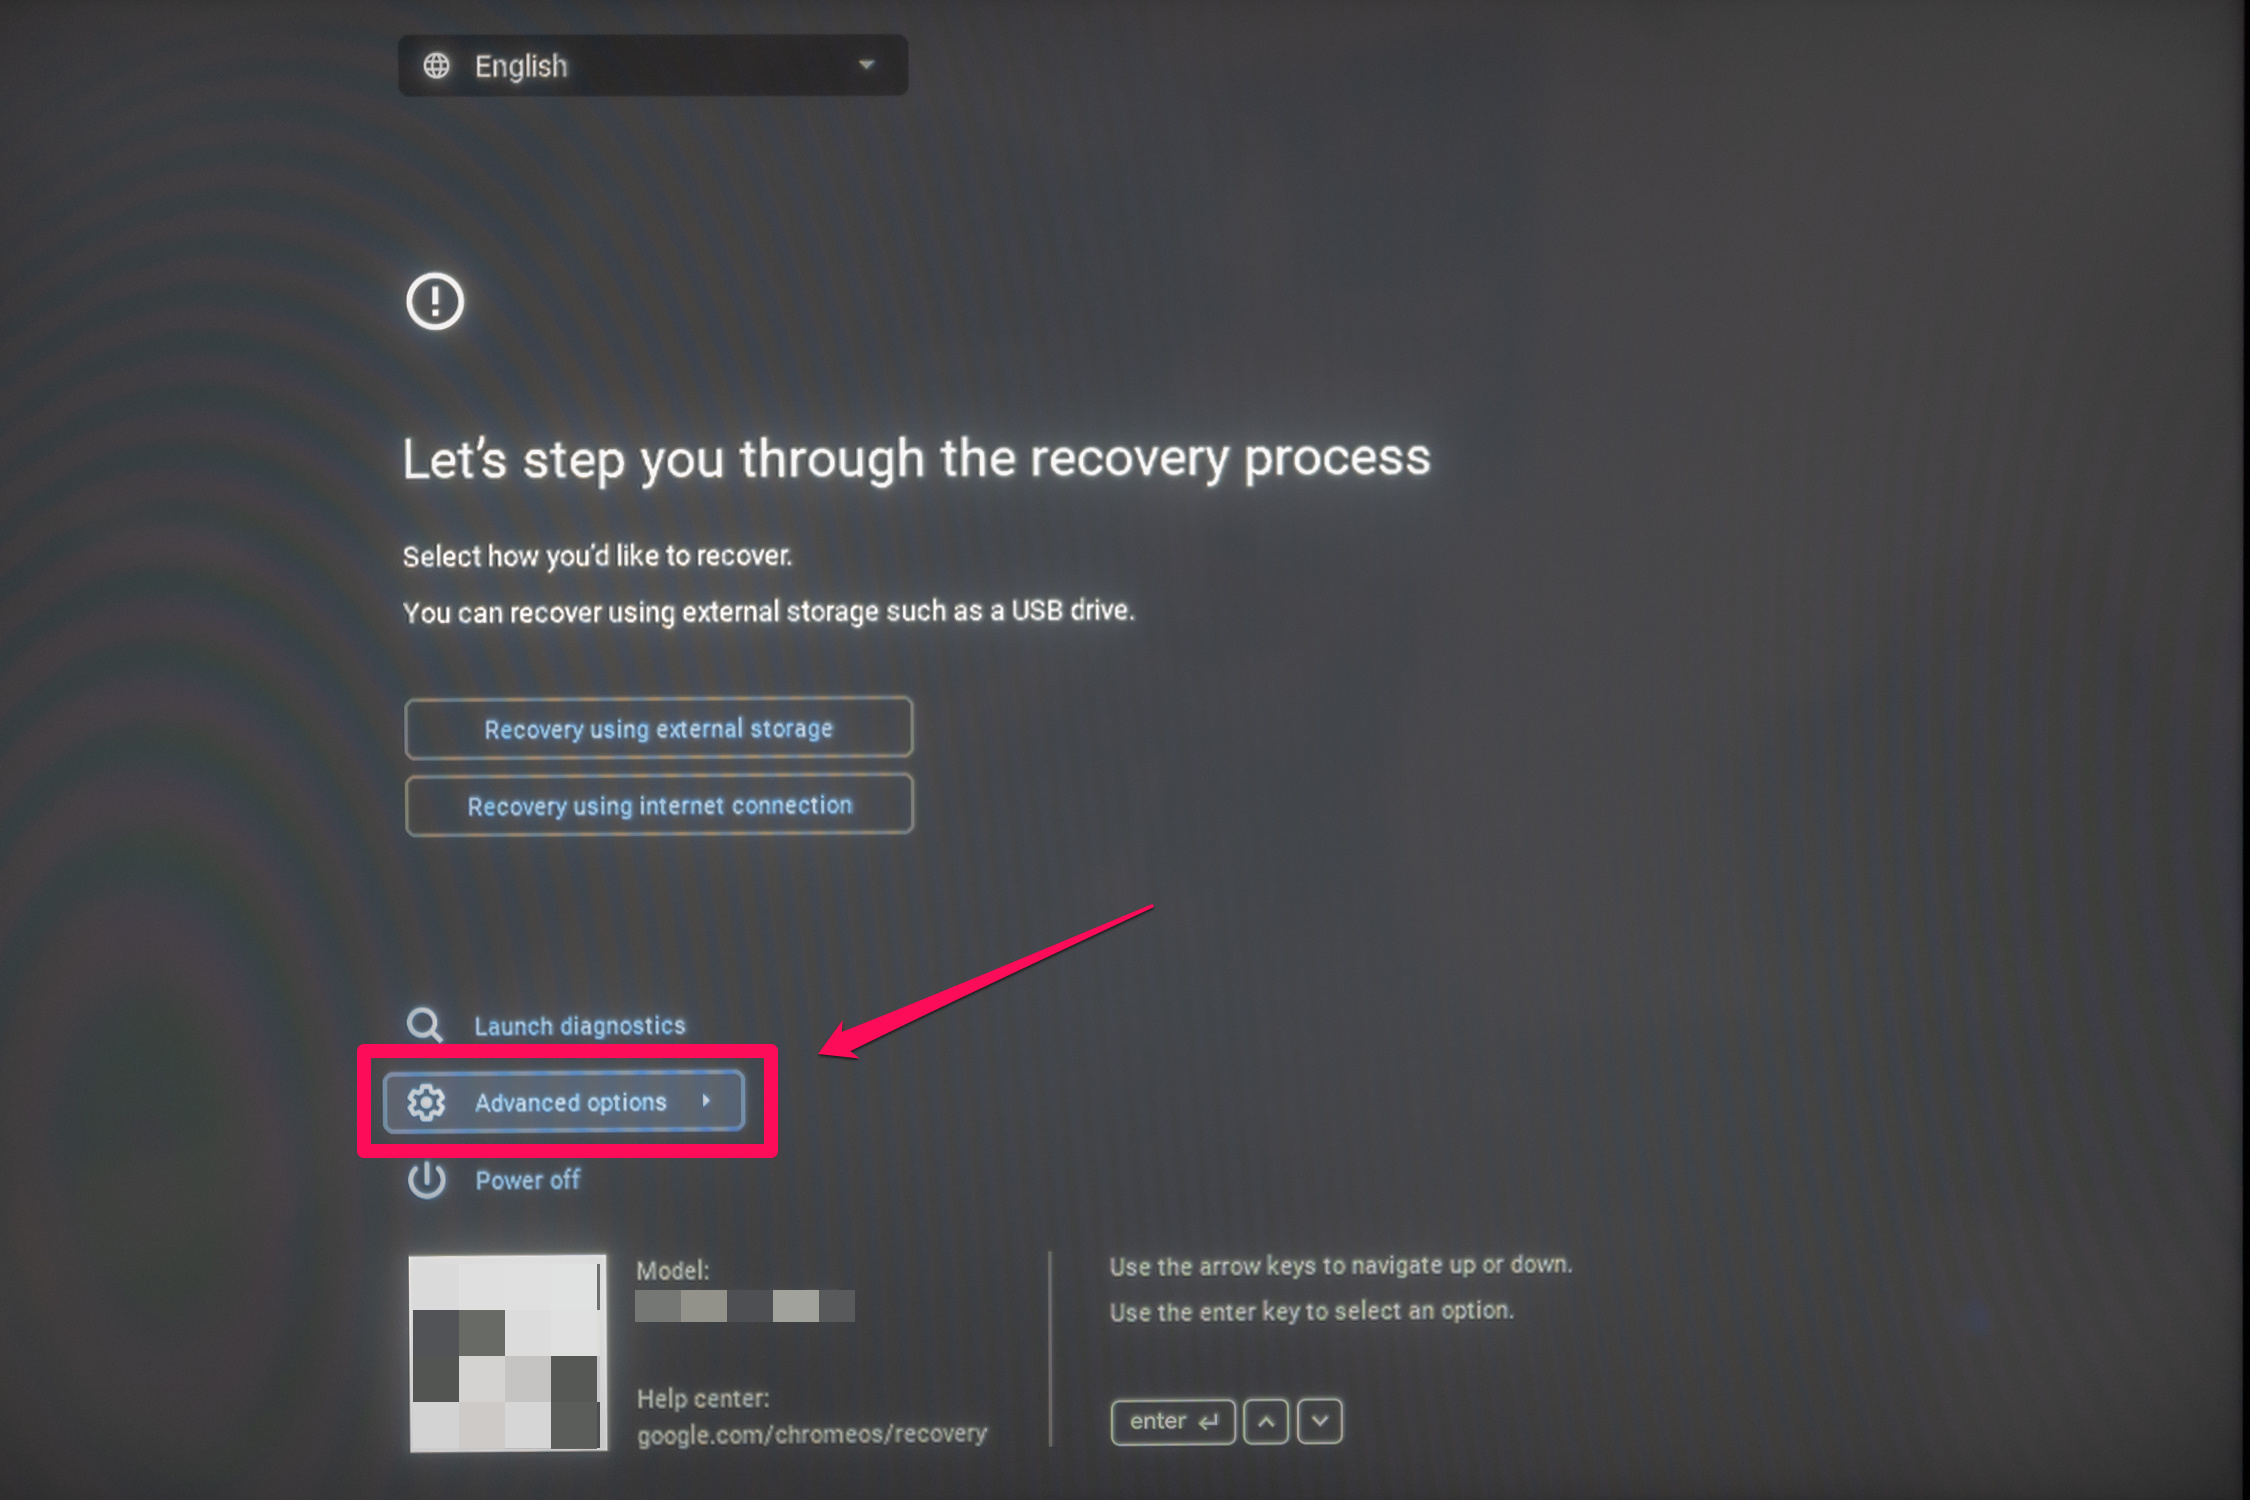
- Begin with your Chromebook turned off.
- Hold down the
Esc + Refresh (F3)keys and press thePowerbutton. This will reboot your Chromebook into Recovery Mode. - Press
Ctrl + Dwhen the recovery screen appears (you’ll see a yellow exclamation point). - Press
Enterto turn off OS verification. This will prompt a screen that tells you OS verification is off, accompanied by a loud beep. - Press
Ctrl + Dor wait 30 seconds to proceed. Your Chromebook will now transition into Developer Mode. This could take some time, usually around 10 to 15 minutes. - Set up your Chromebook again. Once in Developer Mode, your system will reboot, and you’ll go through the initial setup process.
- Developer Mode is now enabled. Enjoy your newly unlocked Chromebook.
Summary:
Enabling Developer Mode can be immensely powerful, equipping you with the tools to tinker with your device’s full capacities. The benefits include running alternative operating systems, accessing a deeper layer of Chrome OS, and developing new software. However, the downsides are significant; you will void your warranty, and your device’s security will be compromised as certain protection features are bypassed.
Using the Crosh Shell
While in Developer Mode, you have access to the Crosh Shell, a local command line interface for Chrome OS.
Detailed Steps:
- Press
Ctrl + Alt + Tto open the Crosh Shell in a new browser tab. - Explore various commands such as
shellto access the full Unix shell,helpto see a list of available commands, orpingfollowed by a web address to check network connectivity. - Use the shell for advanced tasks, like ping tests, network diagnostics, or ssh to securely connect to a remote server.
Summary:
Gaining access to the Crosh Shell through Developer Mode gives you a level of control over your device more akin to traditional operating systems. This is an invaluable tool for troubleshooting or developers. On the flip side, it’s a gateway to potentially make system-level changes that could affect your Chromebook’s functionality.
Powerwash: Resetting Your Chromebook
If you test the limits with Developer Mode and need to revert to a stable state, Powerwashing returns your Chromebook to factory settings.
Detailed Steps:
- Backup your data. Powerwashing will erase all local data.
- Open Settings by clicking on the time in the bottom-right corner and selecting the gear icon.
- Click on ‘Advanced’ at the bottom of the Settings window to expand the menu.
- Under ‘Reset settings’, click on ‘Powerwash’ and then ‘Restart’.
- Follow the on-screen prompts to reset your Chromebook to its original state.
Summary:
Powerwashing is like hitting the reset button on your Chromebook; it can solve many issues by returning the device to its original configuration. Although it’s a useful feature, be mindful that you’ll lose all local files not backed up elsewhere.
Installing Linux Applications
With Developer Mode activated, installing Linux applications becomes possible, which traditionally wouldn’t run on Chrome OS.
Detailed Steps:
- Open Settings and click on ‘Advanced’ to access the ‘Developers’ section.
- Enable the Linux development environment by clicking ‘Turn on’.
- Follow the on-screen instructions to install the Linux container.
- Once installed, use the Linux terminal to install applications using Linux commands.
Summary:
This process extends your Chromebook’s capabilities by unlocking a new suite of software. While it opens the door to a broader range of tools, it’s vital to be cautious with what you install to maintain system stability and security.
Creating Recovery Media
Before diving into Developer Mode, creating recovery media for your Chromebook is a sensible precaution.
Detailed Steps:
- Insert a USB drive or SD card into your Chromebook. Ensure it’s at least 4GB and that you have backed up any files from it as it will be formatted.
- Open the Chrome browser and install the ‘Chromebook Recovery Utility’ from the Chrome Web Store.
- Open the utility and follow the instructions to create a recovery image for your specific Chromebook model.
Summary:
Creating a recovery drive provides a safety net if you encounter any issues in Developer Mode. While it takes a little time and a spare USB drive, the peace of mind knowing you can restore your Chromebook is often worth the effort.
Accessing Full Chrome OS Shell
Developer Mode lets you access the full Chrome OS shell for more advanced customization and control.
Detailed Steps:
- Enable Developer Mode following the earlier instructions.
- Once Developer Mode is enabled, open the Crosh Shell by pressing
Ctrl + Alt + T. - Type
shellto access the full Bash shell.
Summary:
Launching the full Chrome OS shell widens the scope of what you can accomplish with your device. It provides the power of a complete Linux command-line environment. Be mindful that incorrect commands could lead to system issues.
Disable Developer Mode
If you find that Developer Mode is not for you, disabling it is straightforward but will erase your local data.
Detailed Steps:
- Backup any important data.
- Reboot your Chromebook and wait for the screen with the red exclamation mark.
- Press the spacebar when prompted to re-enable OS verification.
- Follow the on-screen instructions to restore the system to its default, secured state.
Summary:
Disabling Developer Mode reinstates all security features and functions of your Chromebook, but it also deletes all your data in the process. It returns your device to its secure, streamlined state.
Booting from USB
Once in Developer Mode, booting from a USB device becomes an option, something that is disabled by default for security.
Detailed Steps:
- Insert the bootable USB device into your Chromebook.
- Press
Ctrl + Uat the startup screen to boot from the USB device.
Summary:
This ability is extremely handy for those wishing to trial new operating systems or run live versions of software. However, booting unfamiliar software can potentially harm your system, so proceed with caution.
Enhancing Your Chromebook’s Performance
Developer Mode allows for performance tweaks to get the most out of your Chromebook.
Detailed Steps:
- Access the Chrome OS shell and try commands like
topto monitor system processes orsudofor root user commands. - Disable animations and tweaks graphic settings for a performance boost.
Summary:
Optimizing performance through Developer Mode can breathe new life into your device and tailor the experience to your liking. It’s important, though, to understand that modifying system settings can sometimes result in instability.
Using Secure Shell (SSH) for Remote Access
Developer Mode allows for secure remote connections to other systems using SSH.
Detailed Steps:
- Open the Chrome OS shell with Ctrl + Alt + T and then type
shell. - Type
ssh [user]@[host]to initiate a secure connection. - Follow the prompts to authenticate and establish the connection.
Summary:
SSH in Developer Mode is an incredible tool for developers and IT professionals, enabling secure remote access to servers and other devices. While powerful, it should be used with an understanding of network security.
Conclusion
Embracing Developer Mode on your Chromebook can equip you with new levels of control and customization options for your device. By following these steps and tips, you’ve learned how to venture beyond the default settings while being mindful of the responsibilities that come with this freedom. Remember, with great power comes the need for great caution – always backup your data and ensure you’re prepared for any complications that may arise.
FAQs
Will enabling Developer Mode void my Chromebook’s warranty?
Yes, enabling Developer Mode often voids the manufacturer’s warranty. It’s important to consider this before proceeding.
Can I exit Developer Mode after enabling it?
Absolutely, you can exit Developer Mode at any time, though it will erase all your data and restore the default security settings.
Is it safe to use Developer Mode on my primary Chromebook?
It can be risky as it disables some security features. If you rely on your Chromebook for critical tasks, use Developer Mode with caution or consider using a secondary device.