In the digital world we navigate today, security is paramount. This principle extends to the operating systems that power your computer—like Windows. Each user on a Windows system has a unique identifier known as a Security Identifier, or SID. This identifier plays a crucial role in managing permissions and security settings. You might never see your SID at work, but in certain situations—like when setting up network permissions or troubleshooting access issues—finding it can be essential. Don’t worry if you’re not a tech wizard; this guide is designed to help anyone retrieve a user’s SID on a Windows machine with ease.
Using the Command Prompt
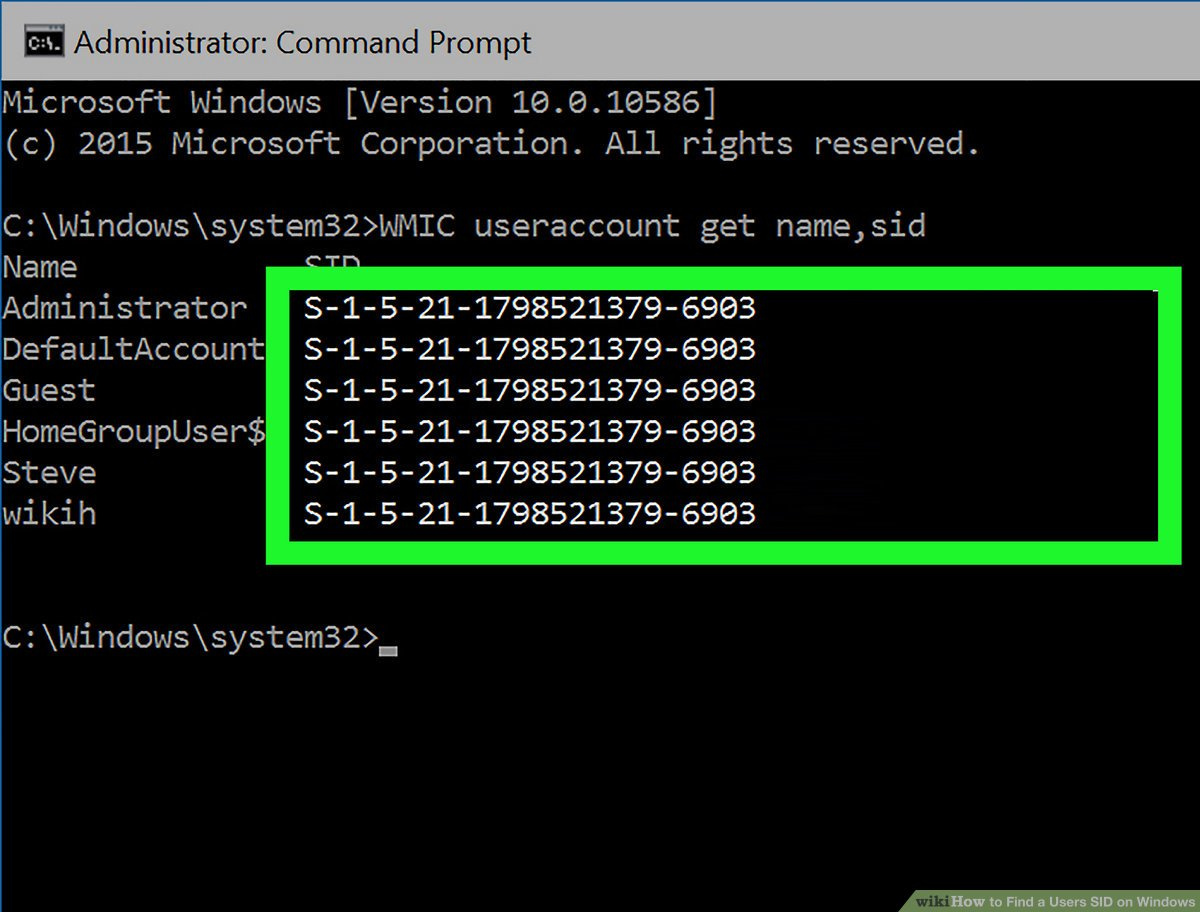
Each user account on your Windows system is assigned a unique SID by the operating system. To find this SID, one straightforward method involves using a utility called the Command Prompt.
- Search for Command Prompt: Click on the Start menu or press the
Windowskey, and type “Command Prompt” or “cmd”. You might see it pop up as a search result. - Run as Administrator: Right-click on Command Prompt and select “Run as Administrator” to ensure you have the necessary privileges to perform the task.
- Enter the Command: Once the Command Prompt window opens, type in the following command and press Enter:
wmic useraccount get name,sid - Find the SID: This command will list all the user account names and their corresponding SIDs on your system. Locate the username for which you want the SID and note the series of numbers next to it; that’s the SID.
By using the Command Prompt, you can quickly retrieve the SID for any user account on your machine. This approach is simple and doesn’t require any special software. However, those uncomfortable with command-line tools might find this method intimidating.
Accessing the Registry Editor
The Windows Registry is a database that stores a vast array of configurations and settings for your operating system. User SIDs are also stored here, and with a little navigation, you can find them.
- Open the Registry Editor: Press the
Windowskey +Rto open the Run dialog box, typeregedit, and press Enter. - Navigate to the SID keys: Use the folder tree to navigate to
HKEY_LOCAL_MACHINESOFTWAREMicrosoftWindows NTCurrentVersionProfileList. - Browse the ProfileList: You’ll see a list of folders with names that look like SIDs. Click on these folders (SID keys) and look at the
ProfileImagePathentry in the main window, which shows the profile associated with each SID. - Identify the User: Match the user profile with the account you’re interested in, and the folder’s name will be the SID for that user account.
The Registry Editor is a powerful tool, allowing you to see not just SIDs but a whole host of system settings. It’s essential to exercise caution when in the Registry Editor because accidental changes can affect system stability. This method is beneficial for those who prefer graphical interfaces over text commands.
Utilizing Windows PowerShell
Windows PowerShell is a versatile scripting environment that allows for more advanced administration and automation. You can use it to find user SIDs with a simple command.
- Open Windows PowerShell: Search for PowerShell through the Start menu, right-click, and select “Run as Administrator.”
- Enter the Command: In the PowerShell window, type
Get-LocalUser | Select Name,SIDand press Enter. - View the Results: Look at the output in the PowerShell window, which will show the list of usernames and their SIDs.
PowerShell is particularly handy if you’re looking to script the retrieval of SIDs or incorporate it into a larger automated task. Beginners might find the interface a bit complex, but following the steps should mitigate this complexity.
Searching the System Properties
Sometimes, you can find a user’s SID through the System Properties dialog—a legacy feature that’s been part of Windows for generations.
- Access System Properties: Right-click on ‘This PC’ or ‘My Computer’ on your desktop, and select ‘Properties’. Then click on ‘Advanced system settings’.
- Open User Profiles Settings: In the System Properties window, go to the ‘Advanced’ tab and click on the ‘Settings’ button under User Profiles.
- Locate the SID: In the User Profiles dialog box, you can see different profiles associated with your system. Select the profile you are interested in, and you’ll find a grayed-out path that includes the user’s SID.
This method is quite straightforward and does not involve using a command-line interface, which might be a relief for users who are not as comfortable with text-based commands.
Deploying Third-Party Tools
A range of third-party software solutions exists that can help you find user SIDs with a graphical interface.
- Choose a Tool: Research and select a reputable third-party tool designed for viewing and managing SIDs.
- Download and Install: Follow the provider’s instructions to safely download and install the software.
- Locate the SID: Use the software to locate the SID according to the specific tool’s instructions.
While using third-party tools can be convenient, always be cautious and download software only from trusted sources to avoid security risks. It’s also important to consider that some third-party tools can be paid solutions.
Querying User SID via SystemInfo Command
The SystemInfo command provides a wealth of information about your system, including the user SIDs.
- Open Command Prompt: Access the Command Prompt as discussed earlier.
- Run SystemInfo Command: Type
systeminfoand press Enter. - Extract the SID: Look through the information provided for the username and SID. You might need to scroll through quite a lot of data to find what you’re looking for.
This command provides a comprehensive overview of your system, but it might be overwhelming due to the amount of information displayed all at once.
Using the Local Users and Groups Manager
The Local Users and Groups manager is a console that provides detailed information about user accounts and their properties.
- Open the Manager: Press the
Windowskey +R, typelusrmgr.msc, and press Enter. - Select Users: In the left pane, select ‘Users’ to see a list of user accounts.
- Check User Properties: Right-click on the user whose SID you need, select ‘Properties’, and then go to the ‘Object’ tab to find the SID.
This tool is only available in certain editions of Windows, like Professional and Enterprise, so it may not be accessible to everyone.
Finding SID with Whoami Command
The whoami tool is a straightforward command-line utility that displays the current user’s SID.
- Access Command Prompt: As before, launch the Command Prompt.
- Execute Whoami Command: Type
whoami /userand press Enter. - View SID: The command will directly output the username and SID for the logged-in user.
This method is quick and easy, but it only reveals the SID for the current user, not for other accounts on the system.
Reading SID Through Advanced User Accounts
The Advanced User Accounts program, netplwiz, can also provide access to SIDs.
- Open Advanced User Accounts: Press the
Windowskey +R, typenetplwiz, and press Enter. - Explore Advanced Properties: Select a user account and click the ‘Properties’ button, then go to the ‘Advanced’ tab.
- Document SID: The SID is displayed there for your documentation.
This utility simplifies the process for less technical users, although it doesn’t offer as much detail as some other methods.
Accessing SID via Security Settings
Local Security Policy settings can also provide SIDs in a broader security context.
- Launch Local Security Policy: Press the
Windowskey +R, typesecpol.msc, and press Enter. - Navigate to User Rights Assignment: Go to Security Settings Local Policies User Rights Assignment.
- Examine Policies: Review the policies to identify any that include specific user SIDs in their security settings.
However, like Local Users and Groups, this feature is not available in all versions of Windows.
By now, you’ve seen several methods to find a user’s SID in Windows. Each approach has its benefits, with some offering simplicity and others providing more extensive details. Be mindful of potential downsides, like the complexity of the Command Prompt for some users or the limitations of certain tools based on your Windows version.
In conclusion, understanding how to find a user’s Security Identifier (SID) in Windows can be quite useful, whether you’re administering your computer, troubleshooting, or setting up permissions. While the process might seem technical, this guide shows that with the right instructions, anyone can locate user SIDs. By choosing the method that suits your comfort level and system version, you’ll maintain greater control over your computer’s security configurations.
FAQs
What is a SID in Windows?
A SID, or Security Identifier, is a unique string of numbers used by Windows to manage permissions and security protocols for each user account on a system.
Why would I need to find a user’s SID?
You may need to find a user’s SID when setting up security policies, troubleshooting access permissions, or when working with some software applications that require this information.
Can I change a user’s SID?
It’s not recommended to change a user’s SID as it can cause significant issues with permissions and access rights across the system. SIDs are meant to be permanent identifiers.


