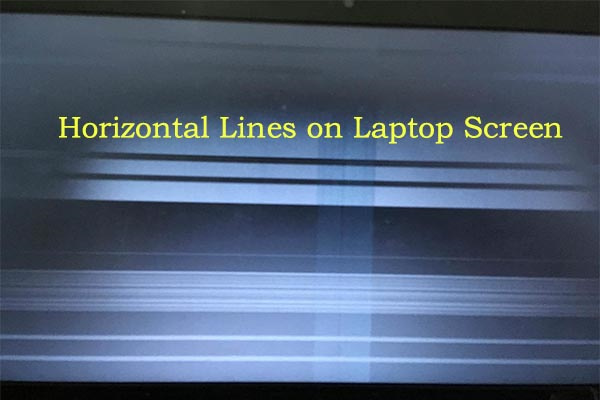
Have you ever been working on your computer and suddenly noticed distracting horizontal lines across the screen? These lines can range from a minor nuisance to a significant hindrance to your work or entertainment. They are often caused by various issues, such as cable problems, graphic card issues, or even the need for driver updates. Fixing them is important for an optimal viewing experience, but don’t worry—it doesn’t always require a tech expert. In the comprehensive guide that follows, we will explore several actionable steps you can take to troubleshoot and resolve this frustrating problem.
Check the Monitor Cables
Before delving into any complex solutions, it’s crucial to ensure that the problem isn’t being caused by something as simple as a loose or damaged cable.
- Turn off your computer and monitor.
- Disconnect all cables connecting the monitor to the computer and power source.
- Inspect each cable for any signs of damage, such as fraying or kinks.
- Reconnect all cables, ensuring they are secured tightly.
- Turn on the computer and monitor to see if the problem persists.
By simply checking the cables, you might solve the problem with minimal effort. While it’s easy and cost-effective, sometimes the issue could be deeper, like within the hardware itself.
Update or Reinstall Graphics Drivers
Outdated or corrupted graphics drivers could be the culprit behind those pesky horizontal lines.
- Open the “Device Manager” (you can search for it in the Start menu).
- Expand the “Display adapters” section.
- Right-click on your graphics card and select “Update driver” or “Uninstall device.”
- If updating, choose to search automatically for updated driver software.
- If uninstalling, follow the prompts and restart your computer—the drivers should reinstall upon rebooting.
Keeping drivers up-to-date can enhance performance and fix various issues, but sometimes an update itself may introduce new problems. In such cases, rolling back to a previous driver version might be helpful.
Adjust Screen Resolution
Incorrect screen resolution settings might result in display issues, including horizontal lines.
- Right-click on the desktop and select “Display settings.”
- Scroll down to “Display resolution” and click the dropdown menu.
- Select the recommended resolution (usually marked).
- Confirm the change and check if the lines disappear.
This solution is quick and doesn’t affect system stability—the worst that can happen is having to revert to the original resolution if the change doesn’t help.
Check for Hardware Issues
Sometimes, the issue may be a hardware defect with the monitor or graphics card.
- Connect your computer to a different monitor. If the lines disappear, the problem is likely with the original monitor.
- If the lines are still there, it could indicate an issue with the graphics card or inside components.
Identifying a hardware issue means you’ll potentially avoid unnecessary changes or updates to your system. However, repairing hardware can be expensive and might require professional assistance.
Refresh Rate Adjustment
An incorrect refresh rate setting can also cause screen anomalies.
- Right-click on the desktop and select “Display settings.”
- Click “Advanced display settings” at the bottom of the page.
- Go to “Display adapter properties for Display 1.”
- Click the “Monitor” tab and select a different “Screen refresh rate” from the dropdown.
- Apply the changes and check if the lines are gone.
Altering the refresh rate requires caution; setting it too high can damage your monitor. Always stick to supported rates mentioned in your monitor’s specifications.
Reset the Monitor Settings
Monitors have their own settings that can be reverted to factory default, possibly eliminating screen issues.
- Access the monitor’s built-in menu (typically via buttons on the monitor).
- Look for an option that says “Reset,” “Factory Reset,” or something similar.
- Confirm the reset and allow the monitor to reboot.
Resetting is simple and safe to do. Be prepared to recalibrate your display settings, as all custom configurations will be lost.
Update the BIOS/UEFI
Although less common, an outdated BIOS/UEFI can cause display issues. It’s a bit more advanced, so proceed with caution or seek help.
- Visit the website of your computer or motherboard manufacturer for instructions and the latest BIOS/UEFI version.
- Follow their specific guide to update your system’s BIOS/UEFI.
Due to the risk of potentially ‘bricking’ your system if the update fails, this method should be a last resort after exhausting other fixes.
Run the Windows Hardware Troubleshooter
Windows includes built-in troubleshooters that might identify and fix the issue.
- Open ‘Settings’ and go to ‘Update & Security.’
- Click on ‘Troubleshoot’ and select ‘Additional troubleshooters.’
- Run the ‘Hardware and Devices’ troubleshooter and follow on-screen instructions.
This process is quite safe and automated, making it user-friendly. However, it might not always detect the issue, particularly if it’s hardware related.
Inspect for Software Conflicts
Incompatible or buggy software can sometimes interfere with your display settings.
- Observe if the lines appear when running specific programs.
- Boot the computer in “Safe Mode” (you can find instructions on how to do this online),
and check for the presence of lines. - If they disappear in Safe Mode, a software conflict is likely. Try to identify and uninstall the problematic software.
Identifying software conflicts is a process of elimination and could take some time. Be cautious when uninstalling programs to avoid removing important system software.
External Devices and Magnets
External devices and magnets can interfere with your monitor’s functionality.
- Remove all external devices (like printers, USB drives) one by one to see if they’re causing the issue.
- Ensure there are no strong magnets near your monitor as they can distort the display.
This is often overlooked but is an easy fix. Unfortunately, it can be time-consuming to troubleshoot multiple devices and their potential interference.
In summary, fixing horizontal lines on a computer screen often requires simple checks and adjustments such as ensuring proper cable connections, updating drivers, adjusting display settings, or even resetting the monitor. It’s beneficial to try these solutions before considering more drastic measures like hardware replacements. Remember that while software fixes are typically low-risk, hardware interventions carry a higher chance of complications.
In conclusion, horizontal lines on your computer monitor are a common issue, but as we’ve seen, there are numerous possible solutions. From checking cable connections to updating software and inspecting for hardware problems, these steps can help restore your display to its full glory. While some fixes are straightforward and easily reversible, others, particularly involving hardware or BIOS updates, may require additional caution or professional support. Start with the simplest solutions and work your way through the list until you achieve a clear, line-free screen.
FAQs
-
Can the horizontal lines on the screen be caused by a virus?
While less common, it’s possible for malware or a virus to cause display irregularities. Ensure your antivirus software is up to date and perform a full system scan. -
Is it safe to update graphics drivers on my own?
Yes, updating graphics drivers is generally safe and can often be done automatically through Windows updates or the device manufacturer’s software. -
If the horizontal lines are due to a hardware problem in the monitor, can it be fixed at home?
Some hardware issues, like loose internal connections, can be fixed at home if you have the technical know-how. However, for most people, repairs should be carried out by professionals to avoid further damage.