When booting up your computer, you might encounter a message that reads “PXE-E61: Media Test Failure, Check Cable.” This can be perplexing and frustrating, especially if you’re not well-versed in computer troubleshooting. The PXE (Preboot Execution Environment) error you’re experiencing is often related to the boot sequence in your computer’s BIOS (Basic Input/Output System) or an issue with your hard drive and its connection. Fortunately, there are several steps you can take to resolve this error, even without advanced technical knowledge.
Check Boot Order
Before delving into hardware inspections, it’s essential to first make sure your computer is trying to boot from the correct device.
Detailed Introduction
The boot order in your computer’s BIOS determines which devices it checks for the operating system during startup. If the hard drive isn’t set as the primary boot device or the boot order is incorrect, your computer might attempt to boot from other devices and hence lead to the PXE-E61 error.
Detailed Steps
- Restart your computer and enter the BIOS setup. This usually involves pressing a key like F2, F10, or Del during startup.
- Navigate to the ‘Boot’ or ‘Startup’ tab using your arrow keys.
- Check the boot sequence and make sure your primary hard drive is listed first.
- If necessary, use the instructions provided in the BIOS setup to change the boot order.
- Save the changes and exit the BIOS setup.
Summary
Adjusting the boot order is a simple and safe step with no real downsides. If the error was due to a misconfigured boot sequence, this could solve the problem without the need to delve into hardware solutions.
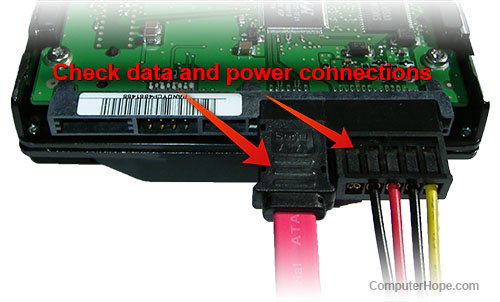
Inspect Cables and Connections
A loose or damaged cable can also cause the PXE-E61 error, so it’s vital to make sure the internal connections are secure.
Detailed Introduction
The error message indicates that the issue might be with the communication between your motherboard and hard drive. Checking the cables ensures that they are not only properly connected but also in good condition.
Detailed Steps
- Power off your computer and unplug it from its power source.
- Open the computer case according to the manufacturer’s instructions—this might require unscrewing or sliding open a panel.
- Locate the hard drive and check the SATA or IDE cable connecting it to the motherboard.
- Ensure the connection is firm. If loose, unplug and then firmly reconnect the cable to both the hard drive and the motherboard.
- Check for any visible damage on the cables and replace them if needed.
- Close the computer case and try booting the computer again.
Summary
Inspecting cables is usually trouble-free and can frequently resolve the issue. However, handling computer components does require a gentle touch to avoid static damage or unintentionally unseating other components.
Examine Hard Drive in BIOS
Verifying the hard drive’s detection in BIOS helps confirm whether the system recognizes the device it’s attempting to boot from.
Detailed Introduction
If the computer’s BIOS does not list the hard drive, it indicates that your system isn’t detecting the hard drive, which could result in the PXE-E61 error.
Detailed Steps
- Enter the BIOS setup on your computer during boot up.
- Go to the section that lists your storage devices. This is often under tabs like ‘Main’, ‘Advanced’, ‘Boot’, or ‘Storage’.
- Look for your hard drive’s name and model.
- If the hard drive isn’t listed, it means the BIOS is not detecting it, which could be due to a variety of issues including a hardware fault or connection problem.
Summary
This step is beneficial for identifying whether the hard drive is recognized by your computer without additional software. If the BIOS doesn’t list your hard drive, the issue likely lies with the drive itself or the connections, rather than the BIOS settings.
Restore BIOS to Default
Restoring the BIOS to its default settings can sometimes rectify issues that arise from configuration errors.
Detailed Introduction
Incorrect BIOS settings can cause boot issues. Restoring defaults can wipe out incorrect configurations that might be causing the PXE-E61 error.
Detailed Steps
- Access your BIOS settings during the startup process.
- Look for an option that allows you to reset or restore default settings. This is usually labeled as ‘Restore Defaults’, ‘Load Default’, or ‘Load Optimal Defaults’.
- Select this option and confirm the action.
- Save and exit the BIOS.
Summary
This measure can effectively resolve issues stemming from corrupt or misconfigured BIOS settings. However, any custom settings will be lost, which might impact system performance or preferences if they had been specifically set.
Update BIOS Firmware
An outdated BIOS can sometimes be the root of the problem, and updating it to the latest version might solve the issue.
Detailed Introduction
Manufacturers release BIOS updates to fix bugs, add new features, or improve compatibility. An update can address the specific error your computer is experiencing.
Detailed Steps
- Check your current BIOS version in the BIOS setup or by using a system information tool in your operating system.
- Visit your motherboard manufacturer’s website and find the latest BIOS update for your model.
- Carefully read the instructions provided by the manufacturer for updating the BIOS.
- Download the necessary files and proceed with the update process as instructed, typically using a USB drive and a BIOS utility.
Summary
BIOS updates can resolve a range of issues but come with the risk of bricking your motherboard if done incorrectly. Ensure there is no power interruption during the update, and follow the manufacturer’s instructions meticulously.
Perform a Hard Drive Test
Testing the hard drive can help determine if the PXE-E61 error is stemming from a faulty storage device.
Detailed Introduction
Hard drive tests can verify the integrity of your drive and if it is functioning correctly. This step can pinpoint if the hard drive itself is the source of the boot issue.
Detailed Steps
- Access the hard drive testing utility in the BIOS setup, if available. This is usually found in the diagnostics or tools menu.
- If the BIOS does not offer this utility, you may need to use third-party software to create a bootable USB drive for testing the hard drive.
- Run the test and await the results, which will indicate if there are any errors or malfunctions with the drive.
Summary
Hard drive tests are typically safe but can take some time to complete. They provide crucial insight into the health of your drive; however, not all errors may be fixable, possibly leading to the requirement of drive replacement.
Replace the Hard Drive
If testing indicates that your hard drive is failing or has failed, replacing it might be the necessary course of action.
Detailed Introduction
Mechanical failures or irreparable errors on a hard drive will require it to be replaced with a new one. This ensures that your computer has a functioning device to boot from.
Detailed Steps
- Purchase a new hard drive that is compatible with your computer’s motherboard (SATA or IDE).
- Shut down the computer and remove the old hard drive.
- Install the new drive using the same cables and mounting brackets.
- You may need to reinstall your operating system on the new drive if you haven’t cloned the old one.
Summary
Replacing a hard drive is a definitive fix for a failed drive but involves additional costs and requires reinstalling the system and software. For non-technical users, professional assistance might be preferred to ensure the new drive is correctly set up.
Check for Additional PXE Boot Options
Sometimes, the PXE boot attempts to network boot, and disabling this function can eliminate the error.
Detailed Introduction
Some systems have a network boot option enabled by default. Disabling it can prevent the PXE-E61 error by stopping the boot process from seeking network sources.
Detailed Steps
- Enter the BIOS setup.
- Navigate to the boot options menu.
- Look for any options titled ‘Network Boot’, ‘PXE Boot to LAN’, or similar and disable them.
- Save the changes and exit the BIOS setup.
Summary
Disabling network boot is a quick fix if it’s causing the issue. It won’t impact your system negatively unless you specifically need to boot from a network source.
Disable Secure Boot
Certain systems with secure boot enabled may not boot from drives that lack the proper bootloader security features.
Detailed Introduction
Secure Boot adds a layer of security by ensuring that only trusted software can boot. Disabling it might allow your system to bypass the PXE-E61 error.
Detailed Steps
- Access the BIOS settings.
- Find the Secure Boot option, commonly located under the ‘Security’ or ‘Boot’ tab.
- Disable Secure Boot.
- Save and exit.
Summary
Disabling Secure Boot can resolve compatibility issues, but it may leave your system slightly less secure during bootup. Re-enable it once the issue is resolved if there are no booting problems.
Consult Manufacturer Support or a Professional
When all else fails, reaching out to professional tech support can guide you through advanced troubleshooting.
Detailed Introduction
If none of the previously mentioned steps fix the error, the issue may be more complex and require professional expertise to diagnose and repair.
Detailed Steps
- Contact the support service of your computer or motherboard manufacturer.
- Provide them with detailed information about your issue and the steps you’ve already tried.
- Follow their guidance for further diagnosis and repair.
Summary
Professional support can be invaluable, although possibly costly. They will offer the most precise solutions catered specifically to your system.
Conclusion
While the “PXE-E61: Media Test Failure, Check Cable” error might seem daunting, these steps can guide even those with limited technical knowledge through troubleshooting procedures to find a resolution. Remember, it’s essential to approach each step with caution, especially when it involves handling hardware components. By systematically working through the potential solutions, you significantly increase your chances of resolving the issue with minimal stress.
FAQs
Q1: What does PXE-E61 mean?
A1: PXE-E61 is an error that indicates your computer is trying to boot using PXE (network boot) but cannot find the server or has an issue with the boot configuration or hardware.
Q2: Can I resolve the PXE-E61 error on my own?
A2: Yes, many times this error can be resolved through basic troubleshooting like adjusting BIOS settings, checking cable connections, and ensuring the correct boot order.
Q3: Will I lose any data while fixing this error?
A3: Most solutions for the PXE-E61 error do not involve data loss. However, if your hard drive has failed and needs replacement, unless you’ve backed up your data, you may lose what’s stored on the drive. Always back up your data regularly to prevent data loss.