Gaining recognition on Twitch can be a real game-changer for streamers. It’s a platform where creativity meets opportunity, and getting verified is a milestone that sets serious content creators apart. Verification comes with a coveted badge, increased visibility, and a sense of accomplishment. In this guide, we will walk you through the steps to achieve this prestige, making sure to simplify the technicalities so you can follow along, regardless of your level of expertise.
Build a Following
Before considering verification on Twitch, the foundational step is to cultivate a sizable and engaged audience. This detailed introduction is your road map to accumulation of followers necessary for verification.
Detailed Steps
- Stream Consistently: Set a schedule and stick to it. Consistency helps followers know when to tune in.
- Engage with Your Audience: Interaction can turn viewers into loyal followers. Read and respond to chat messages, and consider incorporating viewer suggestions into your content.
- Collaborate with Other Streamers: This can introduce you to new audiences and build community.
- Promote your Twitch Channel on Other Platforms: Share your content on social media or create a community on platforms like Discord to keep your followers engaged even off-stream.
Summary
Building a following increases your channel’s visibility and fosters a community, which is crucial for Twitch verification. However, it can take time and requires consistent effort.
Consistent Branding
A strong, recognizable brand can make your Twitch channel memorable and enhance your chances of verification.
Detailed Steps
- Create a Logo and Visual Theme: Maintain a consistent color scheme and style throughout your channel.
- Develop a Streaming Persona: Your on-camera personality should be authentic yet engaging.
- Use Professional Overlays and Graphics: These add to your stream’s visual appeal and professional look.
Summary
Strong branding helps create a professional appearance that can attract followers and appeal to Twitch for verification. It requires effort in design and may involve some initial investment.
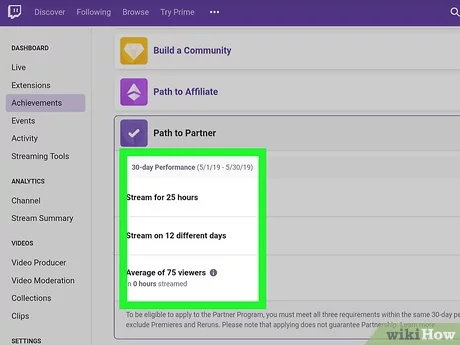
Understand the Requirements
To get verified, you need to know what Twitch expects. Here’s a simple explanation of the criteria.
Detailed Steps
- Study Twitch’s Partner Program: Go through the official Twitch Partner criteria to understand the specific requirements.
- Assess Your Channel: Regularly check your channel’s analytics to see how close you are to meeting these targets.
- Plan for the Long Term: Reaching these benchmarks might not happen overnight. Set realistic goals and timelines.
Summary
Understanding Twitch’s requirements is the first practical step towards verification. It involves dedication to consistently meet the set standards.
Engage Beyond Streaming
Engaging with your community off-stream can strengthen your bond with viewers.
Detailed Steps
- Use Social Media: Share insights, updates, and personal moments on platforms like Twitter or Instagram.
- Create Additional Content: Make YouTube videos or blog posts related to your Twitch content.
- Participate in Forums and Communities: Join discussions on sites like Reddit, or Twitch’s own community forums.
Summary
Engagement off-stream helps build a robust community, but managing multiple platforms can be time-consuming and may distract from content creation.
Leverage Analytics
Understanding Twitch analytics can help you refine strategies to attract and keep viewers.
Detailed Steps
- Access Twitch Analytics: Learn to navigate and interpret your metrics within the Twitch dashboard.
- Identify What Works: Adapt your content strategy based on which streams have higher viewership and engagement.
- Set Measurable Goals: Use the data to set achievable targets for growth and improvement.
Summary
Using analytics can effectively guide your content direction and growth but requires learning how to interpret data effectively.
Offer Quality Content
The quality of your content is paramount in attracting viewers and ultimately getting verified.
Detailed Steps
- Invest in Good Equipment: Get a reliable PC, high-quality microphone, and camera.
- Improve Your Broadcasting Skills: Educate yourself on entertaining and communicating effectively.
- Refine Your Content Niche: Focus on your strengths and the interests of your audience.
Summary
While equipment and skill improvement can be costly and time-consuming, they are vital components for providing quality content.
Network within the Twitch Community
Networking with peers on Twitch can lead to support and growth opportunities.
Detailed Steps
- Join Twitch Teams: Collaborate with other streamers to cross-promote each other.
- Participate in Events: Attend Twitch meetups, gaming conventions, or online events.
- Support Other Streamers: Active participation in other streams can build reciprocity.
Summary
While networking is essential, it requires a significant time investment and might not yield immediate results.
Maintain a Positive Reputation
Your online reputation affects your relationship with both Twitch and your audience.
Detailed Steps
- Adhere to Community Guidelines: Always follow Twitch’s rules to avoid strikes against your account.
- Be Mindful of Your Conduct: Uphold a respectful and inclusive attitude on and off your stream.
- Handle Conflicts Gracefully: Resolve any issues with viewers or other streamers diplomatically.
Summary
A positive reputation fosters trust and community but managing difficult situations poorly can have lasting negative impacts.
Apply Strategically
When you’re ready, applying for Twitch verification should be done thoughtfully.
Detailed Steps
- Prepare Your Application: Ensure all your information is accurate and your channel is at its best.
- Submit through the Partner Program: Apply via the official channel to ensure your application is considered.
- Be Patient: Allow time for Twitch to review your application and be prepared for possible rejections.
Summary
Strategic application can maximize your chances, but the process requires patience and may need multiple attempts.
Stay Updated with Twitch Policies
Twitch continuously updates their terms and partner requirements, so keep informed.
Detailed Steps
- Follow Twitch on Social Media: Get updates on policy changes directly from their platforms.
- Regularly Check the Twitch Blog: Stay informed on changes and new features that may benefit your channel.
- Participate in Twitch Town Halls: Attend virtual events where Twitch addresses the community and asks for feedback.
Summary
Staying updated is critical in maintaining compliance and taking advantage of new opportunities, but it requires consistent vigilance.
In conclusion, getting verified on Twitch is a journey that involves creating quality content, building a following, and staying proactive within the community. While it can be quite a challenging path, the credibility, increased visibility, and potential for growth that come with verification make it a worthwhile pursuit. Remember, persistence, engagement, and continual improvement are your best tools on this adventure.
FAQs
Q: How long does it usually take to get verified on Twitch?
A: The time it takes varies greatly depending on the streamer’s ability to meet the Partnership criteria, the growth rate of their channel, and the time it takes Twitch to process applications. There is no set time frame.
Q: Can I reapply for verification if I’m initially rejected?
A: Yes, you can reapply for verification. Twitch recommends waiting at least a few months to improve your channel based on the feedback provided before reapplying.
Q: Does having a large following on other social media platforms help with Twitch verification?
A: While Twitch focuses primarily on your activity and following on their platform, a strong presence or following on other social media platforms can showcase your overall influence and perhaps support your case for verification.


