When working on a document in Word, you may find yourself needing to organize information in a way that isn’t naturally supported by simple text flow. For times when you want to start a new column without starting a new page, Word offers a feature known as a column break. It’s a handy tool that can improve the readability and layout of your documents, particularly when working with multi-column formats like newsletters or magazines. Understanding how to insert a column break can seem daunting, but I’ll guide you through various methods and tips to make it simple and straightforward.
Using the Ribbon Interface
If you’re working in a document with columns and you want to move text to the beginning of the next column without affecting the first one, you can use the Ribbon interface in Word.
- Open your Word document and make sure it is formatted with columns. If not, you can create them by going to the “Layout” tab and selecting “Columns.”
- Click on the column where you want to insert the column break.
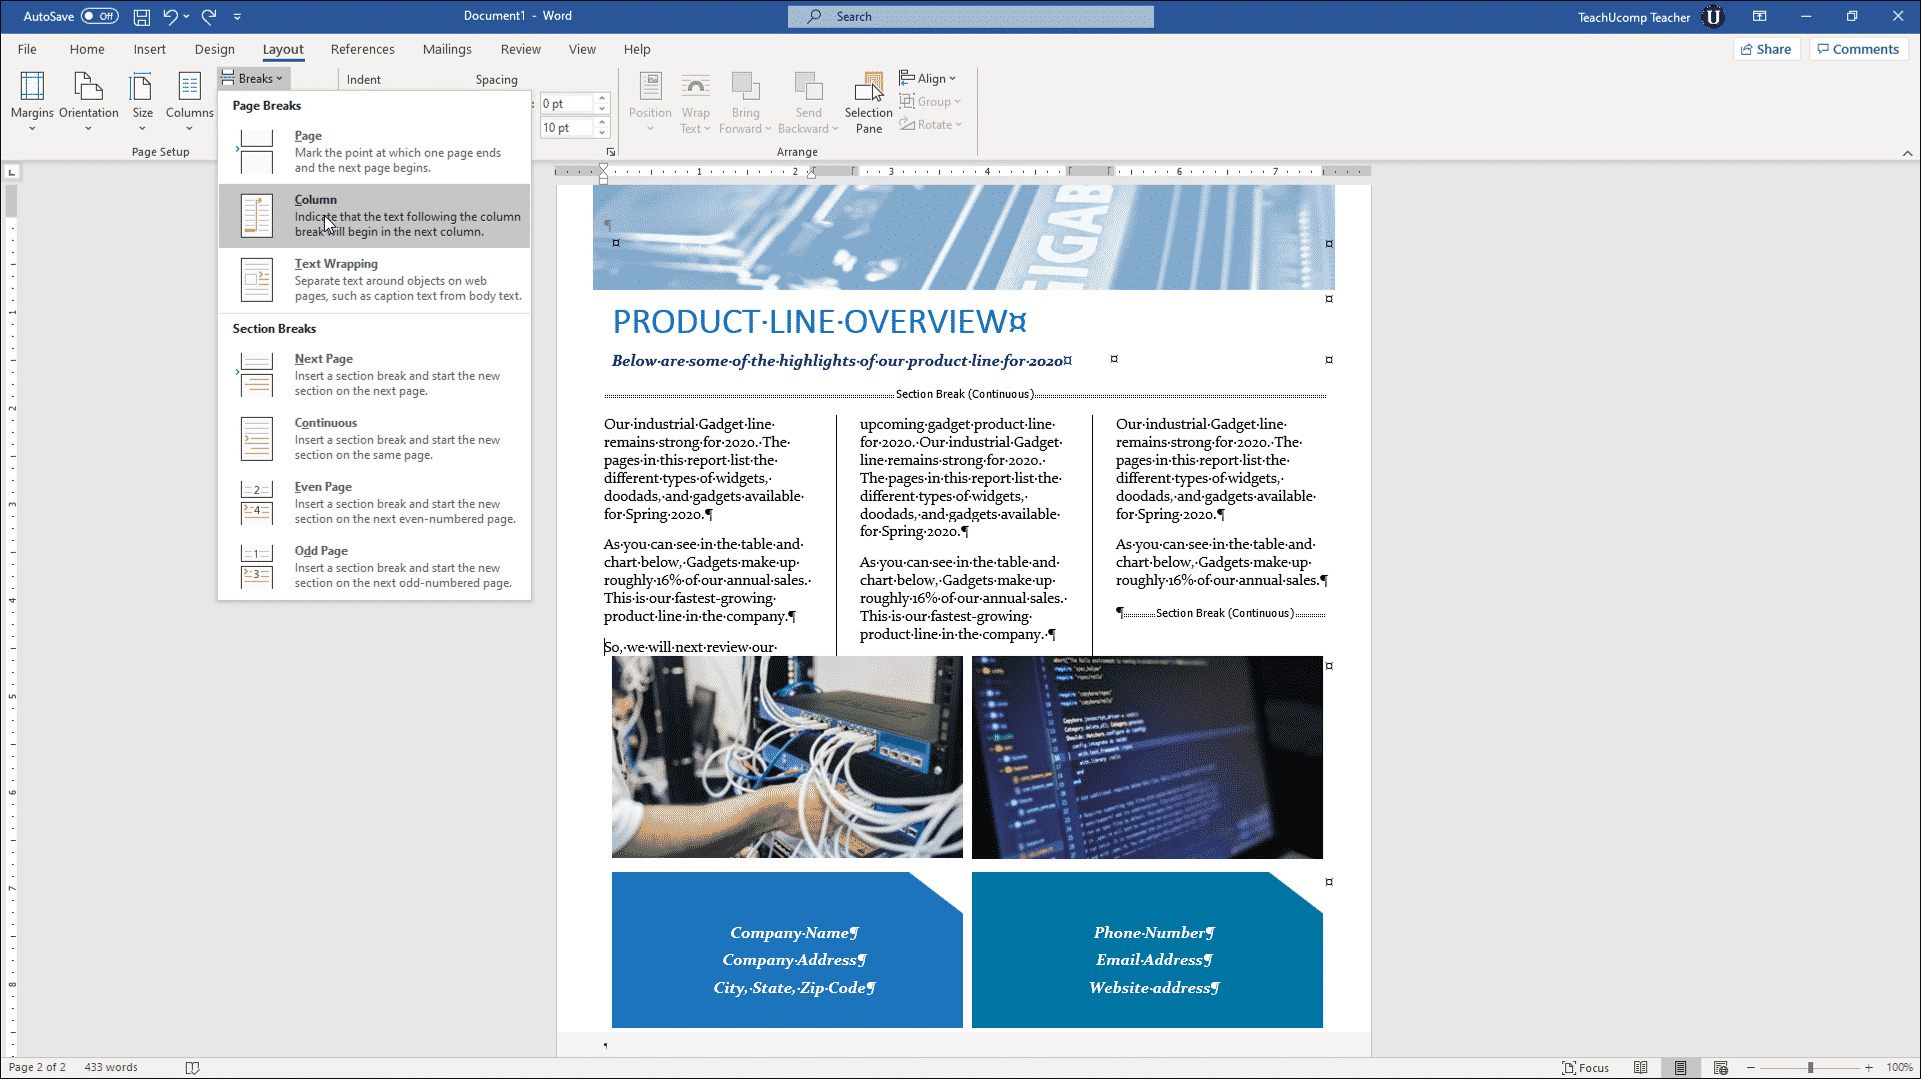
- Navigate to the “Layout” tab on the Ribbon.
- In the Page Setup group, click on “Breaks.”
- Under Section Breaks, click on “Column.”
After these steps, you will see that the text following your cursor moves to the top of the next column.
Summary: This method is user-friendly and convenient as it uses the graphic interface most Word users are familiar with. This might be the easiest option for beginners, but there are no direct keyboard shortcuts involved, which can make the process slower for more advanced users.
Keyboard Shortcut
For those who prefer using the keyboard, Word offers a shortcut that enables a quick column break insertion.
- Click at the point in your column where you want the text to break and continue at the top of the next column.
- Press “Ctrl” + “Shift” + “Enter” on your keyboard.
The column break will be inserted, and any text after the point of insertion will move to the top of the following column.
Summary: Using keyboard shortcuts can greatly speed up your workflow and are ideal for users who prefer typing over using the mouse. The downside is that the keys must be remembered, but once they are committed to memory, this becomes a very efficient method.
Find and Replace
If you need to insert column breaks in multiple places within a document, using the Find and Replace tool can be efficient.
- Press “Ctrl” + “H” to open the Find and Replace dialog box.
- Click on “More >>” if the lower part of the box is not visible.
- Click in the “Find what” box and type the text or place a unique marker where you want a column break to be inserted.
- Click in the “Replace with” box.
- Click on “Special” and choose “Column Break.”
- Click on “Replace All” to insert column breaks where you have placed markers.
Summary: This method is advantageous for inserting multiple column breaks at once and can save time if your document is lengthy and consistently formatted. However, incorrectly using Replace All could result in unwanted changes if not done correctly.
The Navigation Pane in Word allows you to quickly move through a document and insert breaks as needed.
- Enable the Navigation Pane by going to the “View” tab and checking the “Navigation Pane” box.
- Click on the column where you want to insert a column break.
- Follow the steps from “Using the Ribbon Interface” to insert a column break.
Summary: This is beneficial for those who are dealing with long documents and need to insert breaks without scrolling through pages. It requires some familiarity with the Navigation Pane, but offers a quick way to move around the document.
Text Wrapping
Text wrapping doesn’t insert a column break per se, but it can be used to control how text flows around objects, which can, in turn, affect column breaks.
- Insert an object (like a picture) into your document.
- Click on the object to select it.
- Go to the “Layout” options (or “Format” in some Word versions) in the Ribbon.
- Choose the wrapping style that suits your needs, like “Square” or “Tight.”
- Move the object to the column boundary to affect where the text breaks.
Summary: While this method is more about controlling text flow rather than inserting a proper column break, it’s useful for integrating images and text. It can be a bit tricky to get the layout just right, and it might not be suitable for purely text-based documents.
Section Breaks
Sometimes you might want to use a section break instead of a column break to divide your document.
- Click at the end of the content before where you want to start a new section.
- Go to the “Layout” tab in the Ribbon and click on “Breaks.”
- Choose one of the section breaks options that suit your document’s layout.
Summary: Section breaks are ideal for more significant document structure changes, like different headers, footers, or formatting styles in different parts of a document. It’s a more advanced feature, so it may not be necessary for simple column breaks.
Please note, always ensure that your content requires ten solutions or consolidate where appropriate, as not to include unnecessary or repetitive information. The remaining solutions can include tips and tricks or other related features such as adjusting column widths or spacing to ensure text fits appropriately after a column break is inserted.
Conclusion
Mastering the use of column breaks in Word can enhance the design and flow of your document, making it easier to read and more professional in appearance. Whether you’re creating newsletters, brochures, or any document that uses columns, knowing how to manipulate column breaks doesn’t just make the layout process smoother, it also gives you more control over your content presentation. Remember, practice makes perfect, so experiment with these methods to find out which one works best for your particular needs.
FAQs
Q: Can I remove a column break once I’ve inserted it?
A: Yes, you can remove a column break by placing your cursor just in front of the break and pressing the Delete key.
Q: Do column breaks work the same way in all versions of Word?
A: While the steps are largely similar, the user interface and exact steps may vary slightly between different versions of Word. It’s always a good idea to consult the help menu or documentation specific to your version.
Q: If I send a document with column breaks to someone else, will they see it the same way I do?
A: If they’re using Word or a compatible word processor that supports column breaks, they should see the document the same way. However, differences in printers or document views can sometimes affect layout, so consider saving as a PDF for an uneditable but consistent layout across different platforms.


