When working on a Mac, you might find that you need to keep one window visible while juggling between multiple applications. Whether you’re monitoring live stats, keeping chat windows handy, or referencing notes, having the ability to pin a window on top of others can significantly streamline your workflow. Unfortunately, macOS does not natively support this feature, but there are ways to achieve this functionality with a few tweaks and third-party tools. Below, we’ll explore a variety of methods to keep your application window always on top, ensuring you can maintain productivity and ease of use, even if you’re not tech-savvy.
Use Afloat
Afloat is a widely-used third-party tool that can keep your windows on top of all others. It integrates seamlessly with most Mac applications, offering additional window management options such as transparency and pinning.
Detailed introduction
Despite not being directly supported by the latest macOS versions, Afloat can still be a valid solution for keeping windows always on top, especially if you’re running an older version of macOS. It works by adding itself to your window management options in your menu bar.
Detailed steps
- Check that your system is compatible with Afloat, as it is better suited for older macOS versions.
- Install SIMBL (Simplified Input Method Bundle Loader) as it’s required to run Afloat.
- Download the Afloat installer package.
- Follow the installer prompts to integrate Afloat with your system applications.
- Restart your Mac and open the application you want to keep on top.
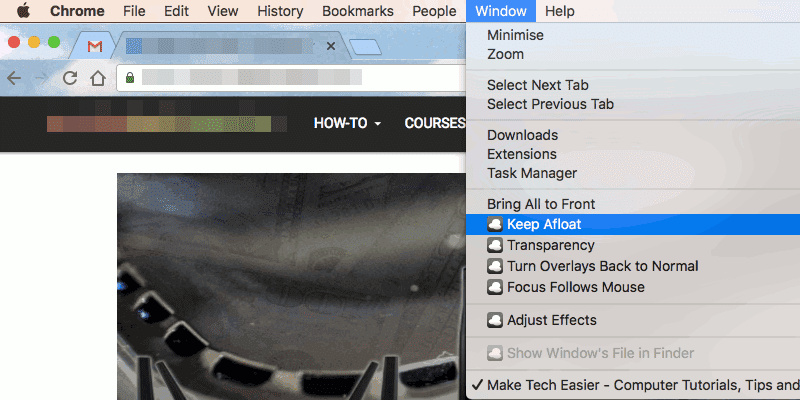
- Click on the application’s name in the menu bar to access the dropdown menu.
- Look for the “Keep Afloat” option and select it to pin your window on top.
Summary
Afloat provides a simple solution for window management, including always-on-top functionality, but may not support the most recent macOS versions, which is a significant downside. For users with compatible systems, it offers a cost-free and robust tool for enhancing multitasking capabilities.
DeskPins Equivalent for Mac
While DeskPins itself is not available for Mac, there are alternatives that mimic its functionality on macOS. These alternatives are third-party tools designed to provide the ‘always on top’ feature through easy-to-use interfaces.
Detailed introduction
For those looking for functionality similar to DeskPins on a Windows PC, various Mac-compatible tools serve as equivalents. These applications allow you to select any window and pin it to the forefront with just a couple of clicks.
Detailed steps
- Search for a DeskPins equivalent for Mac, such as “AfloatX” or “Stay.”
- Choose a software solution that is regularly updated and compatible with your macOS version.
- Download and install the application from its official website or the Mac App Store.
- Open the application and familiarize yourself with its interface.
- Follow specific instructions provided by the app to pin a window to the top.
Summary
DeskPins equivalents for Mac typically offer an intuitive and user-friendly method to keep windows on top, with the capability to work alongside macOS updates. However, they often come with a cost and, being third-party tools, can sometimes cause compatibility issues with system updates or other installed software.
Using Terminal Commands
For more advanced users, Terminal on Mac can be utilized to tweak system behavior, but the complexity and potential risks should be considered.
Detailed introduction
The Terminal in macOS allows you to enter commands to control your system. While it doesn’t have a built-in command for keeping a window always on top, you can script or use commands to install third-party utilities or make adjustments to how windows behave.
Detailed steps
- Open Terminal from your Applications folder or by using Spotlight search.
- Type in a command that will install a utility capable of enabling the always-on-top feature. This would typically involve the use of Homebrew (a package manager for macOS). If you don’t have Homebrew installed, you will need first to install it by typing
/bin/bash -c "$(curl -fsSL https://raw.githubusercontent.com/Homebrew/install/HEAD/install.sh)". - Once Homebrew is installed, you can enter a command like
brew install some-packagewheresome-packageis the name of the utility that offers the ‘always on top’ feature. - Follow any additional instructions provided in the Terminal to enable and use the utility.
Summary
Using Terminal commands provides a powerful, cost-free solution for professionals comfortable with command-line interfaces. However, there is a steeper learning curve, and improper use could potentially disrupt your system. It’s essential to follow steps carefully and understand commands before executing them.
Keyboard Shortcuts with Third-Party Apps
Many third-party applications come with the ability to set keyboard shortcuts for keeping a window always on top.
Detailed introduction
Keyboard shortcuts are an efficient way to manage windows without disrupting your workflow. Some Mac applications allow you to define custom shortcuts to pin windows to the top, making multitasking more effortless and organized.
Detailed steps
- Install a third-party application that supports window management keyboard shortcuts.
- Open the application and navigate to its preferences or settings menu.
- Look for options to manage window behaviors or set shortcuts.
- Define a shortcut key combination that doesn’t conflict with other shortcuts you use.
- Apply the settings and use the shortcut when you want to keep a window on top.
Summary
Keyboard shortcuts add convenience to the task of keeping windows always on top, especially for users who prefer not to interrupt their typing flow. While easy to implement once set up, the initial configuration may take some time, and relying on third-party apps always carries a slight risk of system conflicts.
Accessibility Features
macOS has a range of built-in accessibility features that, while not specifically designed to keep windows on top, can sometimes be leveraged to assist in focusing on a particular window.
Detailed introduction
Accessibility features in macOS provide users with additional support to interact with their computers. Although not intended for window management, some features can help by enabling options that bring focus to active windows or applications.
Detailed steps
- Open System Preferences from the Apple menu.
- Click on “Accessibility.”
- Explore the various settings, such as “Zoom” or “VoiceOver,” to see if they can help in keeping your active window prominent.
- Experiment with various settings to find a combination that brings your required window into main focus.
Summary
Using accessibility features offers a built-in method that doesn’t require additional installations or external applications. However, since these features are not designed for window pinning, the results may not be as expected, and users might need to adapt in unexpected ways.
Custom Window Arrangements
Strategically arranging windows on your screen is a manual way to keep important windows visible.
Detailed introduction
If you often work with a set number of applications, you might find a systematic arrangement of windows on your screen helpful. This manual method requires no additional software and simply leverages the space on your desktop.
Detailed steps
- Open all the applications you need to use.
- Resize and position the windows on your screen so that the most important ones remain visible while you work.
- Make use of the Mission Control feature (by pressing F3 or using a three-finger swipe up on a trackpad) to create additional desktop spaces if needed.
- Arrange desktops in a way that makes it easy to switch between tasks while keeping the primary window in view.
Summary
This no-cost approach is uncomplicated and safe, as it utilizes the operating system’s built-in features. The downside is that it requires manual adjustment and doesn’t truly keep a window “on top” but rather strategically in view.
Hot Corners
Hot Corners are a macOS feature that can help switch between windows and applications quickly, keeping important ones accessible.
Detailed introduction
Mac’s Hot Corners allow you to assign specific actions to each corner of your screen. When you move your mouse to a corner, the action activates, such as showing the desktop or launching Mission Control. This doesn’t pin windows on top but can streamline window management.
Detailed steps
- Open System Preferences and click on “Mission Control.”
- Select “Hot Corners…” at the bottom of the window.
- Choose an action for each corner of your screen that will help you keep important windows ready and accessible.
- Test the corners to ensure they help you in keeping your primary window easy to reach.
Summary
Hot Corners are convenient, allowing quick access to windows without the need for additional software. They won’t keep a window on top, but they can enhance navigation efficiency, reducing the hassle of window management.
Floating Browser Windows
Certain web browsers, like Helium, let you create floating browser windows that always stay on top.
Detailed introduction
If the window you need to keep on top is a web browser window, software like Helium can create floating, always-on-top browser windows. This is great for videos, tutorials, or any web-based content.
Detailed steps
- Download and install a browser like Helium that supports floating windows.
- Open the browser and navigate to the webpage you need to keep on view.
- Use the application’s feature to create a floating window that will remain on top.
Summary
This method is perfect for web content and is especially user-friendly, as it typically works with just a few clicks. The downside is that it’s limited to content that can be accessed through the specific browser application.
Scripting Solutions
Advanced users might opt for scripting solutions, using AppleScript or Automator to create a personalized solution.
Detailed introduction
For those comfortable with a bit of programming, AppleScript and Automator provide a way to automate tasks on your Mac, including setting up scripts to manage window behaviors.
Detailed steps
- Open “Script Editor” or “Automator” from your Applications folder.
- Write or record a script or workflow that includes commands to adjust window levels.
- Test and refine the script to ensure it works smoothly with the windows you want to keep on top.
Summary
Scripting is a highly customizable, cost-free approach and can be a fun project for those interested in programming. The complexity and time investment are significant, however, and it can be intimidating for non-tech-savvy users.
Third-Party Window Management Suites
Comprehensive window management suites like Magnet or Moom go beyond just keeping windows on top and offer a range of organizational tools.
Detailed introduction
Investing in a full suite of window management tools can give you the always-on-top feature along with a host of other functionalities like snapping windows, organizing workspaces, and more.
Detailed steps
- Find and purchase a window management suite that fits your needs.
- Install the suite and go through the tutorial or help section to understand its features.
- Set up the always-on-top feature along with any other window arrangements you prefer.
Summary
While third-party suites offer powerful and versatile tools and often user-friendly interfaces, there is usually a cost involved. Additionally, as with any third-party application, there is a risk of conflicts with other software or updates.
In conclusion, though macOS doesn’t natively support keeping application windows always on top, a variety of methods—from third-party software, feature leveraging, to manual organization—can help fulfill your needs. Each method comes with its benefits and potential downsides, so consider your comfort level with technology, your specific workflow requirements, and whether you’re willing to invest in additional software to find the best solution for you.
Frequently Asked Questions
-
Can I keep a window always on top without installing any third-party software on my Mac?
While macOS doesn’t have a built-in feature for keeping windows on top, you can organize your windows manually or use Hot Corners to improve window accessibility. -
Is there a risk to my computer when using third-party applications to keep windows on top?
There is always a slight risk when using third-party applications, as they can occasionally conflict with other software or system updates. Be sure to download apps from reputable sources and verify compatibility with your version of macOS. -
Will these methods work with any application on my Mac?
Most third-party window management tools and methods described will work with standard Mac applications. However, there can be exceptions, particularly with full-screen apps or those that have custom interfaces.