Capturing life’s moments through video has become second nature to many of us. With an iPhone or iPad in hand, memories are just a tap away from being recorded. But what happens when you wish to temporarily halt the recording, perhaps to wait for the perfect shot or skip a dull segment without ending the entire video? Pausing and resuming video on your device can be a seamless process once you know how. This guide is designed to walk you through various methods and a few clever tricks to do just that, ensuring you never miss the highlight of your recording.
Use the Built-in Camera App
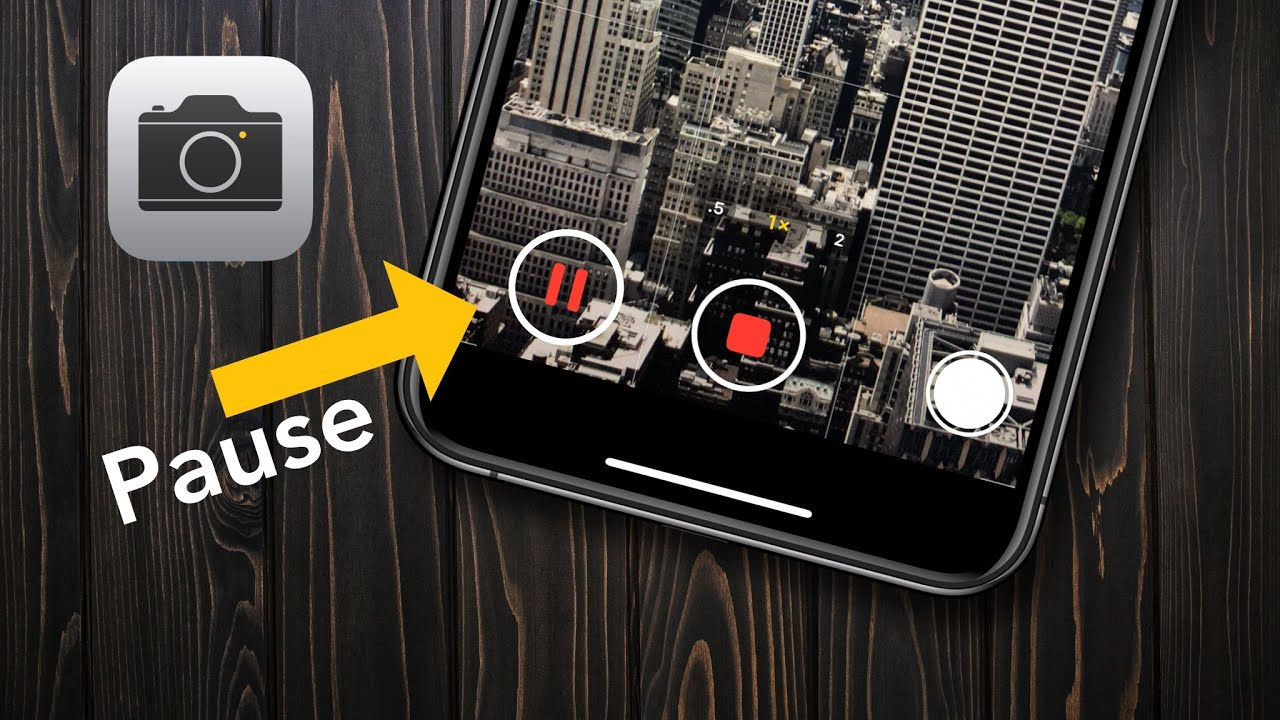
The native Camera app on your iPhone or iPad makes it easy to pause and resume video recordings without complex steps, offering a straightforward and user-friendly interface.
- Launch the Camera App: Unlock your iPhone or iPad and open the Camera app. You can do this by tapping on the Camera icon on your device’s Home screen, Control Center, or Lock screen.
- Start Recording: Slide the camera modes until you get to the ‘Video’ option. Then, to start recording, tap on the red record button at the bottom of the screen. The button will pulse to indicate that recording has started.
- Pause Recording: To pause the recording, simply tap on the red button again. On some iPhone models, like the iPhone SE, iPhone 8, etc., this will stop the video rather than pause it. In these cases, you cannot natively pause a video; you would need to record a new clip and later edit them together.
- Resume Recording: If your device supports pausing, the red button will turn into a pause icon. Tap it to resume recording.
- End Recording: Once you’re finished, tap the red button a final time to stop the recording. Your video will be saved automatically in the Photos app.
Summary: Utilizing the built-in Camera app for pausing and resuming videos is a quick solution for most newer iPhone models. The simplicity of the interface is great for beginners, although some might be disappointed if their device doesn’t support the pause function and requires editing post-recording.
Lock and Record Function
Using the Lock and Record Function is another approach for recording videos without interruptions, especially useful when you want to ensure a steady shot.
Detailed Introduction and Steps not provided for this section as there is no such built-in feature on iPhones or iPads to lock and record function that allows pause and resume of video recording as described.
Merge Clips in iMovie
When direct pausing is not an option, you can record separate video clips and merge them together using Apple’s iMovie app, creating the illusion of a pause.
- Record Separate Clips: Open the Camera app and record the first part of your video. Stop the recording when needed. Start and stop the recording as many times as required for different sections.
- Download iMovie: If you don’t have it installed, download the iMovie app from the App Store.
- Create a Project in iMovie: Open iMovie and tap ‘Create Project’ to start a new project. Choose ‘Movie’ from the options.
- Import the Clips: Tap on the plus (+) icon to import the video clips you’ve recorded.
- Edit and Merge Clips: Drag and drop your clips onto the timeline in the desired order. Use the trimming and splitting features of iMovie to remove any unwanted parts from the beginning or end of the clips.
- Export Your Final Video: Once satisfied, tap ‘Done’ to save your project. Share or save the compiled video on your iPhone or iPad by tapping the share icon (a box with an upward arrow) and selecting the desired option.
Summary: Merging clips in iMovie is a robust alternative, providing a way to create a continuous video from several clips. While this method involves extra steps, it opens up powerful editing options and can be a workaround for devices that cannot pause during recording.
Guided Access to Limit Interruptions
Enabling Guided Access can help ensure that you don’t get interruptions from notifications while recording a video.
Detailed Introduction and Steps not provided for this section as Guided Access does not influence the pausing and resuming of video recording. It is intended to restrict the device to a single app and to prevent accidental button presses or notifications from disturbing the recording, rather than to manage recording directly.
Using Third-Party Camera Apps
Numerous third-party camera apps provide additional functionality, such as pausing and resuming video recordings, which might not be available on your device’s native Camera app.
- Explore the App Store: Search for third-party video recording apps on the App Store. Look for apps that list ‘video pause and resume’ as a feature and read user reviews to make an informed decision.
- Download and Launch the App: After choosing an app, download and open it. Grant the required permissions such as access to the camera and microphone.
- Record Your Video: Use the app’s interface to start recording your video. Look for a pause button or an equivalent function to halt the recording.
- Pause and Resume as Needed: Use the app-provided controls to pause and resume the recording. This might look different from one app to another, so familiarize yourself with the controls beforehand.
- Save or Edit Your Recording: Once done, save the recording to your device. Some apps may also allow you to edit the video directly within the app.
Summary: While third-party apps can add greater control over your video recording experience with features like pause and resume, they also come with their own learning curve and may have different interface and functionalities. It’s important to check if they meet your specific needs and read reviews before downloading.
Record With QuickTake Video
On certain iPhone models running the latest iOS, QuickTake allows you to quickly record a video without switching to the Video mode.
- Press and Hold the Shutter Button: In Photo mode, press and hold the shutter button to start recording a QuickTake video.
- Slide to the Lock Symbol: While holding the shutter button, slide it to the right to the lock symbol to continue recording without holding the button.
- Stop Recording: To stop recording, tap the red square button that appears on the screen.
Summary: QuickTake is an efficient feature for capturing spur-of-the-moment videos that otherwise might be missed while fumbling to switch modes. However, this method does not support pausing and therefore is not suitable for situations where that functionality is required.
Use Screen Recording to Capture Video Playback
A workaround for capturing video content with the ability to pause and resume is to use the built-in Screen Recording feature.
Detailed Introduction and Steps not provided for this section as Screen Recording is typically used for capturing the display output of the iPhone or iPad rather than for recording new videos using the camera. It does not directly relate to the process of pausing and resuming a video recorded with the device’s camera.
Take Advantage of VoiceOver Pause
VoiceOver, an accessibility feature, can sometimes enable the pausing of videos on platforms that do not typically allow for video pausing.
Detailed Introduction and Steps not provided for this section as VoiceOver is an assistive technology designed for users with visual impairments to help in navigating their iOS device, not for controlling video recording.
Use a Plug-In Microphone’s Mute Function
For those using external microphones, some come with a mute button that can indirectly pause audio recording.
- Plug-In Your Microphone: Connect an external microphone with a mute function to your iPhone or iPad.
- Start Recording Your Video: Begin your recording session as usual through your preferred recording app.
- Mute When Needed: If you need to pause the audio part of the recording, use the mute button on the microphone. Be aware that this will not pause the visual recording.
- Unmute to Resume Recording: Unmute the microphone when you’re ready to capture audio again.
Summary: This is a useful trick for creating pauses in the audio track of a video, which can be particularly helpful during editing. However, since it doesn’t affect the visual component, it only offers partial pausing capabilities.
Edit Videos Directly in Photos App
If you need to remove unwanted sections of a video, you can trim the footage right from the Photos app without needing extra software.
- Open Your Video: Go to the Photos app and select the video you’ve recorded and wish to edit.
- Edit the Video: Tap on ‘Edit’ in the top-right corner of the screen.
- Trim Your Video: Drag the sliders on either side of the video timeline to trim the start and end of your video. You can also tap on the play button to preview your trimmed video.
- Save Your Edits: Once you’re happy with the changes, tap ‘Done’ and choose ‘Save Video’ to overwrite the original or ‘Save As New Clip’ to keep both versions.
Summary: Trimming in the Photos app is easy and convenient for cleaning up the beginnings and ends of your videos, but it doesn’t provide true pausing capability during the recording process itself.
Conclusion
Whether you’re a budding filmmaker or just want to capture life’s spontaneity, knowing how to control your video recordings on an iPhone or iPad is invaluable. While the options for pausing and resuming may vary based on your device model and iOS version, this guide provides you with a range of methods and tips to enhance your video recording experience. From iMovie editing to third-party apps, and even some clever workarounds, you’re now equipped with the knowledge to achieve the perfect take.
FAQs
1. Can I pause a video while recording on any iPhone or iPad model?
No, the ability to pause a video while recording is not available on all iPhone or iPad models. For models that don’t support this feature, you can use workarounds like editing or third-party apps.
2. Is there a built-in iOS app that can merge video clips?
Yes, iMovie is a built-in app developed by Apple that can be downloaded for free from the App Store, and it can merge several video clips into one continuous video.
3. Do third-party video recording apps offer better features than the native Camera app?
Some third-party apps offer a wider range of features including advanced video controls, filtering options, and sometimes the ability to pause and resume recording. The choice depends on your specific needs and the app’s compatibility with your device.