Recording audio directly from your computer can be invaluable for a variety of reasons, from creating a podcast to providing a voiceover for a presentation. If you have a Mac, you’re in luck, as QuickTime Player—a free application that comes with MacOS—can do just that. While it may seem intimidating, QuickTime Player is user-friendly, and capturing system audio is straightforward once you understand the process. Let’s simplify the workflow and get you set up to record your system audio with ease.
Using Soundflower with QuickTime
Soundflower is a free third-party application that allows you to route audio between applications on a Mac, effectively enabling you to record system audio using QuickTime, which doesn’t support this feature directly.
Detailed Introduction
Since QuickTime Player doesn’t capture system audio natively, using an intermediary audio routing software like Soundflower can bridge this gap. Soundflower acts as a virtual audio device, channeling the sound from your system into QuickTime, just like a microphone would channel your voice.
Detailed Steps
- Download and Install Soundflower: Head over to the Soundflower GitHub release page, download the latest version, and follow the prompts to install it on your computer.
- Configure Audio Output: Go to ‘System Preferences’, select ‘Sound’, click on the ‘Output’ tab, and choose Soundflower (2ch) as your output device. This sends your system sounds to Soundflower.
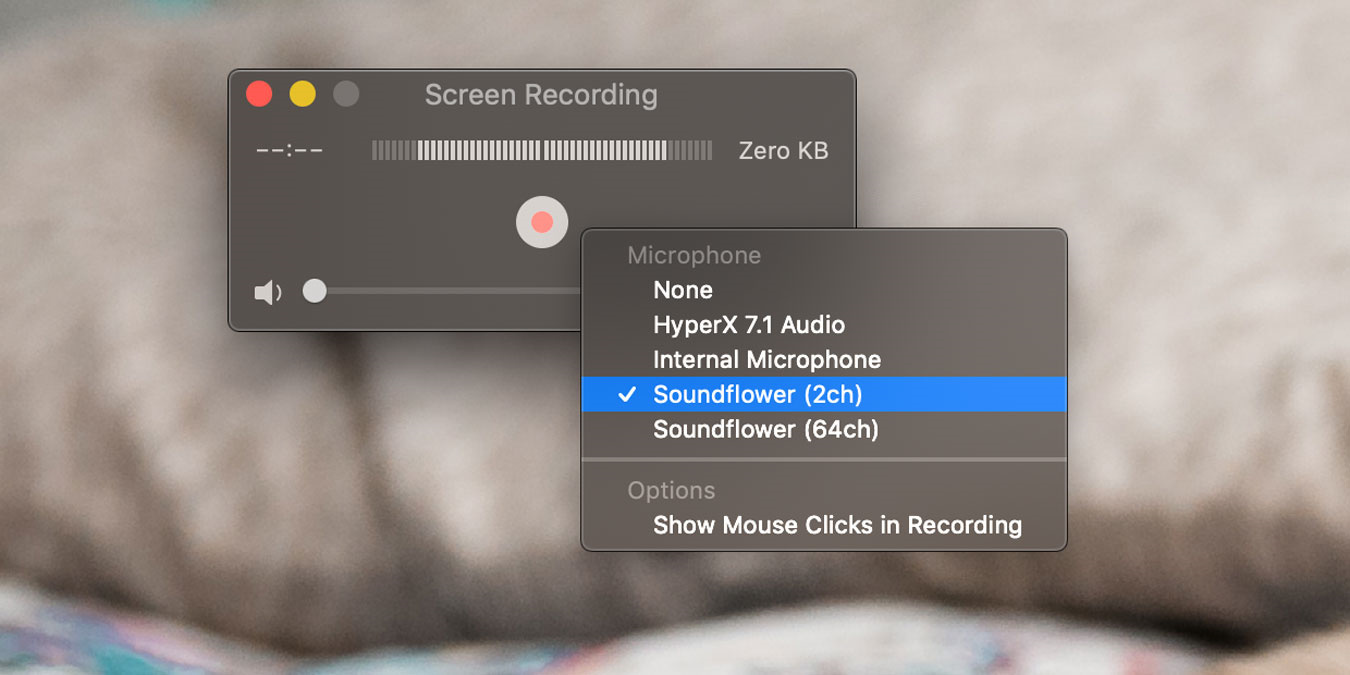
- Set Up QuickTime Recording: Open QuickTime Player, go to ‘File’, and select ‘New Screen Recording’. Click the arrow next to the record button and select Soundflower (2ch) as the microphone.
- Record Your Audio: Hit the record button when you’re ready, and carry out the actions that involve the audio you want to record. When done, hit the stop button.
- Restore Original Sound Settings: Remember to go back to ‘Sound’ settings and change the output back to your original speaker or headphones.
Summary
Soundflower extends QuickTime Player’s capabilities, allowing you to record the system’s audio indirectly. It’s an effective if somewhat technical solution. The downside could be the additional step to install third-party software, and the initial setup may be a bit complex for novice users.
Using BlackHole with QuickTime
BlackHole is another virtual audio driver that functions similarly to Soundflower.
Detailed Introduction
BlackHole is a modern alternative to Soundflower, offering virtual audio routing without the need for additional interfaces or installations. It supports 16 and 64-channel versions for more complex audio setups.
Detailed Steps
- Download and Install BlackHole: Visit the BlackHole GitHub page or website, download the installer, and run it on your Mac.
- Configure Mac’s Audio Settings: In ‘System Preferences’ under ‘Sound’, set BlackHole as both the input and output device.
- Prepare QuickTime for Recording: Open QuickTime Player, select ‘New Screen Recording’, and in the options menu, choose BlackHole as the microphone source.
- Begin the Recording: Press the record button, perform the tasks that produce the audio you want to capture, and click stop when completed.
- Revert Sound Settings: When finished recording, go back to your sound preferences and switch your input and output devices back to their original settings.
Summary
BlackHole provides a streamlined solution for capturing system audio through QuickTime. The tool is free and straightforward once set up. However, it can be daunting for those unfamiliar with audio routing, and some users might prefer a solution that doesn’t require altering system settings.
Adjusting QuickTime Preferences
While QuickTime does not have native preference adjustments for recording system audio, ensuring your preferences are correctly set is crucial.
Detailed Introduction
Ensuring your QuickTime preferences are configured appropriately is key to efficient operation, although it won’t allow you to record system audio without a virtual audio device.
Detailed Steps
- Access QuickTime Preferences: Open QuickTime Player, then go to ‘QuickTime Player’ in the menu bar, and select ‘Preferences’.
- Review Preferences: Check the preferences to familiarize yourself with QuickTime’s options, though none will directly affect system audio capture.
- Prepare for Indirect System Audio Capture: Even without direct settings, knowing your way around QuickTime’s preferences will be helpful for troubleshooting any issues.
Summary
While adjusting QuickTime’s preferences won’t provide a direct path to recording system audio, it does lay the foundation for smooth operation in conjunction with virtual audio drivers like Soundflower or BlackHole. There are no direct benefits in terms of system audio, but understanding these settings can improve overall user experience.
Loopback Audio Method
Loopback by Rogue Amoeba is a more robust alternative for routing audio on Mac, offering a graphical interface and additional features.
Detailed Introduction
Loopback is a premium virtual audio routing application that provides a more user-friendly interface and advanced settings for routing system audio. Unlike free solutions, it offers a more polished experience and customer support but at a cost.
Detailed Steps
- Download and Install Loopback: Go to the Rogue Amoeba website, download the app, and proceed with the installation.
- Create a New Virtual Device: Open Loopback and create a new virtual device. Add your desired sources to route the system audio through the device.
- Configure QuickTime: Open QuickTime Player, start a ‘New Screen Recording’, click on the options arrow, and select your new Loopback device as the audio source.
- Start Recording: Hit the record button, execute the tasks that generate the desired system audio, and click stop when done.
- Returning to Normal Settings: Change your settings back to default in both Loopback and ‘System Preferences’.
Summary
Loopback presents a powerful solution for routing audio, with a clear interface and robust functionality. The main downside is the cost of the software after the free trial ends, making it less ideal for occasional users with budget constraints.
Audio MIDI Setup
Using the Audio MIDI Setup utility on macOS, you can create a multi-output device to route system audio to both your speakers and a virtual audio device like BlackHole.
Detailed Introduction
The Audio MIDI Setup utility is included with macOS and allows users to configure audio devices and settings. Creating a multi-output device lets you hear the system audio while you’re recording it, which isn’t possible with the previously mentioned virtual audio devices alone.
Detailed Steps
- Open Audio MIDI Setup: Search for this utility in Spotlight and open it.
- Create a Multi-Output Device: Click the ‘+’ in the bottom left corner and select ‘Create Multi-Output Device’. Choose your speaker or headphones and the virtual audio device as outputs.
- Adjust QuickTime Settings: Set up a screen recording in QuickTime Player with your virtual audio device as the microphone.
- Record and Monitor System Audio: Start recording. You’ll be able to listen to the system audio live while it’s being recorded.
- Reset Audio Settings After Recording: Once done, head back to the Audio MIDI Setup to disable the multi-output device or switch back to your original output device.
Summary
Using Audio MIDI Setup offers the additional convenience of monitoring audio in real-time. The main financial benefit is that it eliminates the need for a paid solution. However, the setup process may be complex for users unfamiliar with audio configuration tools.
Using iShowU Audio Capture
iShowU Audio Capture is a free macOS extension enabling system audio recording capabilities.
Detailed Introduction
This is another method to capture the system audio by installing an extension that works similarly to Soundflower and BlackHole. It’s tailored to work with applications specifically designed to capture or stream your screen and audio.
Detailed Steps
- Download and Install iShowU Audio Capture: Get the installer from the official website and follow the instructions.
- Follow Configuration Steps: You’ll need to set up an aggregate audio device within the Audio MIDI Setup which includes the iShowU extension and your regular output device.
- Set Up QuickTime: Choose ‘New Screen Recording’, then select the aggregate audio device as your microphone source.
- Start and End Your Recording: Capture your screen and system audio, and remember to switch your audio settings back when done.
Summary
iShowU Audio Capture is another free alternative for system audio recording, but users must navigate a series of setup steps, which could be a barrier for tech novices or those who prefer a plug-and-play method.
Using a Paid Screen Recording Tool
Investing in a paid screen recording tool can simplify the process of capturing audio and video significantly.
Detailed Introduction
If the free methods are too complex or if you frequently need to record screen and system audio, a paid application could be a worthwhile investment. Paid tools often simplify the process, combining screen recording and system audio capture in a single user-friendly interface.
Detailed Steps
- Research and Choose a Paid Recording Tool: Find a reputable screen recording tool that matches your needs and budget, and install it.
- Set Up Your Recording: These applications typically come with easy-to-follow instructions for setting up both screen and audio recording.
- Record Your Content: Use the application to record your screen and system audio. These tools often have the functionality to start and stop recording as needed.
- Edit and Save Your Recording: Many of these applications include editing features so you can polish your recording before saving or sharing it.
Summary
Investing in a professional screen recording tool can eliminate the hassle associated with free methods, offering a more integrated and user-friendly solution. The downside is the cost, especially for occasional users.
Use Audio Hijack
Audio Hijack is a professional-grade application to route and record audio from any application, including system audio, on a Mac.
Detailed Introduction
Developed by Rogue Amoeba, the same company that makes Loopback, Audio Hijack provides extensive control over the audio sources and includes recording features, as well as effects and audio processing options.
Detailed Steps
- Purchase and Install Audio Hijack: Visit the Rogue Amoeba website, purchase Audio Hijack, and install it on your Mac.
- Configure Audio Hijack: Set up a session within Audio Hijack to capture the audio from specific applications or the entire system.
- Use QuickTime for Video Only: Open QuickTime Player and use only the screen recording feature without audio since Audio Hijack is handling the audio part.
- Combine Audio and Video: After recording, you may need to sync and combine the audio captured by Audio Hijack with the video recorded by QuickTime during the editing process.
Summary
Audio Hijack is a powerful tool for professionals who require advanced audio routing and recording capabilities. While it’s a paid application, its extensive features justify the cost. The complexity of syncing audio and video may be a downside for some users.
Using OBS Studio
OBS Studio is a free and open-source software for video recording and live streaming, equipped with features to capture both screen and system audio.
Detailed Introduction
OBS Studio is popular among streamers and for creating screencasts. It allows for multiple audio and video sources, including system audio, and is highly customizable, which can be a great advantage for producing high-quality recordings without additional cost.
Detailed Steps
- Download and Install OBS Studio: Navigate to the OBS Studio website, grab the macOS version, and run the installer.
- Set Up Your Sources: In OBS Studio, add a new ‘Display Capture’ for video and ‘Audio Output Capture’ for your system audio.
- Configure and Record: Adjust the recording settings to your preference and start recording. OBS Studio will capture both screen and system audio simultaneously.
- Save Your Recording: Stop the recording when finished, and OBS Studio will save the video file with the audio embedded.
Summary
OBS Studio offers a free way to record system audio and video in one package, ideal for users who need a versatile recording solution without the expense. The possible downside is the initial learning curve to navigate its comprehensive features.
Capture Using Audio Interface
Some users may opt to use a physical audio interface to route and record system audio, though this method is not common for casual users.
Detailed Introduction
This can involve complex setups where the audio output is sent to an audio interface, then routed back into the computer as an input. This method might be used in professional recording scenarios but is generally overkill for someone just looking to capture system audio for simple tasks.
Detailed Steps
- Connect Your Audio Interface: Plug the interface into your Mac via USB or Thunderbolt.
- Configure The Routing: Route the Mac’s audio output into the interface, then back into the Mac as an input.
- Record with QuickTime: Select ‘New Audio Recording’ in QuickTime, and choose the interface as your input source.
- Monitor and End Recording: Keep an eye on levels to avoid clipping and end the recording when necessary.
- Restore Original Settings: Switch your sound output back to your default device once recording is complete.
Summary
Using a dedicated audio interface guarantees high-quality recordings and may be necessary for professional needs. However, it comes with added expense and complexity, and for most users looking to record system audio for less demanding purposes, virtual audio solutions are a more practical choice.
Conclusion
Recording system audio with QuickTime on a Mac requires a few steps and, in some cases, additional software because the application does not capture system audio natively. However, with the right tools and a bit of setup, you can record anything from tutorials to webinars with professional results. Whether you choose a free virtual audio routing solution or invest in paid software, each method has its strengths suited to varying user needs and technical confidence levels.
FAQs
Can QuickTime Player record system audio on its own?
No, QuickTime Player cannot record system audio by itself. You need to use a virtual audio device like Soundflower, BlackHole, or iShowU Audio Capture to route the audio into QuickTime.
Is it legal to record system audio with QuickTime Player?
While it is technically possible to record system audio with QuickTime using third-party tools, you must ensure that you have the right to record the audio content you are capturing, as there may be copyright or usage restrictions.
Are there any free ways to record system audio on a Mac?
Yes, there are free ways, such as using third-party virtual audio routing software like BlackHole or OBS Studio, which also provides screen recording functionality.