Ubuntu, a popular Linux distribution, is widely appreciated for its ease of use and robust software management. One key feature is the ability to add and remove software repositories—sources from which programs are installed and updated. Sometimes, to keep your system organized or to address a problem, you may need to remove these repositories. This process is akin to updating your contacts list: occasionally, you have to delete outdated or unnecessary numbers. Here, we’ll guide you through various methods, ensuring you can clean up your software sources confidently, regardless of technical expertise.

Using Software & Updates Utility
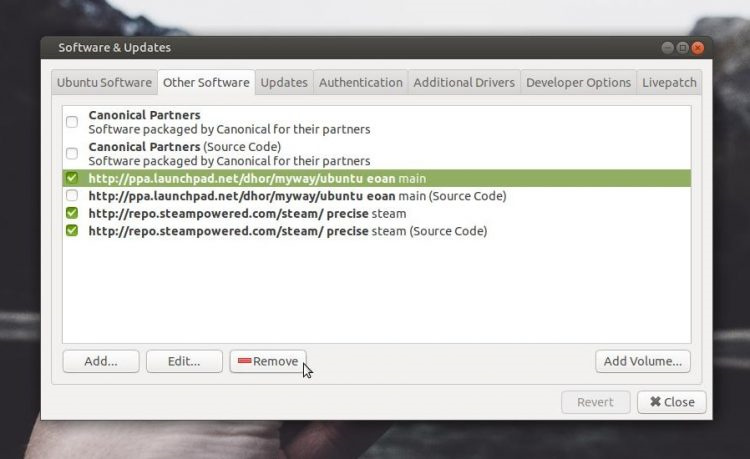
The Software & Updates utility in Ubuntu provides an easy-to-use interface for managing your repositories. This tool is akin to a control panel, designed specifically for handling software sources.
-
Open the Software & Updates Utility:
- Click on “Activities” and type “Software & Updates.”
- Click on the icon to open the program.
-
Navigate to the ‘Other Software’ Tab:
- You’ll see several tabs—click on “Other Software.”
-
Remove a Repository:
- From the list, find the repository you wish to remove.
- Untick the checkbox to disable or click on the repository and then hit the “Remove” button to delete it.
-
Authenticate the Changes:
- Enter your password if prompted to authenticate the changes.
-
Update the Package Lists:
- Close the Software & Updates tool. This should prompt an update to your package lists. If it doesn’t, open a terminal and type
sudo apt update.
- Close the Software & Updates tool. This should prompt an update to your package lists. If it doesn’t, open a terminal and type
Summary
By using the Software & Updates utility, you’ve managed to remove unneeded repositories through a graphical interface seamlessly, without messing with command lines. This is generally safe, but be aware that removing certain repositories might lead to some software not receiving updates.
Editing Repositories Using Terminal
For those comfortable with the command line, the terminal offers a direct way to manage repositories. This is like texting via a command prompt; you type specific commands to tell the system what to do.
-
Open Terminal:
- Use the shortcut Ctrl+Alt+T or search for it in the “Activities” search bar.
-
View Repository List:
- Enter
grep ^ /etc/apt/sources.list /etc/apt/sources.list.d/*to see a list of the repositories.
- Enter
-
Identify the Repository File:
- Locate the desired repository—it will typically be in the format
deb [options] url suite component.
- Locate the desired repository—it will typically be in the format
-
Edit the Sources List:
- Use a text editor like nano with the command
sudo nano /etc/apt/sources.listorsudo nano /etc/apt/sources.list.d/repository.listreplacingrepository.listwith the actual filename.
- Use a text editor like nano with the command
-
Remove the Repository Lines:
- Find the lines corresponding to the repository and either comment them out by adding
#before each line or delete them entirely.
- Find the lines corresponding to the repository and either comment them out by adding
-
Save and Exit:
- Press Ctrl+X to exit, confirm the changes by pressing Y, and then Enter to save and close the editor.
-
Update Package Lists:
- Run
sudo apt updateto apply the changes.
- Run
Summary
Editing via terminal might seem daunting, but it offers precise control over your repositories. Though mistakes in command syntax could lead to issues, careful following of instructions will keep you on the right track.
Removing PPAs with add-apt-repository
PPAs, or Personal Package Archives, are repositories used to distribute software not included in the official Ubuntu repositories. You can remove a PPA through the terminal using a simple command.
-
Open Terminal:
- Like before, use Ctrl+Alt+T or search for it.
-
Remove the PPA:
- Use the command
sudo add-apt-repository --remove ppa:example/ppa, substitutingexample/ppawith the PPA name you wish to remove.
- Use the command
-
Update Package Lists:
- Run
sudo apt updateto refresh your package list.
- Run
Summary
Using the add-apt-repository command provides a straightforward way to remove PPAs. While this method is usually error-free, one must ensure the correct PPA name is provided to avoid unintentional deletions.
Purging PPAs using ppa-purge
Sometimes, simply removing a PPA may leave behind previously installed packages. To remove a PPA and revert to official packages, ppa-purge is a powerful tool.
-
Install ppa-purge if Necessary:
- Open Terminal and enter
sudo apt install ppa-purge.
- Open Terminal and enter
-
Purge the PPA:
- Run
sudo ppa-purge ppa:example/ppa, again replacingexample/ppawith the PPA to be purged.
- Run
-
Follow On-Screen Instructions:
- The program might prompt you for confirmations; follow these accordingly.
Summary
ppa-purge helps in not only removing the repository but also in downgrading packages to their original versions. This might take some time, and improper use could cause system instability, so proceed with caution.
Using Synaptic Package Manager
Synaptic is a more powerful and detailed alternative to the Software & Updates utility for managing software. However, it does not come pre-installed.
-
Install Synaptic Package Manager:
- In Terminal, run
sudo apt install synaptic.
- In Terminal, run
-
Open Synaptic Package Manager:
- You can open it from your applications menu.
-
Manage Repositories:
- In Synaptic, go to “Settings” and then “Repositories” to find and manage your software sources.
-
Reload Package Information:
- After any changes, click the “Reload” button to update package information.
Summary
Synaptic provides a detailed and fine-grained control over software repositories, but its complexity might be overwhelming for new users. The power it provides also means one small mistake can lead to issues, so it should be used with care.
Disabling Repositories from the List File
Sometimes, you might want to temporarily disable a repository without removing it entirely.
-
Open Terminal:
- Use the shortcut or search option.
-
Edit the Sources List:
- Enter
sudo nano /etc/apt/sources.list.
- Enter
-
Disable Repository:
- Find the repository lines and add a
#at the beginning to comment them out.
- Find the repository lines and add a
-
Save and Exit:
- Use Ctrl+X, then Y, and Enter to save.
-
Update Package Lists:
- Run
sudo apt update.
- Run
Summary
Disabling repositories is reversible and less drastic than full removal, ideal if you might want to enable the repository again in the future. However, forgetting to re-enable could lead to missed updates in the long term.
Tips for Managing Repositories
Beyond removal, it’s vital to keep software sources well-managed.
-
Regular Audits:
Perform periodic checks to ensure all repositories are necessary and trustworthy. -
Backup Sources List:
Before making changes, backup the sources.list file usingsudo cp /etc/apt/sources.list /etc/apt/sources.list.backup. -
Use Official Sources:
To ensure security and reliability, prioritize official and well-known repositories.
Summary
Following these best practices can enhance the safety and efficiency of your system by avoiding unnecessary risks and clutter.
Conclusion
Managing software repositories on Ubuntu is like caring for a garden; regular pruning ensures everything runs smoothly, and your system stays secure. Depending on your comfort level, you can utilize graphical tools or dive into the command line, but either way, a careful approach is crucial to prevent potential pitfalls. By following these step-by-step instructions, even those with no technical background can keep their system’s sources in check.
Frequently Asked Questions
Q: Will removing a repository delete the software I installed from it?
A: No, removing a repository does not delete the software already installed, but it will prevent future updates for that software.
Q: How can I find out the names of installed PPAs?
A: Open a terminal and run grep ^ /etc/apt/sources.list /etc/apt/sources.list.d/* to list all the active PPAs.
Q: Is it safe to remove repositories?
A: Generally, yes, but make sure you are not removing repositories that are essential for system updates, like the official Ubuntu repositories.


