Restoring your computer to a previous state can feel like traveling back in time. Fortunately, if you’re a Mac user, you have a built-in safety net called Time Machine. It’s like a time capsule, preserving your files, applications, and system settings at various points. If things go awry—be it accidental file deletion or a more serious system issue—Time Machine can help you turn back the clock and retrieve your lost data. Now, let’s explore the ways you can harness Time Machine to put things right again.
Using Time Machine Recovery
If your Mac encounters serious issues such as system failures or corrupt files, restoring your system through Time Machine’s Recovery is a dependable method. This feature can take your entire system back to a healthier state from before the problems occurred.
- Start your Mac and immediately hold down Command () and R keys to access macOS Recovery mode. Release the keys once you see the Apple logo or spinning globe.
- Choose ‘Restore From Time Machine Backup’ and click ‘Continue’.
- Read the info on the ‘Restore Your System’ page and select ‘Continue’ again.
- Select your Time Machine backup disk when prompted.
- Choose the backup you wish to restore from—usually, you would select the most recent backup before the trouble started.
- Click ‘Continue’ and wait. Your Mac will begin restoring from the chosen Time Machine backup and restart once finished.
Summary:
Restoring through the Recovery mode reinstates everything on your Mac to the selected backup’s state. This can be especially useful after a major mishap. A downside is that any files created or changes made after that backup will be lost.
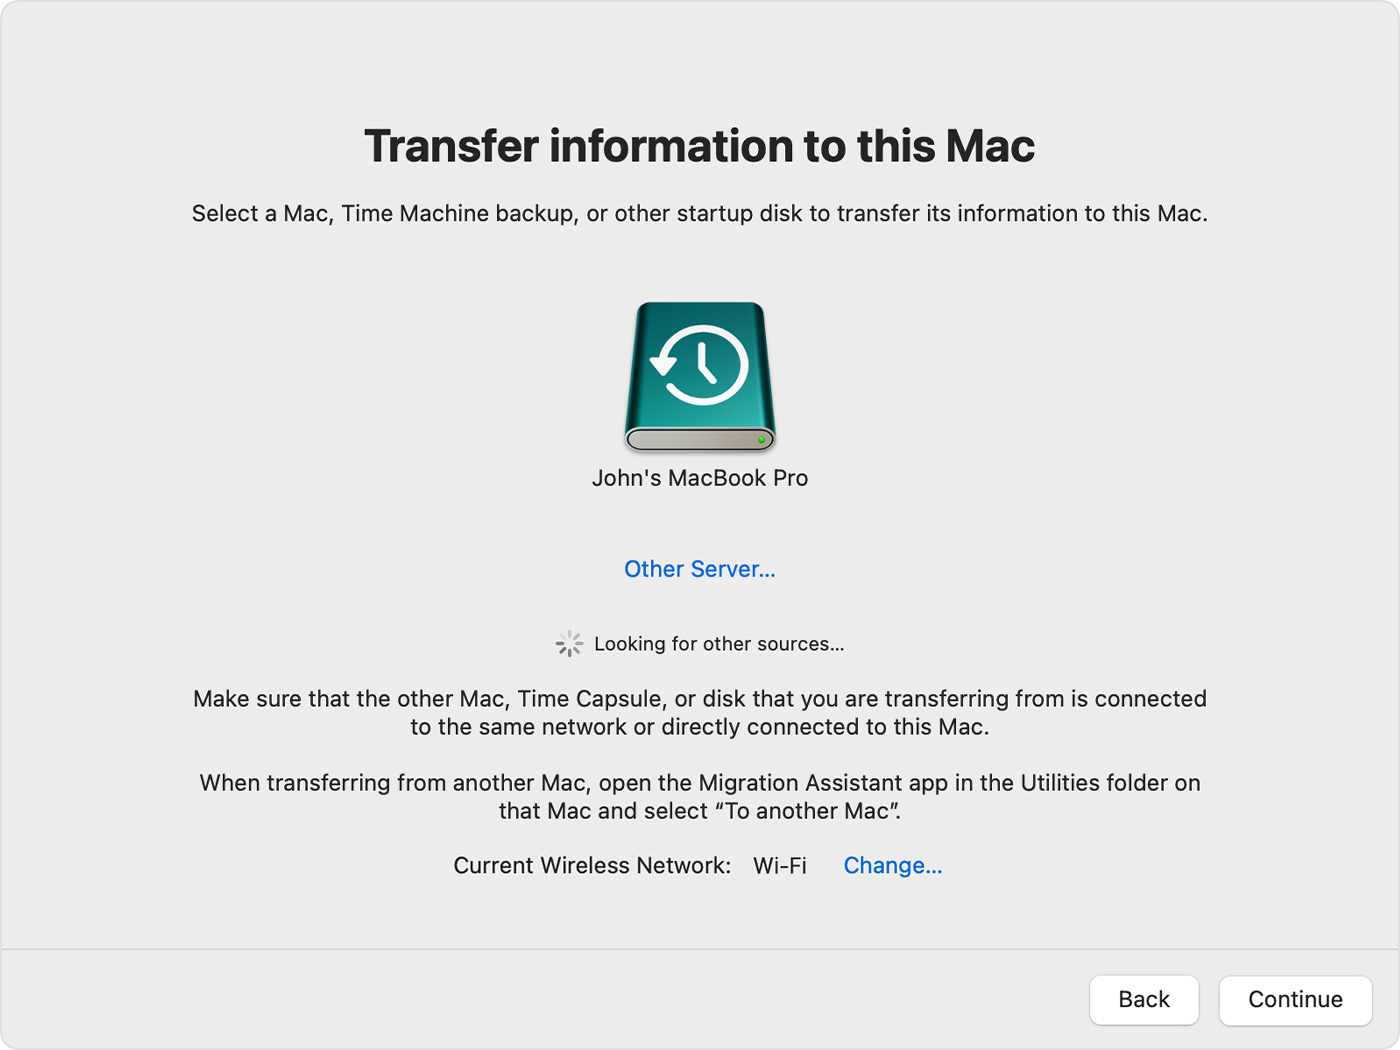
Using Migration Assistant
After setting up a new Mac or reinstalling macOS, Migration Assistant can help you transfer all your important data from a Time Machine backup.
- Open ‘Migration Assistant’ from the Utilities folder within Applications.
- Click ‘Continue’ on the opening screen and enter your admin password if prompted.
- Select ‘From a Mac, Time Machine backup, or startup disk’ and click ‘Continue’.
- Choose the correct Time Machine backup and select the information you want to transfer.
- Click ‘Continue’ and wait until the transfer is complete.
Summary:
Migration Assistant is very useful for moving data to a new Mac or after reinstalling the operating system. The process is usually user-friendly and comprehensive. However, it can be time-consuming, especially with large backups.
Direct File Restoration
Sometimes, you only need to bring back specific files or folders, not the entire system. Direct file restoration is straightforward with Time Machine.
- Click on the Time Machine icon in the menu bar and choose ‘Enter Time Machine’.
- Navigate to the date and time from before the files were lost or changed.
- Use the timeline on the right side of the screen to locate the items.
- Select the file or folder, then click ‘Restore’ to recover it to its original location.
Summary:
This method is perfect when you only need to recover specific items. It’s quick and avoids the need for a full system rollback. However, if your entire system needs a restore, this wouldn’t be suitable.
Email Restoration
Losing important emails can be stressful, but Time Machine can bring back your entire Mail application state from a given backup.
- Open Mail, then click on the Time Machine icon and choose ‘Enter Time Machine’.
- Browse through your inbox as it appeared at different backup points.
- Select the emails or entire mailboxes you wish to restore.
- Click ‘Restore’ to retrieve the selected items back into your current Mail app.
Summary:
Restoring emails is a simple process through Time Machine. It’s highly beneficial if you accidentally delete important messages. However, this will not work for email accounts with server issues or if the emails were deleted from the server.
Restoring Calendar Events
Losing calendar events can disrupt your schedule. Time Machine makes it easy to bring them back.
- Open Calendar and access Time Machine via the icon in the menu bar.
- Look through your calendar in the past backups.
- Find the events you need and hit ‘Restore’ to bring them back.
Summary:
For individuals heavily reliant on their Calendar, this feature is a lifesaver. Just remember that it only works for the calendars stored locally on your Mac.
Reinstating Contacts
Should you lose or delete contacts, Time Machine can help you recover them.
- Open Contacts and initiate Time Machine from the menu bar.
- Browse through your contacts list.
- Select the contact(s) you wish to restore and press ‘Restore’.
Summary:
This targeted recovery is excellent for retrieving valuable contacts or lists without affecting other data.
Retrieving Photos
Accidentally deleted photos are not lost forever when you have Time Machine at your disposal.
- Open Photos and enter Time Machine.
- Navigate to the backup where your desired photos exist.
- Select the photos or albums to be restored, then click ‘Restore’.
Summary:
Time Machine’s role in preserving memories by restoring photos can be invaluable. Just make sure your backup drive is connected when you need to find lost images.
Recover System Preferences
Personalizing your system takes time, and losing those preferences is frustrating. Time Machine can restore them too.
- Go to System Preferences and activate Time Machine.
- Find the date before your preferences were altered.
- Select the ‘System Preferences’ and press ‘Restore’.
Summary:
This is helpful for returning your Mac to a familiar state without affecting your personal documents.
Tips: Regular Backups
Consistent backups are key. Set up Time Machine to regularly back up your Mac to an external drive or network-attached storage.
Tips: Verify Backup Disk
Regularly verify your backup disk’s integrity using Disk Utility. This ensures your backups are in good shape for when you need them.
Tips: Exclude Items
Save space by excluding non-essential files or folders from your backups through Time Machine preferences.
In conclusion, Time Machine is an incredibly powerful and versatile tool integral to your Mac’s resilience against data loss. Whether it’s a simple file retrieval or a catastrophic system error, Time Machine offers varying levels of restoration to suit your needs. Remember to maintain regular backups and verify your backup disk to ensure a safety net is always there. With Time Machine, you can rest a little easier knowing that a solution is just a few clicks away.
FAQs:
Q: Can Time Machine back up to an online source?
A: Time Machine is designed to work with physical drives and some network-attached storage devices, not directly with online storage services.
Q: How long does a system restore from Time Machine take?
A: The duration varies depending on the size of your backup and the speed of your backup drive. It can range from a few minutes to several hours.
Q: Can I use Time Machine to restore files to a Mac running a different version of macOS?
A: Generally, Time Machine backups are best restored to the same version of macOS. Restoring to a different version can result in compatibility issues, especially with system files.


