In the digital age, knowing who and what is on your local network is as crucial as locking your doors at home. For Mac users, the Terminal is a gateway to understanding this digital landscape. It’s a tool that allows you to communicate with your computer using text commands, offering a way to peer into the workings of your network. Whether you’re ensuring your personal security, troubleshooting connection issues, or simply satisfying your curiosity, learning to scan your local network using the Mac’s Terminal can be empowering. Let’s explore how to effectively utilize this powerful feature, step by step, providing you with invaluable insights into your own network environment.
Command-Line Basics
Before embarking on network scanning, it’s essential to have a grasp of Terminal and the command-line interface (CLI). The CLI is a way to interact with your computer using text-based commands, and Terminal provides access to the CLI on macOS.
Detailed Steps:
- Open Terminal: You can find Terminal in the Utilities folder, which is inside the Applications folder. Alternatively, you can use Spotlight by pressing
Command + Space, typing “Terminal,” and hittingEnter. - Get Comfortable: When you open Terminal, you’ll see a blinking cursor. This invites you to type commands.
- Start Simple: Type
echo Hello Worldand pressEnter. This command will make Terminal repeat whatever followsecho. You should see the words “Hello World” printed below your command.
Summary:
Understanding CLI is the foundation of network scanning. You’ve learned how to open Terminal and execute a basic command. This is a harmless way to see the immediate result of a typed command, which is vital as you proceed to more complex tasks. The downside is that CLI can seem intimidating at first to newcomers, but with practice, it becomes less daunting.
Discover Network Devices with Ping Sweep
A ping sweep is a technique used to identify the devices on your network.
Detailed Steps:
- Identify Your IP Range: Type
ipconfig getifaddr en0for wired connections oripconfig getifaddr en1for wireless. Note down the IP address. - Determine Network Range: The first three numbers of your IP address, followed by 0/24, usually represent your entire network range. For example, if your IP is 192.168.1.5, your network range is likely 192.168.1.0/24.
- Perform Ping Sweep: You can use the command
ping 192.168.1.Xreplacing X with numbers ranging from 1 to 255. Each active device will respond with a reply.
Summary:
A ping sweep can give you a good indication of what devices are active on your network. However, it can be time-consuming, as you need to manually type each IP address, and some devices may not respond to pings if they are configured to be stealthy.
Scan with arp-scan
The arp-scan tool allows you to automatically scan your network for active devices.
Detailed Steps:
- Install Homebrew: Homebrew is a package manager for macOS. Install it by pasting
/bin/bash -c "$(curl -fsSL https://raw.githubusercontent.com/Homebrew/install/HEAD/install.sh)"into Terminal. - Install
arp-scan: Runbrew install arp-scanin Terminal. - Run
arp-scan: Use the commandsudo arp-scan --localnetto scan your network. You’ll need to enter your password since you’re usingsudo.
Summary:
The arp-scan is faster and more automated compared to a ping sweep. It’s particularly useful for quickly identifying devices on your network. The downside is the requirement to install third-party software, which might not be preferable for all users.
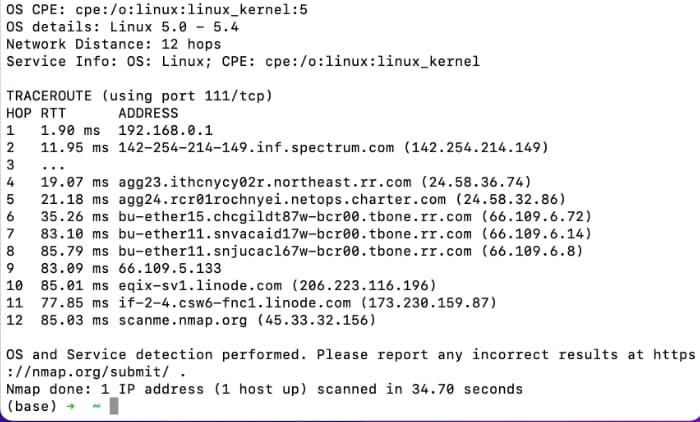
Network Scanning with Nmap
Nmap is a more advanced network scanning tool which gives detailed information about your network.
Detailed Steps:
- Install Nmap: Run
brew install nmap. - Scan Your Network: Type
nmap -sn 192.168.1.0/24, substituting with your actual network range. - Interpret the Results: Nmap will display a list of hosts with their status.
Summary:
Nmap provides a comprehensive overview of the devices on your network, including the operating systems they run and the services they offer. The potential downside to using Nmap is that it can be overwhelming due to the wealth of information it provides, and this level of detail is often not necessary for casual users.
Using netstat to View Network Connections
netstat is a command-line tool that displays incoming and outgoing network connections.
Detailed Steps:
- Open Terminal.
- Type
netstat -p tcpto see TCP connections. - For a more user-friendly display, you can type
netstat -p tcp -f inet.
Summary:
Netstat provides a real-time overview of your network connections. It’s particularly useful for identifying unexpected or malicious connections. The main downside of netstat is that the output can be quite verbose and may require some interpretation.
Check Network Quality with mtr
mtr combines the functionality of ping and traceroute.
Detailed Steps:
- Install mtr: Enter
brew install mtr. - Run mtr: Type
sudo mtr <IP_ADDRESS/hostname>substituting with the target IP or hostname. - Analyze the report: Mtr provides a dynamic report that updates in real-time.
Summary:
Mtr is excellent for troubleshooting network quality issues like packet loss and latency. It can be less intuitive than some other tools and might provide more information than what is needed for simple network scanning tasks.
Tips and Tricks
- Understanding IP Addresses: An IP address is like a phone number for your computer on a network. It’s important to know yours and the range your network uses.
- Learn to Use
grep: This command can help you filter the output of other commands, isolating the information you’re interested in. - Regular Scanning: Regular scans can help you spot new, unknown devices quickly.
- Security Considerations: Be aware of the legal and ethical considerations—only scan networks you own or have permission to scan.
- Keep Your Network Private: Use a robust password and security protocol for your Wi-Fi to prevent unauthorized access.
- Update Frequently: Keep your software updated to benefit from the latest network tools and security patches.
Conclusion
Scanning your local network on macOS using the Terminal can appear daunting but is very manageable once you’ve familiarized yourself with a few commands and concepts. By following the step-by-step guides provided, anyone can gain valuable insight into the devices and services running on their network. It’s a mix of analyzing real-time data, understanding your network’s structure, and ensuring security. With practice, these tools and techniques can become a regular part of maintaining your digital health and safety.
FAQs:
Q: Do I need to install anything on my Mac to start scanning my network?
A: Basic commands like ping or netstat do not require additional software, but to use tools like arp-scan or Nmap, you will need to install them first.
Q: Is it safe to scan my network? Will I disrupt any services?
A: Scanning your network is generally safe and should not disrupt services. However, it’s important to scan only networks you own or have permission to analyze.
Q: How can I ensure that my network is secure?
A: Regular network scanning is a good start. Additionally, ensure your Wi-Fi has a strong password, use up-to-date security protocols, regularly update your devices, and consider using network firewalls and anti-virus software.