Facebook has made it easy to connect with friends and family across the globe with just a few clicks. One way we reach out is by sending friend requests, but sometimes, we may forget whom we’ve reached out to or whether they’ve accepted our requests. It’s helpful to know how to check the friend requests you’ve sent to manage your online connections effectively. With a platform that’s continuously evolving, finding this information might not be as straightforward. This guide is crafted to help you navigate your way through Facebook’s interface and learn how to view your sent friend requests with ease, even if you’re not tech-savvy.
Viewing Sent Requests via Desktop
If you’re using Facebook on a desktop, checking your sent friend requests is a simple process.
- Log in to your Facebook account: Open your preferred web browser, go to the Facebook website, and sign into your account with your username and password.
- Click on the ‘Friends’ icon: On the homepage, locate the ‘Friends’ icon on the upper part of the screen—it looks like two silhouettes of people. Click on it.
- Select ‘See All Friends’: In the dropdown menu that appears after you click the ‘Friends’ icon, you’ll see an option that says ‘See All Friends’. Click on it.
- Find and click on ‘Friend Requests’: On the ‘Friends’ page, locate the ‘Friend Requests’ button near the top of the screen and click it.
- Go to ‘View Sent Requests’: On the ‘Friend Requests’ page, you’ll see a link that says ‘View Sent Requests’ – click on this to see a list of all the friend requests you’ve sent that have not yet been accepted.
Summary
This method is straightforward and beneficial for those using Facebook on desktop computers. The clear, step-by-step process ensures that you can track your pending friend requests easily. However, those working with a slower internet connection might experience slight delays in loading pages.
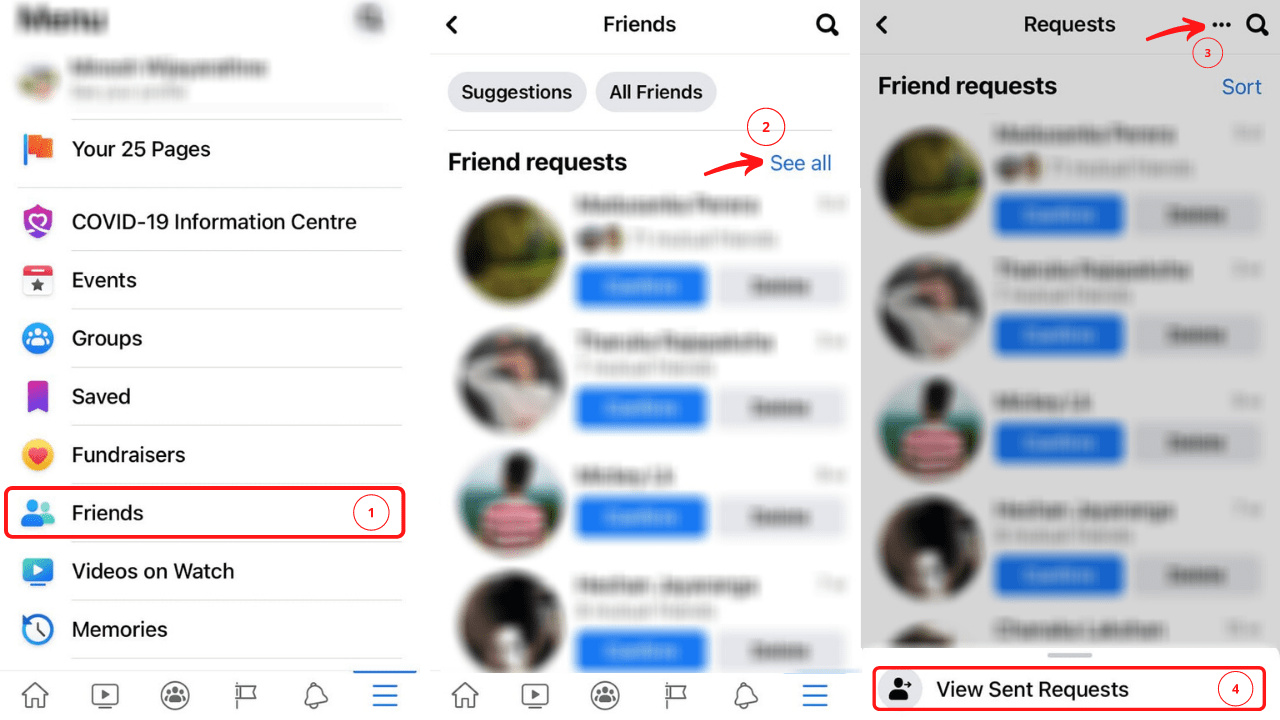
Checking Sent Requests on Mobile
Accessing your sent friend requests on a mobile device is just as easy, whether you’re using the Facebook app or a mobile browser.
- Open the Facebook app or mobile site: Launch the Facebook app on your device or visit the Facebook website using your mobile browser, then log in to your account.
- Tap on the ‘Menu’ icon: Look for the ‘Menu’ icon, represented by three horizontal lines, and tap on it. On the Facebook app, it’s usually at the bottom-right for iOS and the top-right for Android users.
- Scroll to ‘Friends’: Within the menu, scroll to find the ‘Friends’ option, which might be accompanied by the silhouette icon.
- Select ‘Friends’: Tap on the ‘Friends’ option to open your friends and friend requests page.
- Find ‘See All Friend Requests’: Within the ‘Friends’ page, find and tap on ‘See All Friend Requests’ to open the list of received and sent requests.
- View ‘Sent Requests’: At the top of the friend requests list, tap on ‘Sent Requests’ to view all friend requests you have sent out that have not been accepted yet.
Summary
This mobile-centric approach caters to the majority of Facebook users who prefer operating on their devices. It’s convenient and allows you to review your sent requests on-the-go. The drawback here could be that, on different devices, menu items may be in slightly different locations, which might confuse some users.
Using Browser History
For those who have trouble with the Facebook interface, your browser history can be a useful tool in accessing frequently visited pages directly.
- Open your web browser: Open the browser you typically use to access Facebook.
- Go to your browser history: This can usually be done by clicking on the menu button (often represented by three dots or lines) and selecting ‘History’ from the dropdown.
- Search for ‘Facebook friend requests’: In your browser history, use the search function to look for instances where you accessed the Facebook friend requests page.
- Access the page directly: If you find such an instance in your history, click on the link to go directly to your friend requests page where the ‘View Sent Requests’ option should be visible.
Summary
Using browser history is a quick workaround to access your sent friend requests list without navigating the Facebook interface. This is particularly helpful if you’ve visited the page before and need a shortcut. However, this method won’t work if you frequently clear your browser history or use different devices.
Frequently Asked Questions
Q: Can I cancel a friend request after I’ve sent it?
A: Yes, you can cancel a friend request by going to your ‘Sent Requests’, clicking on the person’s name, and selecting ‘Cancel Request’.
Q: Will someone know if I’ve canceled a friend request?
A: No, Facebook does not notify users if a friend request is canceled.
Q: What happens if my friend request is ignored or deleted?
A: If your friend request is ignored or deleted, it will simply disappear from your ‘Sent Requests’ list and the recipient’s incoming friend requests.
In conclusion, whether you’re on your desktop or using your mobile device, Facebook has made it relatively easy to see which friend requests you’ve sent. While the steps are simple, it’s important to interact with the platform regularly to familiarize yourself with any changes in the layout or features. Keep this guide handy as a reference whenever you need to check your sent friend requests on Facebook, ensuring you stay connected and manage your social network efficiently. Remember that this is part of managing your digital presence and ensuring your social circles reflect your current interests and relationships.


