Modern smartphones offer an impressive array of features, with the ability to store thousands of photos, videos, and apps. However, as we use our devices more, we frequently find the need for additional storage. An SD card is a simple and affordable way to expand your phone’s storage capacity. Through this guide, we’ll navigate the Android settings to set up an SD card as the default storage, allowing you to save more of what you love without worrying about running out of space.
Understanding Your Android’s Storage
Before diving into the steps of setting an SD card as the default storage on your Android device, it’s important to understand how Android manages storage. When an SD card is used as default storage, files such as photos, videos, and applications are saved directly to the card, rather than the device’s internal memory. This can greatly extend the storage capabilities of your Android device beyond its built-in capacity.
Identify Your Android Version
Android devices come in various versions and manufacturers, and the steps to set your SD card as the default storage may vary slightly depending on these factors. Here’s how you can check your Android version:
- Open the Settings app on your smartphone.
- Scroll down and tap on About Phone.
- Look for a section named Software Information or Android Version.
Once you know your Android version, you can follow specific instructions that pertain to your device more accurately.
Inserting Your SD Card
If your Android phone supports expandable storage via an SD card, you’ll first need to insert the card correctly.
- Turn off your device before inserting the SD card to avoid any potential data loss or damage.
- Locate the SD card slot on your device; it’s typically on the edge and may require a small tool or a paper clip to open.
- Insert the SD card into the slot, making sure it’s properly seated and secured.
- Turn your phone back on.
Format as Internal Storage
Formatting your SD card as internal storage will allow apps and media to be stored directly on the card. Here’s how to format your SD card:
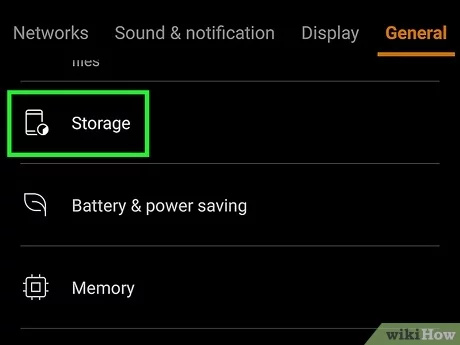
- Open the Settings app.
- Tap Storage (you might find this under “Device care” or similar, depending on your device).
- Select your SD card, then tap the More button, often represented by three dots in the upper-right corner.
- Choose Storage Settings, then Format as Internal.
- Follow the prompts to complete the formatting process.
Once formatted as internal storage, the SD card is treated as an extension of the device’s built-in storage.
Move Existing Content
After setting up your SD card, you may want to move existing content to free up the internal storage.
- Navigate to Settings and select Storage.
- Tap on Internal Storage.
- Choose what you wish to move (e.g., photos, videos, apps) and select the Change or Migrate Data option.
- Follow the on-screen prompts to transfer your data.
Set Camera Storage Location
To automatically save new photos and videos to the SD card, adjust your camera app’s storage settings.
- Open your camera app.
- Access the camera’s settings by tapping the gear icon.
- Look for a storage option, which might be labeled “Storage location” or similar.
- Select the SD card as your preferred storage location.
Tips for App Storage
Not all apps can be moved to an SD card due to system restrictions or developer preferences, but for those that can:
- Go to Settings and tap Apps or Application Manager.
- Select an app you wish to move.
- Tap Storage, and if the app can be moved, you’ll see a Change button.
- Tap Change and select the SD card to move the app.
Remember that moving apps to an SD card can sometimes cause those apps to run more slowly than they would from internal storage.
Regular Backups
It is crucial to regularly back up the data on your SD card to avoid losing precious files:
- Connect your phone to a computer via USB, or use a cloud backup service.
- Transfer files from the SD card to your preferred backup location.
- Ensure that the backup is completed correctly before disconnecting or logging out.
Monitoring Storage Space
Keep an eye on your storage space to ensure your SD card doesn’t fill up:
- Go to Settings and select Storage.
- Here, you can view how much space is used and how much is available.
- Use this information to manage your files effectively.
Maintaining SD Card Health
Keep your SD card functioning properly by:
- Not removing the card from the phone while it is in use.
- Avoiding exposing the card to extreme temperatures or magnetic fields.
- Regularly checking for errors using a computer or a maintenance app.
Understanding the Limitations
While using an SD card as default storage is beneficial, it’s not without limitations. Here’s what you should know:
- SD cards can be slower than the internal storage.
- Not all apps can be stored or function properly on an SD card.
- SD cards are more prone to failure than built-in storage, making data potentially less secure.
Conclusion
Expanding your Android phone’s storage with an SD card is a cost-effective measure that brings immediacy to managing files, photos, and applications. By following the simple steps outlined, you can harness the full potential of your device’s expandable storage.
Frequently Asked Questions
Q: Can I use any SD card for my Android device?
A: It’s important to use a compatible SD card that meets your device’s specifications. Check the manufacturer’s details for recommended sizes and types.
Q: Will moving apps to the SD card void my warranty?
A: Moving apps to an SD card is a supported feature in Android and should not void any warranty, but always consult with your device’s manufacturer to be sure.
Q: How do I keep my data safe on an SD card?
A: Regular backups are the best way to ensure data safety. You could also consider using apps with cloud-storage capabilities for important files.