In a world where connectivity is key, staying in touch has never been more important. Google Messages for Web allows you to send and receive text messages from the comfort of your computer, bridging the gap between mobile and desktop. This service is a seamless extension of the Messages app on your Android device, offering an array of features that keep you connected with friends, family, and colleagues. Whether you’re at work, at home, or simply prefer the ease of typing on a full-size keyboard, understanding how to use Google Messages for Web will enhance your communication experience.
Sync Your Phone with Messages for Web
Before diving into the nitty-gritty of Google Messages for Web, it’s essential to synchronize your smartphone with your computer. This process connects your mobile number to your desktop, allowing you to send and receive SMS and MMS from both devices.
Detailed Steps:
- Open Messages on Your Android Device: Tap on the Messages app to begin.
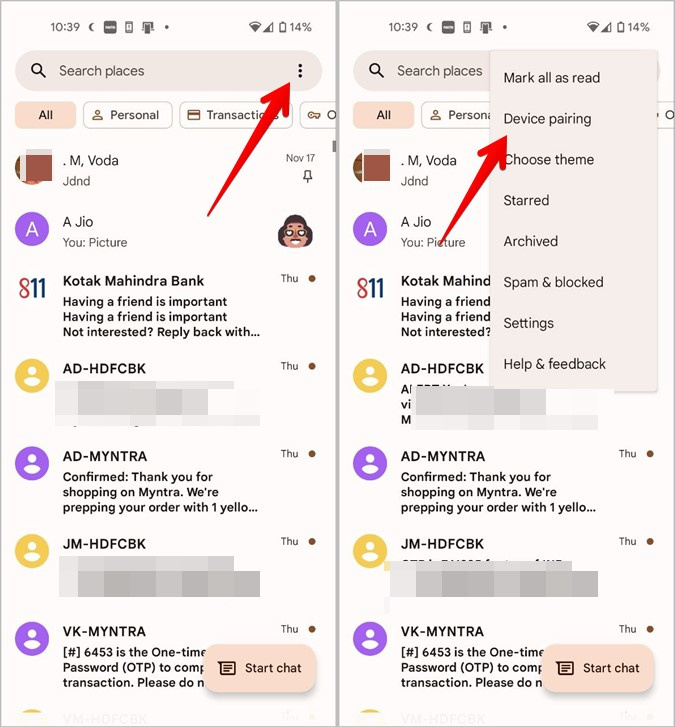
- Go to Messages for Web: Tap on the three dots on the top right of the Messages app and select “Messages for Web” from the dropdown menu.
- Open Messages for Web on Your Computer: On your computer, go to the web address provided within the app (typically messages.google.com/web).
- Scan the QR Code: Using your phone, scan the QR code shown on your computer screen through the Messages app.
- Finish the Synchronization: After scanning, wait for the synchronization to complete. Your messages should now appear on your computer screen.
Summary:
This solution allows you to send and receive messages through your computer, offering the convenience of a larger display and keyboard. It saves time and streamlines your communication workflow. However, if the synchronization process fails, make sure your phone is connected to a stable internet connection, and try again.
Customize Notifications
Staying notified of new messages is key, but so is the ability not to be overwhelmed by alerts. Customizing your notifications lets you strike a balance between being informed and staying focused.
Detailed Steps:
- Access the Settings: Inside Messages for Web, click on the three-dot icon and choose “Settings”.
- Navigate to Notifications: Look for the “Notifications” section within the settings.
- Customize: Toggle on or off for various notification options, such as sound, incoming messages, or even enable “Do not disturb” to silence notifications for a specified period.
Summary:
Customizing notifications ensures that you’re not constantly distracted while working. However, adjusting these settings too much may result in missing important messages, so find a setup that fits your workflow.
Change the Theme
A comfortable visual environment can significantly impact your messaging experience. Google Messages for Web allows you to change themes, making it convenient for users to customize the look to their liking.
Detailed Steps:
- Open Settings: Click on the three-dot icon and navigate to “Settings”.
- Select Theme: In the settings menu, find the “Theme” option and click on it.
- Choose a Theme: Pick from available themes, like Light, Dark, or High Contrast, whatever suits your visual preferences.
Summary:
Changing the theme can help reduce eye strain, especially during extended use. A darker theme is known to be easier on the eyes in low-light environments and can also help conserve battery life on laptops.
Disable/Enable Smart Reply
Smart Reply suggests quick responses to incoming messages. This feature can be a time-saver but can also be distracting or unnecessary for some.
Detailed Steps:
- Launch Settings: In Messages for Web, click on the settings icon.
- Find Smart Reply: Scroll until you see the “Smart Reply” option.
- Toggle On/Off: Click on the switch to enable or disable Smart Replies.
Summary:
Smart Reply can increase your efficiency by cutting down typing time for common responses. However, the suggested replies might not always be appropriate for the conversation, so evaluate whether this feature benefits your communication style.
Search Conversations
Finding specific messages in a conversation is often necessary. Search in Google Messages for Web makes locating particular texts straightforward.
Detailed Steps:
- Start the Search: Click on the search icon (magnifying glass) at the top of the Messages for Web interface.
- Enter Keywords: Type the relevant keywords or contact name you are searching for in your message history.
- Review Results: Go through the search results to find the exact message or thread.
Summary:
The search feature is instrumental in quickly retrieving important information without scrolling through countless messages. However, remember that searching requires the correct keywords to produce accurate results, so be as specific as possible.
Archive Conversations
Archiving is a neat feature to declutter your main message list without deleting conversations.
Detailed Steps:
- Select a Conversation: Hover over the conversation you want to archive and click on the three-dot menu that appears.
- Choose to Archive: From the dropdown, select the “Archive” option.
- Access Archived Messages: If you need to review archived messages, click on the menu icon and select “Archived”.
Summary:
Archiving keeps your chat list manageable without losing past conversations. Yet, be aware that archived messages will not appear in your main chat list, which might cause you to overlook them.
Pin Conversations
When you have important conversations that you need to access quickly, pinning them to the top of your Messages list is a valuable feature.
Detailed Steps:
- Right-Click on Conversation: On the conversation you wish to pin, right-click or click on the three-dot icon.
- Select Pin: From the menu, choose the “Pin” option.
- Conversation Is Pinned: The conversation will now stay at the top of your list.
Summary:
Pinning conversations ensures you can quickly find essential chats. One potential downside is that you might get too many pinned conversations, which can become counterproductive.
Block Unwanted Contacts
Receiving unwanted texts can be intrusive. Google Messages for Web allows you to block these contacts with ease.
Detailed Steps:
- Open the Conversation: Click on the conversation from the unwanted contact.
- Open More Options: Click the three-dot icon within the conversation.
- Block the Contact: Select “Block [Contact Name]” and confirm.
Summary:
Blocking contacts helps maintain your privacy and reduce spam. Remember, once a contact is blocked, you will not receive their messages or calls, and it is not instantly obvious to the blocked party that they have been blocked, which might be relevant for social considerations.
Keyboard Shortcuts
Maximizing efficiency is possible by using keyboard shortcuts that Messages for Web provides.
Detailed Steps:
- Access Keyboard Shortcuts: Press
Ctrl + /(on Windows) orCmd + /(on Mac) within Messages for Web. - Learn Shortcuts: A pop-up window will display all the available keyboard shortcuts.
- Use Shortcuts: Implement these shortcuts in your regular usage to save time.
Summary:
Keyboard shortcuts can significantly speed up your workflow. However, it takes time to memorize and get accustomed to using them, so patience is key.
Send Messages with Enter Key
For faster messaging, you can set the Enter key to send your messages.
Detailed Steps:
- Go to Settings: Click the settings icon in Messages for Web.
- Locate Enter to Send: Check the “Enter is send” option.
- Enable it: Click the checkbox, and now pressing Enter will send your messages.
Summary:
Enabling the Enter key to send messages is ideal for quick communication. Note that this could lead to accidentally sending incomplete messages, so be cautious.
Attach Media Files
Communicating isn’t just about text. Sending images, videos, or documents enriches the conversation.
Detailed Steps:
- Select Conversation: Click on the conversation where you want to attach a file.
- Attach File: Click the paperclip icon and choose to attach an image, video, or file.
- Choose File: Navigate to the file on your computer and select it.
- Send: Review your attachment and click the send icon.
Summary:
The ability to attach media provides a comprehensive messaging experience. It’s vital, however, to ensure file sizes are within the allowed limits for sending and that recipient devices can support the formats sent.
In conclusion, Google Messages for Web is a versatile tool that connects your messaging capabilities across devices. By embracing its features—from syncing devices, customizing settings, to mastering shortcuts—you can elevate your communication and make the most out of your messaging. It’s about working smarter, not harder, and Messages for Web exemplifies this philosophy with its intuitive and user-friendly platform.
FAQs
Q: Can I use Google Messages for Web without my phone?
A: No, your phone needs to be on and connected to the internet since Messages for Web syncs messages from your smartphone.
Q: Is Google Messages for Web secure?
A: Yes, Google uses encryption for Messages for Web, much like the Messages app on your phone, but always ensure you’re using a secure internet connection.
Q: What happens if I log out of Messages for Web on my computer?
A: Logging out will remove your messages and session from that computer. You’ll need to reconnect your phone by scanning the QR code again to use it in the future.