In the digital age, our privacy is often a click away from being compromised, but managing our personal data doesn’t have to be an intimidating task. Facebook, one of the world’s most popular social media platforms, stores a wealth of information about its users, including location history. This feature can be a handy way to remember visits and events, but it also raises privacy concerns. Learning how to view and delete your Facebook location history ensures you have control over what you share online. This guide walks you through simple, easy-to-follow steps to manage your digital footprint on Facebook.
View Your Location History
Before you decide to delete your location history, you might want to review what information Facebook has recorded. Facebook’s “Location History” is a feature that, when enabled, records the locations you have visited with your device.
Detailed Steps:
- Open Facebook: Start by logging into your Facebook account on a desktop or mobile device.
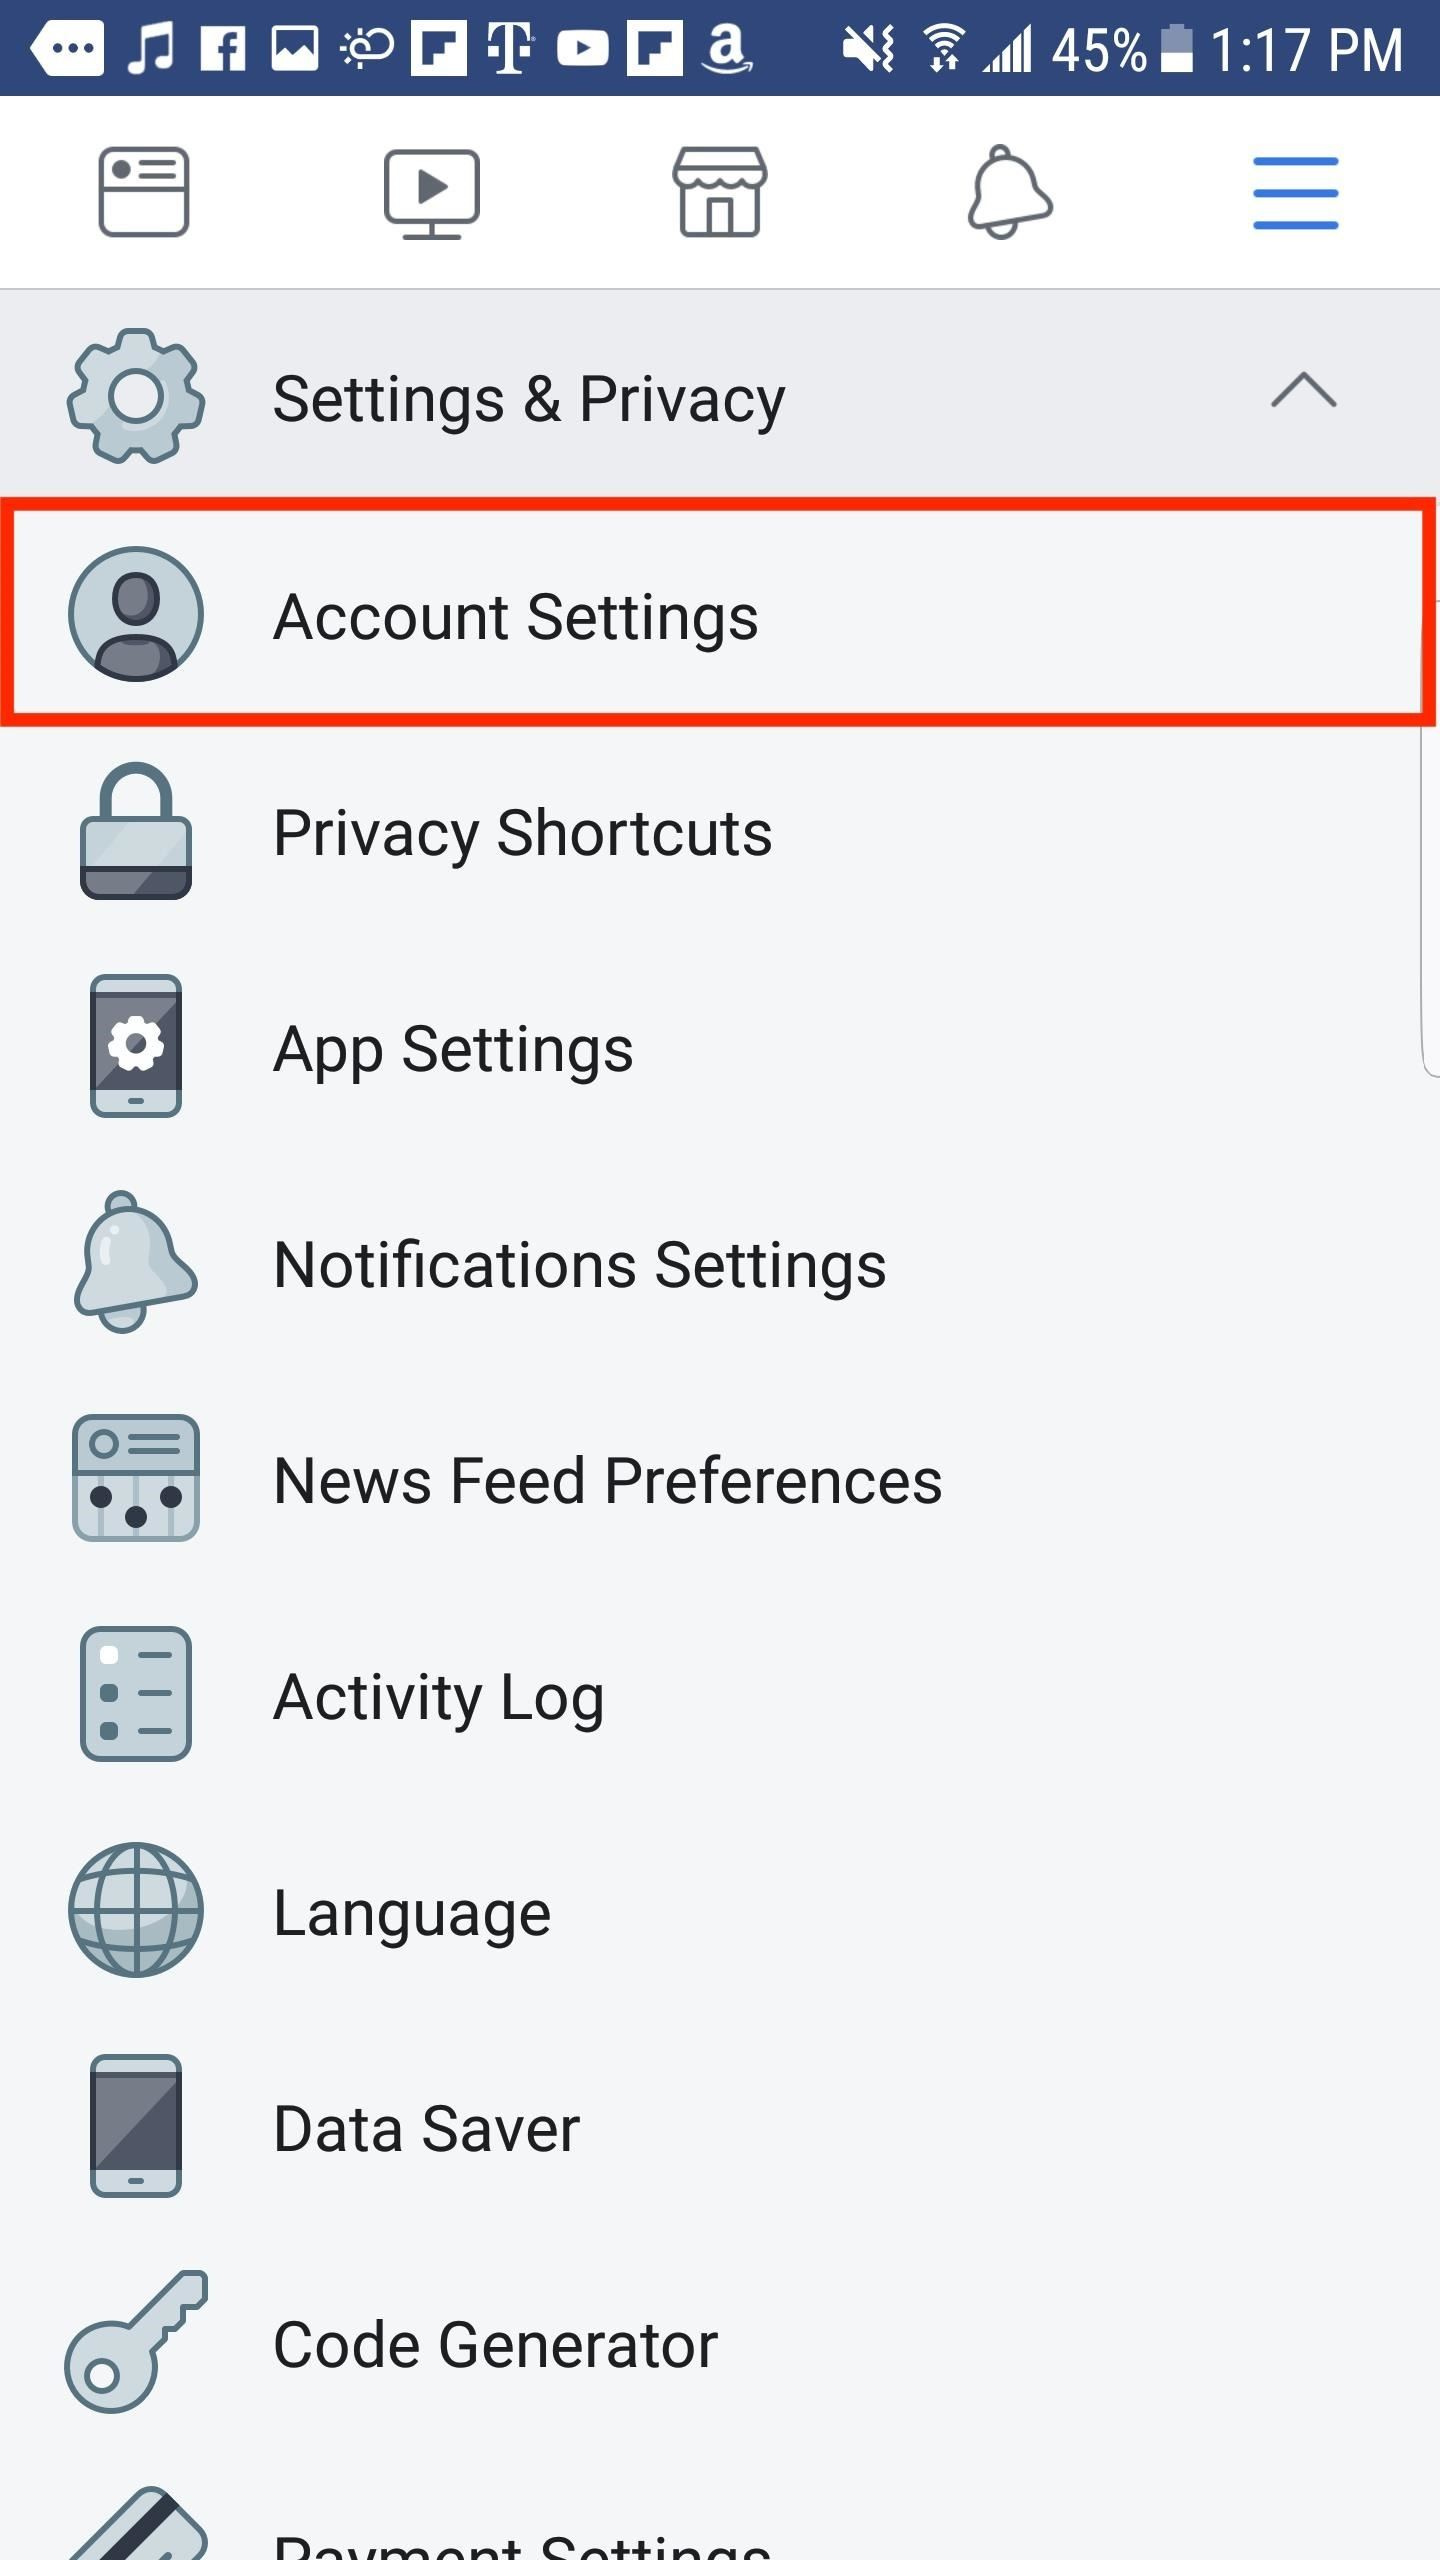
- Access Settings: Click on the downward arrow in the top-right corner (desktop) or the three horizontal lines (mobile), then navigate to ‘Settings & Privacy’ followed by ‘Settings.’
- Location Settings: On the left-hand side (desktop) or within the settings menu (mobile), find and select ‘Location.’
- View Your Location History: Click on ‘View Your Location History.’ You will likely be asked to enter your password again for security purposes.
Summary:
Reviewing your Facebook location history can give you a better understanding of the data Facebook has collected. Knowing what’s there helps you make an informed choice about what to keep or delete. However, keep in mind that this data may be sensitive, and ensuring the privacy of your account during this process is crucial.
Delete Your Location History
If you decide that your location history is something you’re not comfortable with Facebook storing, you can delete it. This will remove the history of locations you have been to as recorded by Facebook.
Detailed Steps:
- Access Your Location History: Follow the steps outlined in the previous section to access your location history.
- Open Location History Page: Once on the ‘Location History’ page, you will see the option to delete your history.
- Delete Location History: Click on ‘Delete All Location History.’ Confirm the action when prompted.
Summary:
Deleting your location history can be a big step towards protecting your privacy. It means that this recorded data won’t be available to you or Facebook anymore, giving you greater control over your personal information. Be aware that this action isn’t reversible, and any data deleted can’t be retrieved.
Turn Off Location History
While viewing and deleting your location history is essential, preventing Facebook from tracking your locations in the future is just as important.
Detailed Steps:
- Navigate to Location Settings: As previously described, go to your ‘Location’ settings within the Facebook settings menu.
- Turn Off Location History: You’ll find an option to turn off your Location History here. Toggle the switch or click ‘Turn Off’ to deactivate this feature.
Summary:
Turning off Location History ensures that Facebook stops recording your locations moving forward. The advantage of this is increased privacy and peace of mind; the downside is that you may lose certain location-based features or suggestions that Facebook offers.
Check Location Permissions on Your Device
Facebook requires permission from your device to access your location. You should regularly check and manage your device’s location settings to keep control over this aspect.
Detailed Steps:
- Access Device Settings: Go into your device’s settings.
- Navigate to Application Permissions: Find the section on your device for app permissions. This will vary depending on whether you’re using an Android or iOS device.
- Adjust Facebook Permissions: Look for Facebook in the list of applications and adjust its permissions. You can deny location access here.
Summary:
Reviewing location permissions on your device provides an added layer of control. Not permitting Facebook to access your location ensures your movements aren’t logged, enhancing your privacy. However, it might affect the functionality of some location-dependent features of the Facebook app.
Review and Manage Other Location Services
Facebook may use other location-related services and tools that you may want to manage, such as ‘Location-Based Alerts’ or ‘Check-ins.’
Detailed Steps:
- Explore Additional Settings: Within your Facebook settings, look for sections that reference other location services.
- Adjust Settings as Needed: Review the information provided by these services and adjust their settings according to your preference.
Summary:
Proper management of all Facebook’s location services can help you maintain a more private and secure online presence. It is wise to be cautious with these settings, as they can affect not only your privacy but also the way some of the app’s features operate.
Regularly Review Platform Updates
Social media platforms frequently update their privacy policies and settings. It’s good practice to stay informed about these changes.
Detailed Steps:
- Stay Informed: Keep an eye on announcements from Facebook regarding changes to privacy settings or features.
- Access the Help Center: Use Facebook’s Help Center to find the latest information on privacy and location settings.
Summary:
Regularly updating yourself on Facebook’s changes ensures you’re not caught off guard by new privacy implications. This proactive approach helps in maintaining your online security.
Educate Yourself on Digital Privacy
Understanding digital privacy goes beyond knowing how to press a few buttons. Take the time to learn about the broader context of digital privacy and data protection.
Detailed Steps:
- Research: Look for online resources, articles, and even courses that discuss digital privacy.
- Apply Knowledge: Use what you learn to review and reinforce your privacy settings on all your digital platforms, not just Facebook.
Summary:
With a solid understanding of digital privacy, you can make more informed decisions about protecting your data. Education is a powerful tool in the digital age, serving as a strong defense against oversharing online.
Seek Expert Advice When Needed
If you find the privacy settings and options overwhelming, don’t hesitate to seek help from a privacy expert or use resources provided by digital privacy advocacy groups.
Detailed Steps:
- Find Resources: Look for organizations that specialize in digital privacy and seek their guidance.
- Implement Recommendations: Apply the expert advice to your Facebook privacy practices.
Summary:
Expert advice can provide valuable insights and help tailor your privacy settings to your specific needs, offering a layer of professional guidance that can be incredibly beneficial.
Backup Data Before Making Changes
Before making significant changes to your location history or privacy settings, consider backing up important information.
Detailed Steps:
- Use Facebook’s Download Your Information Tool: Facebook provides a tool that allows you to download data including your photos, posts, and profile information.
- Store Safely: Keep your downloaded data in a safe and secure place.
Summary:
Backing up your data ensures that you do not lose anything important while making changes to your privacy settings. It provides a safety net in case you wish to reference or restore your information later.
Encourage Friends and Family to Manage Their Privacy
Your efforts to maintain privacy can be more effective when others in your network do the same. Encourage those around you to manage their digital footprints as well.
Detailed Steps:
- Share Knowledge: Talk to friends and family about the importance of privacy settings and guide them through the process of managing their own.
- Lead by Example: Demonstrate good privacy habits in your own use of Facebook and other social media platforms.
Summary:
When your network is privacy-conscious, it helps create a more secure online community. Encouraging others to manage their privacy settings not only helps protect them but also reinforces your privacy efforts.
In conclusion, understanding how to view and delete your location history on Facebook empowers you to take charge of your personal information. With the tools and knowledge provided in this guide, you can navigate the complexities of digital privacy with confidence. Remember, maintaining your privacy is an ongoing process, so it’s important to stay vigilant and proactive in managing your data.
FAQs
Q: Does turning off Location History delete my previous location data?
A: No, turning off Location History stops Facebook from collecting your future location data, but it does not delete your existing data. To delete your past location history, follow the steps provided in this guide.
Q: Can I delete individual locations from my history instead of the whole history?
A: Yes, Facebook allows you to delete specific entries in your location history without having to delete the entire history.
Q: Will disabling location services on my device affect my Facebook experience?
A: Disabling location services can affect certain features on Facebook, like check-ins or location-based recommendations. However, these changes often benefit your privacy.


