With the usage of computer, we may run out of drives’ space. We have to move large programs to another drive or clean up unimportant files. Especially for Microsoft Office, it occupies a large space on computer. When you purchase a new drive, it’s time to migrate MS Office to release your C: drive. However, it’s not an easy task to move Office without reinstalling it. You can just copy and paste the Office program to another drive directly. Hence, I collect a few useful methods for you to move MS Office to another drive with ease in this article.
Part 1. Can we move Microsoft Office to another drive on Windows 10 Settings?
With Windows 10, you may find a new feature that it allows moving programs to another drive in Settings conveniently.

However, this feature only specifies for Windows 10 apps installed by default, like Movies, Photos, Calculator, etc. As for the apps installed from other sources, it’s unavailable. But there are still ways to reach this am. Just follow below two methods.
Part 2. Move pre-installed MS Office to another drive through creating a junction
By default, MS Office is installed in C: drive. Typically, the installation path is C:Program Files (x86)Microsoft Office. Certainly, you may install the programs on another path, but it will not affect the usage of this method.
You can create a junction to move MS Office form one drive to another. First, open Command Prompt as Administrator and then run below commands in the Command window. Be careful that here takes MS Office installed on 64-bit Windows as an instance, so the program location may vary. Change it as needed.
First backup Office folder (optional):
ren “C:Program Files (x86)Microsoft Office” “Microsoft Office.bak”
Then copy all the files in this folder to the new drive with permissions intact:
robocopy “C:Program Files (x86)Microsoft Office.bak” “D:Microsoft Office” /E /ZB /DCOPY:T /COPYALL /R:1 /W:1 /V
Next, create the junction between the old location and new location:
mklink /J “C:Program Files (x86)Microsoft Office” “D:Microsoft Office”
Finally, copy the permissions to the junction:
robocopy “D:Microsoft Office” “C:Program Files (x86)Microsoft Office” /E /COPY:SOU /xo /xn /xc /xx
Hereto, you succeed to create a junction to the new drive. However, it’s better to test the program to ensure it’s working. In addition, once the program works fine in the new drive, just delete the backup you made previously.
Bonus. How to change installation path of Office 365
You may notice that Office 365 doesn’t allow customizing installation path for the Click-to-Run technique of installing software developed by Microsoft. However, in some cases, you may want to install Office 365 to another drive or location. But how to make it? Actually, it’s not a difficult task. You can make some modifications in the Registry to change install directory.
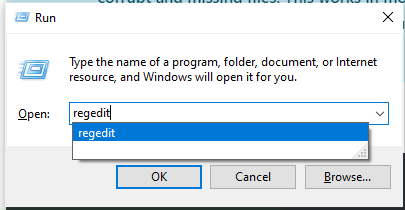
Press Win + R keys to launch Run program and type regedit.

Then find the below path in Registry editor:
HKEY_LOCAL_MACHINESOFTWAREMicrosoftWindowsCurrentVersion
Look for a value named ‘ProgramFilesDir’. Then the default value, which is ‘C:Program Files’ to the new location you intend to migrate the Office to.
Finally, close the Registry editor and restart your system.
Close Words
There show two different ways to help you move Microsoft Office from one drive to another one. As for the advanced users, you can try the first method with command line and it’s free. It’s an easy and friendly way to handle this task and there are fewer unexpected problems when you try to move Office than the method using the command line.


