In the incredibly complex and fast-paced world of video editing, where each and every frame and pixel counts, finding the right balance between file size and quality is no piece of cake. Luckily, the Sony Vegas Pro makes the process of choosing the best render settings much easier.
If you’re a filmmaker, content creator, or simply someone who loves creating stunning 1080p 60fps videos, keep reading to find out how you can achieve the best possible rendering results for all your high-frame-rate, high-definition masterpieces.
How Does Rendering Affect Video Quality?
In order to answer this question, it’s important to understand what rendering actually means. When you start rendering a video, your computer processes all the data that helps create images. In other words, video rendering is the process of transforming the video (or any source material) into its final form. In fact, video rendering takes place whenever you visit a website on your computer, as all the videos and photos are rendered to load the website.
To ensure smooth video playback or to create stunning effects and graphics, your computer will need to render that data to load and produce that image. Since the data that goes into loading and producing 3-D graphics and animations is immense, it’s important to render it ahead of time. If the video is already rendered, it will be easier for the viewer’s computer to handle it.
To put it simply, rendering doesn’t actually impact the video quality, but it makes your video much easier for your viewers to load and view on their computers. With a smoother playback and faster load speed, you’ll have recurrent viewers that stay and watch your entire video instead of bouncing as soon as it starts taking a long time to load.
How to Select the Best Render Settings for 1080p 60fps Videos in Sony Vegas Pro 14
While there are several different versions of Sony Vegas, the render settings are similar, depending on the video codec. Since rendering is an extremely hardware-intensive process, it’s important to choose the best settings and follow the right process.
To prevent blurry videos after rendering and to ensure full HD and ultra-clear videos, here’s what you need to do:
Disable Resampling
- Once you’ve edited your video, drag it to the lower left pane.
- Select everything you want to render out, right-click the selected section, and select ‘Properties.’
- Select the ‘Disable resample’ option. Resampling essentially adds extra frames to your video to make it smoother, but since you’ve already recorded your video in 60fps, there’s no need to force resampling any further.
- Click on ‘OK.’
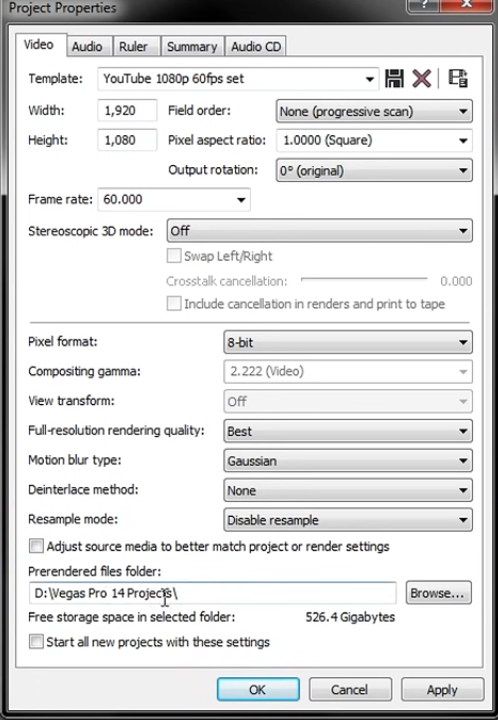
- Change Project Properties.
- Click on ‘Project Properties’ or the gear icon in the upper right corner of your screen.
- Select the ‘Video’ tab.
- Make sure the ‘Width’ and ‘Height’ are set to ‘1920’ and ‘1080’ respectively.
- Change the ‘Frame rate’ to ‘60’.
- Make sure the ‘Stereoscopic 3D mode’ is ‘Off.’
- Change the ‘Output Rotation’ to ‘0-degrees (original).’
- Ensure the ‘Pixel aspect ratio’ is set to ‘1.0000 (Square).’
- Change the ‘Field order’ to ‘None (progressive scan).’
- Set the ‘Pixel Format’ to ‘8-bit.’ While there is an option for ‘32-bit’ available, it won’t make much of a difference in quality, but will simply make the file size bigger.
- Change ‘Full-resolution rendering quality’ to ‘Best.’
- Set ‘Motion blur type’ to ‘Gaussian.’
- Change the ‘Deinterlace method’ to ‘None.’
- Change ‘Resample mode’ to ‘Disable resample.’
In this same window, you can also change the location of your files or set all new projects to start with these settings, according to your preferences.
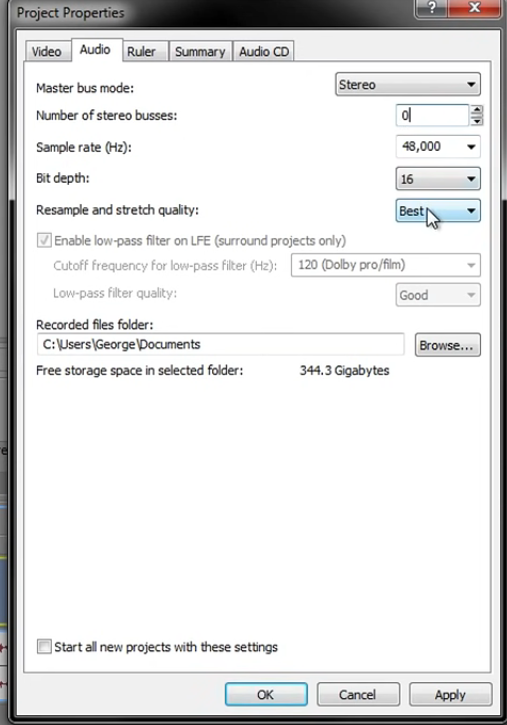
- Switch over to the ‘Audio’ tab and make sure the ‘Master bus mode’ is set to ‘Stereo.’
- Change ‘Number of stereo buses’ to ‘0.’
- Set the ‘Sample rate’ to ‘48,000.’
- Change ‘Bit depth’ to ‘16’ and set ‘Resample and stretch quality’ to ‘Best.’
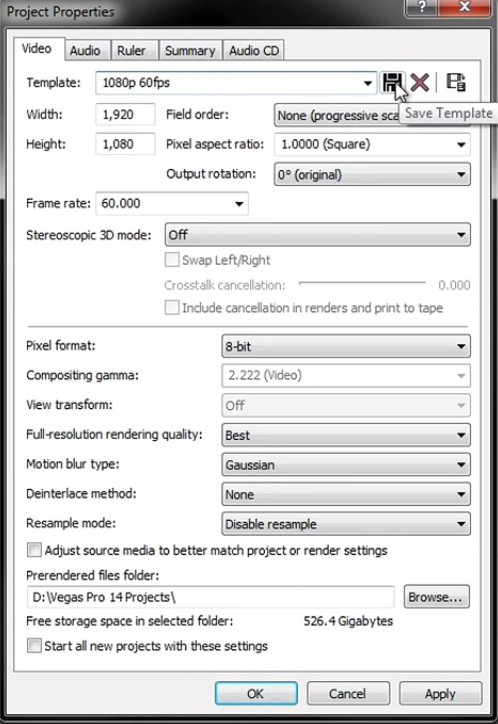
Switch back to the ‘Video’ tab and set a Template name according to your preferences. Click on the ‘Save’ icon next to the template name, select ‘Apply,’ and then click on ‘OK.’ Saving this template will save time and allow you to use these settings for your future videos.
Change Render Settings
Once you’ve set the Project Properties, you can start rendering the video. Here’s how you can set the best render settings for your 1080p 60fps videos:
- Double-click anywhere on the timeline at the bottom half of your screen. Keep in mind that this will only render the clips that are inside the selected or blue region.
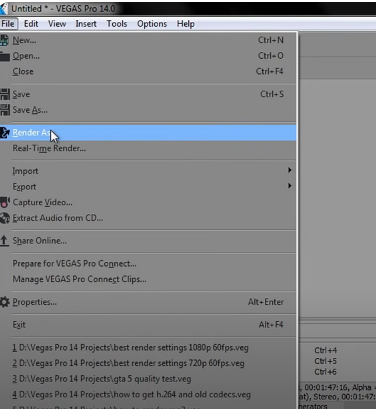
- Click on ‘File’ at the top-left corner of your screen and select ‘Render As.’
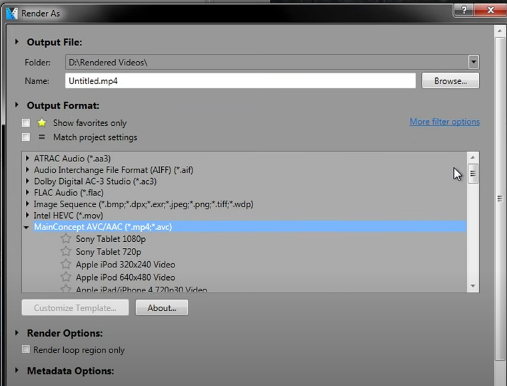
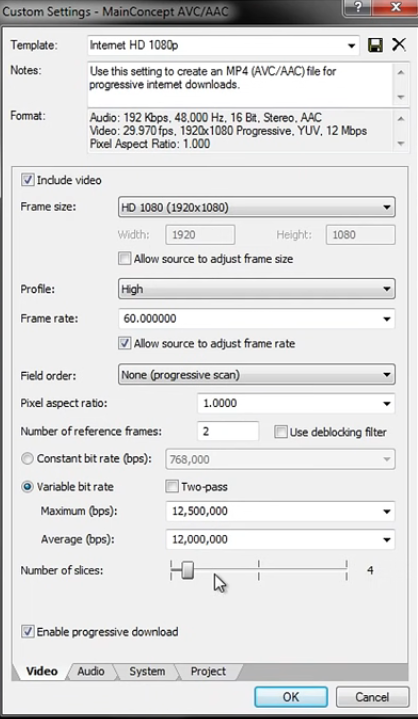
- In the ‘Render As’ window, select ‘MainConcept AVC/AAC.’
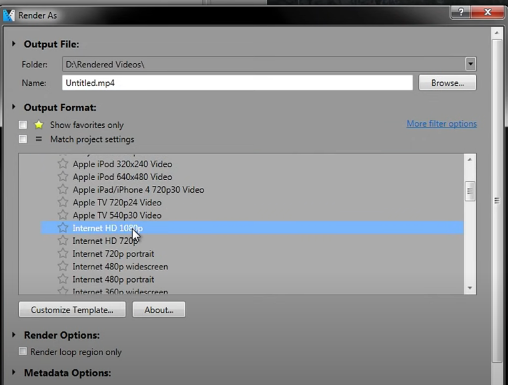
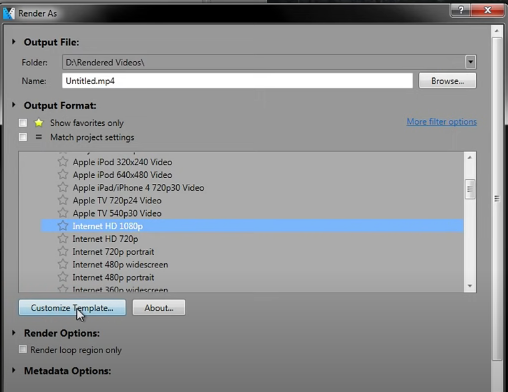
- Scroll down and select ‘Internet HD 1080p,’ and then click on ‘Customize Template.’
- Make sure the frame size is correct and set to ‘HD 1080 (1920×1080)’
- Change the ‘Profile’ setting to ‘High.’
- Set the ‘Frame rate’ to ‘60,’ and make sure the ‘Allow source to adjust frame rate’ option is enabled.
- Set ‘Field order’ to ‘None (progressive scan).’
- Change ‘Pixel Aspect Ratio’ to ‘1.0000.’
- Set ‘Number of reference frames’ to ‘2’ and enable ‘Use deblocking filter.’
- Enable ‘Variable bit rate,’ and change the ‘Average’ and ‘Maximum’ bitrate to ‘18,000,000’ and ‘18,500,000’ respectively.
- If you own a fast computer that can handle rendering incredibly well, then enable ‘Two-pass’ for a higher-quality video. However, if you own a slower machine, then it’s best to leave it disabled, as it will take an extremely long time to render the video.
- Leave the ‘Number of slices’ at their default setting, as they’ll automatically be adjusted according to what your computer can handle.
- Tick the box next to ‘Enable progressive download.’
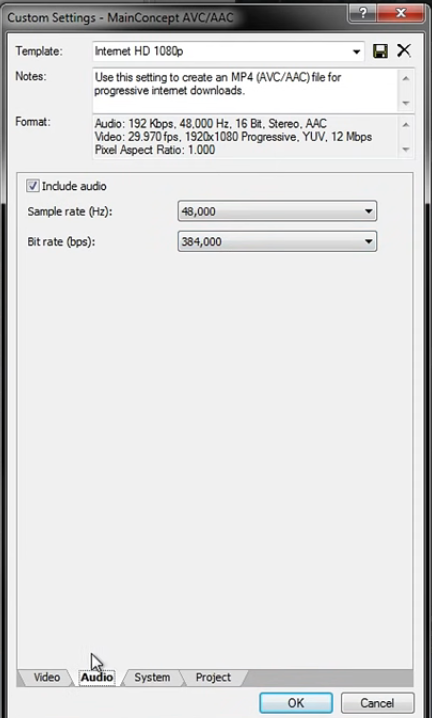
- Switch over to the ‘Audio’ tab, and set the ‘Bit rate’ to ‘384,000.’
- Change the ‘Sample rate’ to ‘48,000.’
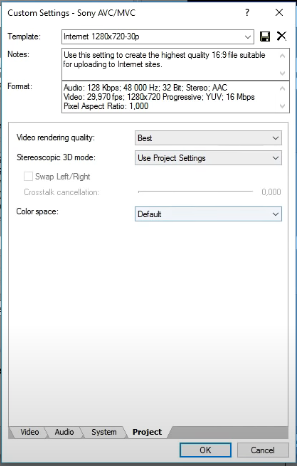
- Switch to the ‘Project’ tab, and change ‘Video rendering quality’ to ‘Best.’
- Set ‘Stereoscopic 3D mode’ to ‘Use Project Settings.’
- Switch back to the ‘Video’ tab, enter a name for the template, and then click on the ‘Save’ icon next to it. This will allow you to directly use these settings for all your future videos.
- Click on ‘OK,’ and then select this template from the list available.
- Enter a name for your rendered video and then select ‘Render.’
Conclusion
Hopefully, with the help of the aforementioned guide, you’ll now be able to choose the best Sony Vegas Pro 14 render settings for your 1080p 60fps videos. You can also apply these same settings to different versions of the software, ensuring your video runs smoothly and continuously once someone hits the ‘Play’ button.
By perfectly balancing file size and quality, you can produce content that stands out in vibrance and clarity. Whether you’re a professional filmmaker with extremely high standards or a YouTuber trying to achieve breathtaking cinematic quality in your videos, the best render settings can help deliver your vision with the utmost impact.
FAQs
What is the optimal render resolution?
In most cases, it’s best to choose a 720×480 px resolution for preliminary renders. If you prefer using a higher resolution, then you can opt for a 2000×1500 px resolution for sample or draft renderings and a 5000×4000 px resolution for final renderings.
Is it better to render at 1080p or 4K?
It’s best to shoot your video in 4K and then edit and upload it in 1080p. This will allow you to easily reframe your footage without worrying about any loss of resolution. Since your final output will be in 1080p, you can render any additional titles and visuals with just 1080p and save yourself a lot of time and expenses.
What bitrate is best for rendering 1080p videos?
The ideal bitrate for 1080p videos can be anywhere between 3500 and 6000 Kbps. If you’re opting for a standard frame rate, it’s best to choose a lower bitrate, preferably between 3500 and 5000 Kbps. However, if you’re using a higher frame rate (60fps), then aim for a bitrate of around 4500 to 6000 Kbps.
What PC specifications do I need to edit 1080p 60fps videos?
If you’re editing 1080p videos, then it’s advisable to have at least 8GB RAM. For 4K videos, 16 GB RAM should be the absolute minimum. In both cases, it’s better to have a larger RAM, but make sure you have a decent graphics card and a good CPU as well.
What are the best settings for a 1080p 60fps stream?
Make sure you set your rate control to CBR for a 1080p 60fps stream. It’s also important to note that the optimal bitrate value will depend on your hardware and upload speed. If you’re planning a 1080p 60fps stream on Twitch, then a bitrate of 6000 Kbps is advisable.
On the other hand, Twitch streams with lower frames per second and lower resolutions should have a bitrate of approximately 4500 Kbps, according to the official Twitch guidelines.


