When your computer is acting up or you’re planning to upgrade hardware, you may need to reset your BIOS settings to their default state. This can help solve compatibility issues and restore the basic functions of your computer. This is often referred to as clearing the CMOS, which stands for Complementary Metal-Oxide-Semiconductor. This small piece of memory on your computer’s motherboard retains the BIOS settings. Thankfully, resetting the BIOS is generally a simple process that can be done in several ways, each to accommodate different system setups and access levels. Our guide is designed to walk you through these methods step by step and make this task as straightforward as possible.
Via Motherboard Jumper
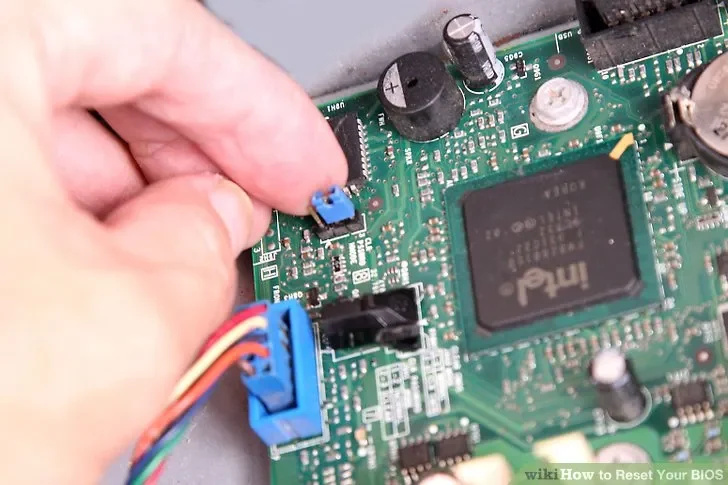
Clearing the CMOS via a motherboard jumper is a direct and effective method. The jumper is a small pin connector located on the motherboard itself.
- Turn off your computer and disconnect the power cable.
- Open your computer case and locate the jumper named CLR_CMOS, CLEAR, CLEAR CMOS, JCMOS1, etc. It’s typically near the battery.
- Use a jumper cap to connect the two pins, or if one is already in place, move it so that it covers the designated clear pins.
- Leave it in place for about 5-10 seconds then replace the jumper to its original position.
- Reconnect the power and turn on the computer.
Summary: By resetting your BIOS in this manner, you’re returning the system to its factory settings, which can resolve many hardware or software issues. The downside is the necessity to open your computer case which might be intimidating for non-tech-savvy users.
Removing the CMOS Battery
Physically taking out the CMOS battery temporarily can reset your BIOS to its default settings.
- Power off your PC and disconnect from the power source.
- Open up the computer’s case to locate the silver coin-shaped battery on the motherboard.
- Carefully remove the battery, being careful not to damage the motherboard.
- Wait for 5 to 15 minutes before reinserting the battery into its holder.
- Close the case, reconnect the power, and boot up the computer.
Summary: This method is usually safe and effective. However, removing the battery can be a bit risky as it requires handling the motherboard directly, which carries a small risk of static damage.
BIOS Setup Menu
If you can boot your computer, you can often reset the BIOS directly from the menu.
- Restart your computer and press the key to enter BIOS setup; this is usually Del or F2.
- Once in the BIOS setup, look for an option that says “Restore Defaults” or “Load Setup Defaults.”
- Select this option, confirm the choice, and exit the BIOS saving the changes.
Summary: This method is user-friendly and doesn’t require physically touching any internal components. However, if the PC fails to boot or the BIOS is inaccessible, this method won’t be viable.
Motherboard Specific Software
Some motherboards come with dedicated software that can clear the CMOS from within the Windows environment.
- Find and download the software from your motherboard manufacturer’s website.
- Install and open the software and look for an option to restore BIOS to default settings.
- Apply the setting, and the software will do the rest upon the next system reboot.
Summary: This is a convenient method for users who prefer not to open up their PCs; however, the downside is that you need to be able to boot into Windows, and it might not be supported by all motherboards.
Power Button Hold
For some motherboards, simply holding down the power button can reset the BIOS.
- Remove the power cord and any connected batteries if it’s a laptop.
- Press and hold the power button for at least 15 seconds.
- Reconnect the power and turn on the PC.
Summary: It’s easy and requires no special tools. However, it may not work for all motherboards, and the effectiveness might vary.
CMOS Reset Button
Some modern motherboards feature a dedicated button for CMOS clearing.
- Locate the CMOS reset button on the rear I/O panel or on the motherboard itself.
- Press and hold this button for 5 to 10 seconds with the computer off but plugged in.
- Release the button and start your PC.
Summary: This is one of the easiest methods if your motherboard has such a button, though not all motherboards will feature this.
Shortcut Key During Boot
Occasionally, there’s a keyboard shortcut that can reset the BIOS during the computer boot process.
- Restart your PC and watch for a prompt during the boot-up process that indicates you can press a key to clear or reset the CMOS.
- Press the indicated key quickly before the operating system starts to load.
- Follow any on-screen instructions to complete the process.
Summary: This quick keypress is simple, but can be easily missed, and is not standard across all systems.
BIOS Flashback
Many motherboards include a BIOS flashback feature which can reset the BIOS.
- Download the latest BIOS update from your motherboard manufacturer’s website onto a USB flash drive.
- Rename the file if required by the manufacturer’s instructions.
- Insert the USB into the designated BIOS flashback port and press the BIOS flashback button.
- Wait for the process to complete, signaled by a flashing light or beep.
Summary: This not only clears your CMOS but updates your BIOS simultaneously. However, it’s a bit more complex and can be daunting for users unfamiliar with BIOS updates.
Professional Assistance
If you’re uncomfortable with handling the hardware, consider getting professional help.
- Reach out to a professional computer technician.
- Describe the issues that led you to believe a CMOS reset might be necessary.
- Allow them to handle the process and follow their advice for preventing future issues.
Summary: This is a safe and secure option, though it will likely incur a service fee.
Read the Manual
When all else fails or if doubt arises, refer to your motherboard’s user manual.
- Obtain a digital or physical copy of your motherboard’s user manual.
- Look for the section about clearing the CMOS or resetting the BIOS.
- Follow the manufacturer-specific instructions detailed in the manual.
Summary: The manual is designed for your specific motherboard and provides the most reliable method for resetting your BIOS, although locating and understanding the manual may pose a challenge for some.
In conclusion, resetting your BIOS isn’t a task reserved for tech wizards. With the right guidance, it can be done safely and effectively by almost anyone. Whether you choose a simple keystroke method, opt to physically adjust the hardware, or decide on professional help, these steps ensure that the process will be as stress-free as possible. By understanding the various ways to reset your BIOS, you can quickly troubleshoot computer issues that may otherwise have had you stumped.
FAQs
Q: Will clearing the CMOS delete my personal files?
A: No, clearing the CMOS affects the BIOS settings, not the data on your hard drives or solid-state drives.
Q: How often should I reset my BIOS to default settings?
A: There’s no need to regularly reset your BIOS. It should only be done if you’re experiencing hardware compatibility issues or other BIOS-related problems.
Q: What do I do if my computer won’t boot after resetting the BIOS?
A: Check all internal connections to ensure everything is seated properly and consult your motherboard manual. If the issue persists, you may need to seek professional assistance.


