In our connected world, sharing memories with friends and family has never been easier, especially for iPhone users. Apple’s shared albums feature provides a simple way to collect and distribute photos and videos among a group, making sure no one misses out on those cherished moments. If you’ve been invited to join a shared album, you might be wondering how to view those shared memories. Fortunately, accepting an invite is straightforward and can enrich your photo library with a wealth of collective experiences. No technical expertise is required; just follow these easy steps to start enjoying and contributing to your shared album.
Accepting Through the Photos App
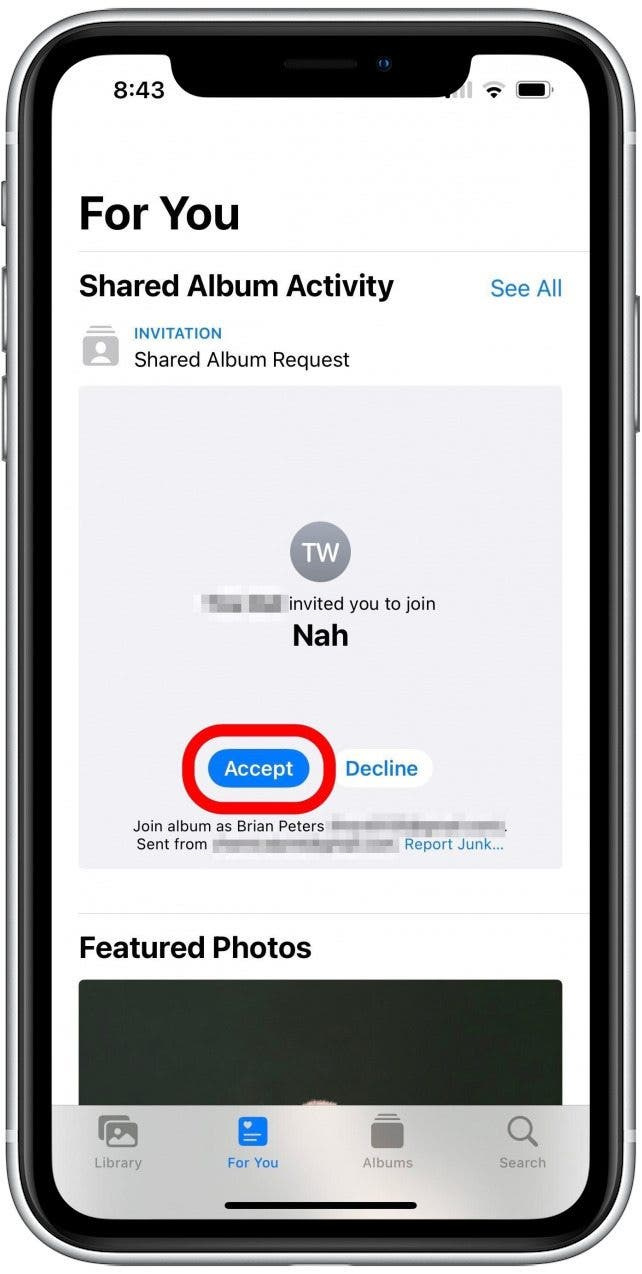
When you receive a shared album invite, your iPhone’s Photos app is the first place to visit. The app not only organizes and stores your photos but also manages shared albums.
- Open the Photos app on your iPhone.
- Tap the For You tab at the bottom of the screen.
- You should see an invitation to the shared album under the section Invitations.
- Tap Accept to add the shared album to your Photos.
- Once accepted, the shared album will appear under the Shared Albums section when you tap the Albums tab at the bottom.
By accepting an invite through the Photos app, you get immediate access to the shared album. This is a simple and quick way to stay connected with friends and family through shared memories. One downside could be that if you’re not regularly checking the Photos app, you might miss the invitation.
Notification Center
Sometimes shared album invites are sent via notifications.
- When an invite pops up as a notification, swipe down from the top of your iPhone screen to open the Notification Center.
- Find the shared album invitation notification.
- Tap the notification, which will redirect you to the Photos app.
- Here, you can tap “Accept” to join the shared album.
This method is quite convenient if you’re already using your iPhone, though notifications can become buried under others over time, leading to potentially overlooked invites.
Email Invitations
If an invitation is sent to you via email, the process is just as straightforward.
- Open the Mail app or your preferred email client on your iPhone.
- Search for an email from the sender with a subject indicating a shared album invitation.
- Open the email and tap the Join this Shared Album link.
- This will redirect you to the Photos app, where you can accept the invitation by tapping “Accept.”
Email invitations are great as they can be accessed anytime, but they do risk being caught up in spam filters or lost amidst other emails.
From Messages
Shared album invitations can also arrive through the Messages app.
- Open the Messages app.
- Locate the conversation where the shared album invite was sent.
- Tap the invitation link or preview.
- You’ll be taken to the Photos app, where you can tap “Accept” to access the shared album.
Accepting via Messages is efficient, especially if you’re already in a conversation with the person sharing the album. However, group chats can become busy, and the invite might get missed if it’s far up in the message history.
The Photos app might sometimes suggest shared albums based on your activity.
- In the Photos app, go to the Albums tab.
- Look for any Shared Album Suggestions.
- If a suggestion is actually an invite you haven’t yet accepted, tap it and choose “Accept.”
This method relies on the Photos app’s intelligence, which can be helpful, but it’s not always guaranteed to provide these suggestions.
Reminder Alerts
If you’ve missed an invite, your iPhone may give you a reminder.
- Look out for reminder alerts that may appear on your lock screen or Notification Center.
- Tap on the alert to be taken to the invitation in the Photos app.
- Once there, you can accept the invite.
Reminders are useful if you’ve missed the original invite, but they require that you pay attention to alerts that often pop up on your iPhone.
Manually Checking for Invites
If you’re expecting an invite but haven’t seen a notification, you can check manually.
- Open the Photos app.
- Go to the For You tab.
- Scroll through the section to see if there’s any invitation waiting.
- If there is, tap “Accept” to join the shared album.
Manually checking ensures that you don’t miss any invites, but it does require that you remember to check periodically.
Using Siri to Accept Invitations
Make use of Siri, your digital assistant, to help with accepting an invitation.
- Activate Siri by holding down the side button or saying “Hey Siri” if this feature is enabled.
- Ask Siri, “Do I have any shared album invitations?”
- Siri will check and either let you know you don’t have any or open the Photos app to an invitation you can accept.
This method is interactive and hands-free, making it a modern convenience if you often use Siri. However, it may not be comfortable for everyone and requires clear speech to understand the command.
Family Sharing
For those in a Family Sharing group, accepting shared album invites can sometimes be even easier.
- If Family Sharing is set up, invitations to join albums may be automatically accepted.
- To check, open the Photos app and go to the Albums tab.
- Look for a new shared album which might indicate an auto-accepted invite.
The benefit here is the automation, but it may also lead to joining albums unwittingly if you prefer to have more control over which albums to join.
Receiving Invites on Multiple Devices
If you have multiple Apple devices (i.e., an iPad in addition to your iPhone), you may get the invitation on all devices.
- You only need to accept the invitation on one device.
- As long as you’re using the same Apple ID, the shared album will appear on all your devices after it’s been accepted.
The advantage is the seamless experience across devices, although it may sometimes be confusing or overwhelming to receive the same invites on multiple devices.
Sharing memories through albums on your iPhone is a delightful way to stay connected with your loved ones. With any of these methods, you’re only a few taps away from accessing a collective trove of photos and videos. Each approach provides the convenience of keeping precious memories at your fingertips, with the only potential downside being the occasional need to keep an eye out for the invites.
As we wrap up this guide, we hope you’ve found it useful in navigating the simple process of accepting shared album invites on your iPhone. This feature exemplifies how technology has advanced to bring us together, allowing us to effortlessly share life’s moments. With the shared album capability, you never have to worry about missing out on the latest family gathering, friendly outing, or any special occasion captured by those close to you. And remember, tech might seem complicated at first glance, but it’s often just a matter of taking things step by step—much like accepting a shared album invitation.
Frequently Asked Questions
Q: What if I accidentally decline a shared album invitation? Can I still join the album later?
A: Yes, you can still join the album if it was accidentally declined. Ask the album owner to send you another invitation.
Q: Will accepting a shared album take up space on my iPhone?
A: Yes, shared albums use iCloud storage but do not count against your iCloud storage limit. However, if you save photos from the shared album to your personal library, it will take up space on your device.
Q: Can I contribute to a shared album after accepting the invite?
A: Yes, once you’ve accepted the invitation, you can add your own photos and videos to the shared album if the album owner has allowed contributors to add content.