If you’ve recently purchased a Roku device or are looking to freshen up your streaming experience, adding apps, also known as “channels,” is a must for maximizing your Roku’s potential. Whether you’re into movies, sports, news, or just looking to binge-watch your favorite TV series, Roku offers a plethora of options. Moving ahead, we’ll walk you through different methods to add these channels to your Roku device, ensuring your streaming experience is tailored just the way you like it.
Using the Roku Device
Navigating the Roku interface to add channels might seem daunting at first, but it’s designed with user-friendliness in mind. Below are the steps to add channels directly from your Roku streaming device.
- Turn on your Roku device and use your Roku remote to select ‘Home’ if you are not already on the home screen.
- Scroll to ‘Streaming Channels’ and press ‘OK’ on your remote to open the Channel Store.
- Browse or search for a channel. You can either scroll through the list of featured channels, search by categories, or use the search function if you know the name of the channel you’re looking for.
- Select the channel you wish to add. Once you find it, select it by pressing ‘OK’ on your remote.
- Add the channel. If the channel is free, select ‘Add Channel’ to install it on your Roku device. If it’s a paid channel, you’ll be prompted to purchase it before proceeding.
Summary: This method is quick and convenient, allowing immediate access to new content as soon as you add it. On the downside, navigating with a remote can be less efficient compared to using a keyboard for searches.
Via the Roku Mobile App
The Roku mobile app offers another handy way to add channels and it’s particularly useful if you prefer using a smartphone to a remote.
- Download the Roku mobile app from the Google Play Store or Apple App Store and install it on your smartphone.
- Connect your smartphone to the same Wi-Fi network as your Roku device.
- Open the Roku mobile app and sign in to your Roku account if prompted.
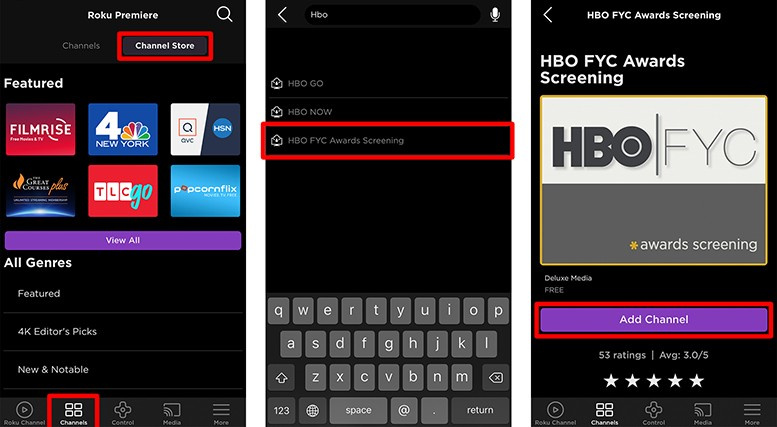
- Tap on the ‘Channels’ icon at the bottom of the screen.
- Navigate to the ‘Channel Store’. Just like on the Roku device, you can browse by categories or search for a channel.
- Select and add the channel. Tap on the channel you’re interested in and hit ‘Add Channel.’ If it’s paid, you’ll need to complete the purchase process.
Summary: Using the Roku mobile app provides the ease of typing and navigation on a touchscreen and often makes searching for channels faster. The possible downside is that you’ll need a smartphone compatible with the app.
On the Roku Website
Adding apps via the Roku website is an efficient option for those who want the convenience of using a computer keyboard and a larger screen.
- Visit the Roku Channel Store website on a web browser.
- Sign in to your Roku account using your email and password.
- Browse or search for channels using the search bar or by viewing the categories offered.
- Click on the desired channel. This will bring up more information about the channel and the option to add it.
- Add the channel. Click on ‘Add Channel’ to install it to your Roku device. For pay channels, follow the prompts to make your purchase.
Summary: The website method is great for those who prefer to manage their Roku channels from their computer and enjoy the ease of a full-size keyboard and screen. However, channel updates may take longer to appear on your TV since the device regularly checks for new updates, typically within a 24-hour window.
Update Channels
Keeping your Roku channels up-to-date ensures that you have access to the latest content and features, and it can also help improve performance.
- Access the ‘Home’ screen on your Roku device using your remote.
- Navigate to ‘Settings’ and select ‘System.’
- Choose ‘System update.’
- Select ‘Check now’ to manually look for channel updates and install them.
Summary: Regularly updating channels can enhance your streaming experience by providing you with new features and bug fixes. Updates are usually automatic, but manually checking can be a useful way to ensure you’re up to date.
Rearrange Channels
Organizing your Roku home screen by rearranging channels allows you to keep your most-watched channels accessible.
- Highlight the channel you want to move on your home screen.
- Press the ’’ (star) button* on your remote to open the options menu.
- Select ‘Move channel.’
- Use the directional pad on your remote to position the channel where you’d like it.
- Press ‘OK’ to confirm the new location for your channel.
Summary: By rearranging channels, you enhance navigation and make your Roku experience more personalized. While this makes accessing your favorite channels easier, be aware that frequent rearrangements may become confusing for shared users.
Private Channels
Roku allows you to add channels that are not listed in the official Channel Store, often referred to as “private” or “hidden” channels.
- Go to my.roku.com on your web browser and log in to your Roku account.
- Scroll down and click on ‘Add a channel with a code.’
- Enter the unique channel code. (Be aware that adding private channels can potentially lead to unsupported or unauthorized content.)
- Click ‘Add Channel’ and confirm if prompted.
Summary: Private channels enable access to niche content that might not be available in the Roku Channel Store, providing a broader spectrum of streaming options. However, these channels are often less regulated for quality and can sometimes lead to accessing content of dubious legality or security.
Remove Channels
As your interests evolve, you might find yourself wanting to declutter your Roku’s home screen by removing channels.
- Select the channel you wish to remove from the Roku home screen using your remote.
- Press the ’’ (star) button* on your remote to bring up the options menu.
- Choose ‘Remove channel’ and confirm your selection.
Summary: Removing unused channels can help streamline your Roku interface, making it easier to navigate and freeing up space. However, if a channel is removed by accident, re-adding it could be inconvenient.
Search Channels by Voice
Utilizing voice search is a convenient, hands-free way to find and add channels on Roku if your remote supports voice commands.
- Press the voice button on your compatible Roku remote.
- Speak the channel name or type of content you are looking for.
- Follow the on-screen prompts to add the channel if it doesn’t automatically install.
Summary: Voice search can significantly speed up the search process and reduce the hassle of typing with a remote. Nonetheless, voice recognition may not be perfect, especially with uncommon channel names or accents.
Guest Mode
Enabling guest mode allows visitors to add and remove channels without affecting your personal Roku account settings.
- Navigate to ‘Settings’ on your Roku device.
- Select ‘System’ and then ‘Guest mode.’
- Follow the on-screen instructions to enable guest mode. Visitors can add channels during their stay, which will be removed once guest mode is exited.
Summary: Guest mode is excellent for hosting without compromising your account, but remember to deactivate guest mode after your guests leave to return to your personalized settings.
Channel Autoplay
Channel autoplay lets you jump straight into content without additional navigation steps once you select a channel.
- Highlight the desired channel on your Roku home screen.
- Press the ‘OK’ button. Certain channels will start playing content immediately based on your viewing preferences.
Summary: Autoplay is a time-saver and a way to discover new content on your favorite channels. However, it may use more data by playing content automatically and can sometimes start content not suitable for all audiences.
Use Roku Channel Lists
Leveraging lists of popular or recommended Roku channels found on the internet can help you discover new apps and content.
- Search online for top Roku channel lists from reputable websites or user forums.
- Browse the suggested channels and make note of any that interest you.
- Add the channels to your Roku device using the previously mentioned methods.
Summary: Using channel lists can be a fun way to discover new content, though the quality and appropriateness of recommendations can vary widely.
In conclusion, adding apps to your Roku device is a simple process that can be done in a variety of ways, including directly through your Roku device, via the mobile app, or through the Roku website. The flexibility of adding, organizing, and updating channels ensures a personalized streaming experience tailored to your preferences. By exploring these methods, you’ll be able to quickly and effortlessly curate a selection of channels that cater to your interests and maximize your Roku device’s capabilities.
FAQs:
Q: Can I add channels to Roku without a Roku account?
A: No, a Roku account is necessary to add channels to your Roku device as it keeps track of your installed channels and settings.
Q: How long does it take for a new channel to appear on my Roku home screen?
A: Channels added through the device or app typically appear immediately. For channels added via the website, it can take up to 24 hours unless you manually check for updates on the device.
Q: Are private channels safe to add to my Roku?
A: Adding private channels can be risky, as they are not officially vetted by Roku. Always ensure you trust the source of the channel code and are aware that some may host unauthorized content.


