In our fast-paced world, multitasking is not just a skill; it’s a necessity. Whether you’re running errands, heading out for a day of meetings, or planning an adventure with friends, arranging your transportation ahead of time can keep your day running smoothly. Ride-sharing services like Lyft have evolved to accommodate our busy lifestyles, and one particular feature that can be a game-changer is the ability to add multiple stops to a single trip. This not only saves time but also ensures you don’t have to arrange a new ride at every location. Figuring out how to make use of this feature can be tricky if you’re unfamiliar with the app, but with a step-by-step guide, you’ll become a multi-stop master in no time.
Adding a Stop Before Your Ride
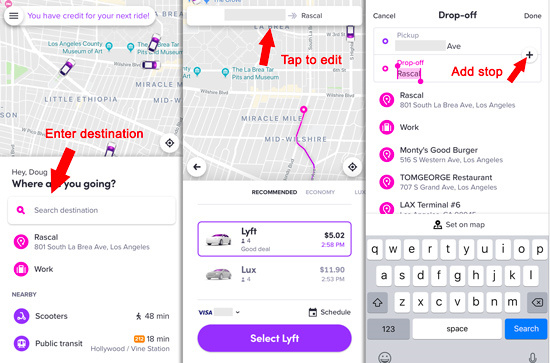
When planning your trip with Lyft, you might already know all the stops you need to make. Adding these stops before you hail your ride is convenient and lets your driver know the plan upfront. Here’s how you get this done.
- Open your Lyft app.
- Enter your first destination in the ‘Where are you going?’ section.
- Tap ‘Add stop’ to include additional locations (you can add up to 2 extra stops).
- Each stop can be rearranged by pressing and holding the three lines next to the stop and dragging it to your preferred order.
- Once the stops are in order, select a ride type and continue as usual.
Summary
This method allows you to have a structured route from the get-go, providing clear expectations for both you and your driver. Drivers can plan the most efficient route, potentially saving you time. However, be aware that adding multiple stops can increase the overall fare due to the longer distance or added time.
Editing Stops During Your Ride
Sometimes plans change mid-ride, or you forget to add a stop beforehand. Lyft offers the flexibility to adjust your journey as needed.
- During your trip, swipe up on the grey bar at the bottom of the app screen.
- Tap ‘Add or change’ next to your destination.
- Insert the additional stop you require.
- To rearrange, use the same method described in adding stops before the ride.
- Confirm your changes.
Summary
Editing stops during the ride provides flexibility and convenience. However, these changes might catch the driver off guard and could potentially complicate the route if not communicated clearly.
Communicating with Your Driver
Clear communication with your Lyft driver will make adding multiple stops a seamless process. Before or right after you start your trip, it’s considerate to briefly discuss your route with your driver.
- Once you’ve added multiple stops in the app, verbally confirm the route with the driver.
- Ensure the driver is comfortable with the additional destinations.
- Answer any questions they might have for a smoother ride.
Summary
Good communication builds a positive rapport with your driver and can lead to a more pleasant experience. It’s also respectful to your driver since they’re partnering with you in your day’s journey. The downside could be a potential misunderstanding if the information isn’t shared clearly.
Planning Ahead for Delays
Understanding that each stop can cause delays is crucial when scheduling your trip, especially if you’re on a tight schedule.
- Consider the time of day and potential traffic at each stop.
- Allow extra time at each stop for unexpected delays.
- Inform your driver if you know a certain stop will be quick (e.g., dropping off a package).
Summary
Planning for delays ensures you remain on schedule without rushing and putting pressure on your driver. The drawback is that you might overestimate the time needed and end up waiting longer than necessary.
Managing Time at Each Stop
Lyft’s policy allows for a maximum of 3 minutes wait time at each stop. Managing your time well is crucial.
- Prepare for your stops by having everything ready in advance.
- Keep track of time to ensure you are back in the car within the 3-minute window.
- Consider rescheduling tasks that might take longer to a different ride.
Summary
By managing your time efficiently, you respect your driver’s time and keep your trip costs down. However, underestimating the time needed at a stop may lead to rushed transactions or possibly needing to schedule a new ride if you exceed the time limit.
Factor in Additional Costs
Adding stops to your Lyft journey can increase the fare due to the added distance and time.
- Review Lyft’s fare estimate when you add your stops.
- Be prepared for the fare to change if there are unexpected delays or changes to your route.
- Consider if the convenience of multiple stops justifies the potential cost increase.
Summary
By factoring in additional costs, you avoid surprises when the trip ends. It can be more expensive, but the efficiency of completing multiple tasks in one trip might be worth the extra cost.
Maximizing Efficiency
To make the most out of your multi-stop Lyft ride, it’s essential to plan your stops in a logical order.
- Add your stops in a geographical sequence to avoid backtracking.
- Consider traffic patterns and rush hours when planning the sequence.
- Use map applications to visualize the best route if you’re unsure.
Summary
Efficient route planning can reduce the trip duration and cost, resulting in a more satisfying experience. However, poor planning might lead to a longer trip and a higher fare.
Keeping Your Driver Informed
Updating your driver on changes as soon as possible helps ensure a smooth ride.
- Use the chat feature in the Lyft app to communicate any updates clearly.
- If a stop needs to be skipped or added, tell your driver immediately.
- Share any relevant details about the stops that might assist the driver.
Summary
Keeping your driver in the loop can lead to a flexible and accommodating service experience. However, too many changes might complicate the ride and potentially cause frustration.
Review Stop Locations for Accuracy
Before confirming your stops, double-check their accuracy to prevent miscommunications.
- Verify each address and location you enter for accuracy.
- Check the final route overview to ensure it makes sense.
- Speak up immediately if you notice an error during the ride.
Summary
Accuracy in stop locations can save time by preventing detours and errors. However, failure to review can result in inconvenient and costly mistakes.
Consider Peak Times and Surge Pricing
Lastly, it’s always a good idea to take into account the time of day when scheduling a multi-stop ride.
- Plan your trip outside of peak hours to avoid surge pricing.
- Monitor the app for fare estimates before confirming your ride.
- Try to avoid rush hours for a quicker, potentially cheaper journey.
Summary
Avoiding peak times can save you money and reduce your trip duration. However, you may need to adjust your schedule accordingly, which isn’t always feasible.
In conclusion, adding multiple stops to your Lyft ride offers a layer of convenience and efficiency to your day’s travel. By understanding and utilizing the app’s features, you can plan a successful journey that meets all your needs. Keep communication clear, be mindful of your drivers’ and your own time, and always review your plans for accuracy. This approach to travel not only allows for a structured day but also helps foster a positive relationship with your driver, ensuring smoother rides in the future.
FAQs
Q: How many stops can I add to my Lyft ride?
A: You can add up to two additional stops, making a total of three stops for your Lyft trip.
Q: What happens if I take longer than 3 minutes at a stop?
A: The Lyft driver is allowed to leave if you take longer than the allotted 3 minutes at a stop, and you may be charged a fee for the time you’ve used. It’s best to rebook your ride if you anticipate a longer wait.
Q: Does adding stops to my Lyft ride cost more?
A: Yes, adding stops can increase the overall fare because the total ride time and distance might increase. Always check the fare estimate when adding stops to your journey.