Imagine being able to express yourself, your mood, and your tastes without saying a word. Your Facebook profile is more than just pictures and posts; it can be a personal canvas showcasing your love for music. Whether you’re a fan of upbeat pop, smooth jazz, or any genre in between, adding music to your Facebook profile can personalize your social media presence and make your interactions more engaging. And the best part? Doing so is easy and fun! Here’s how you can elevate your profile with your favorite tunes.
Personalized Soundtrack
Adding music to your Facebook profile allows you to create a personalized soundtrack that represents you. It’s a way to share your favorite songs with friends and visitors and to discover common musical interests. Whether it’s the latest hit or a timeless classic, your profile music sets the stage for your online persona.
Detailed Steps:
- Open Your Facebook App: Start by opening the Facebook app on your mobile device, as this feature is not available on the desktop version.
- Go to Your Profile: Tap on your profile picture to go to your personal Facebook profile.
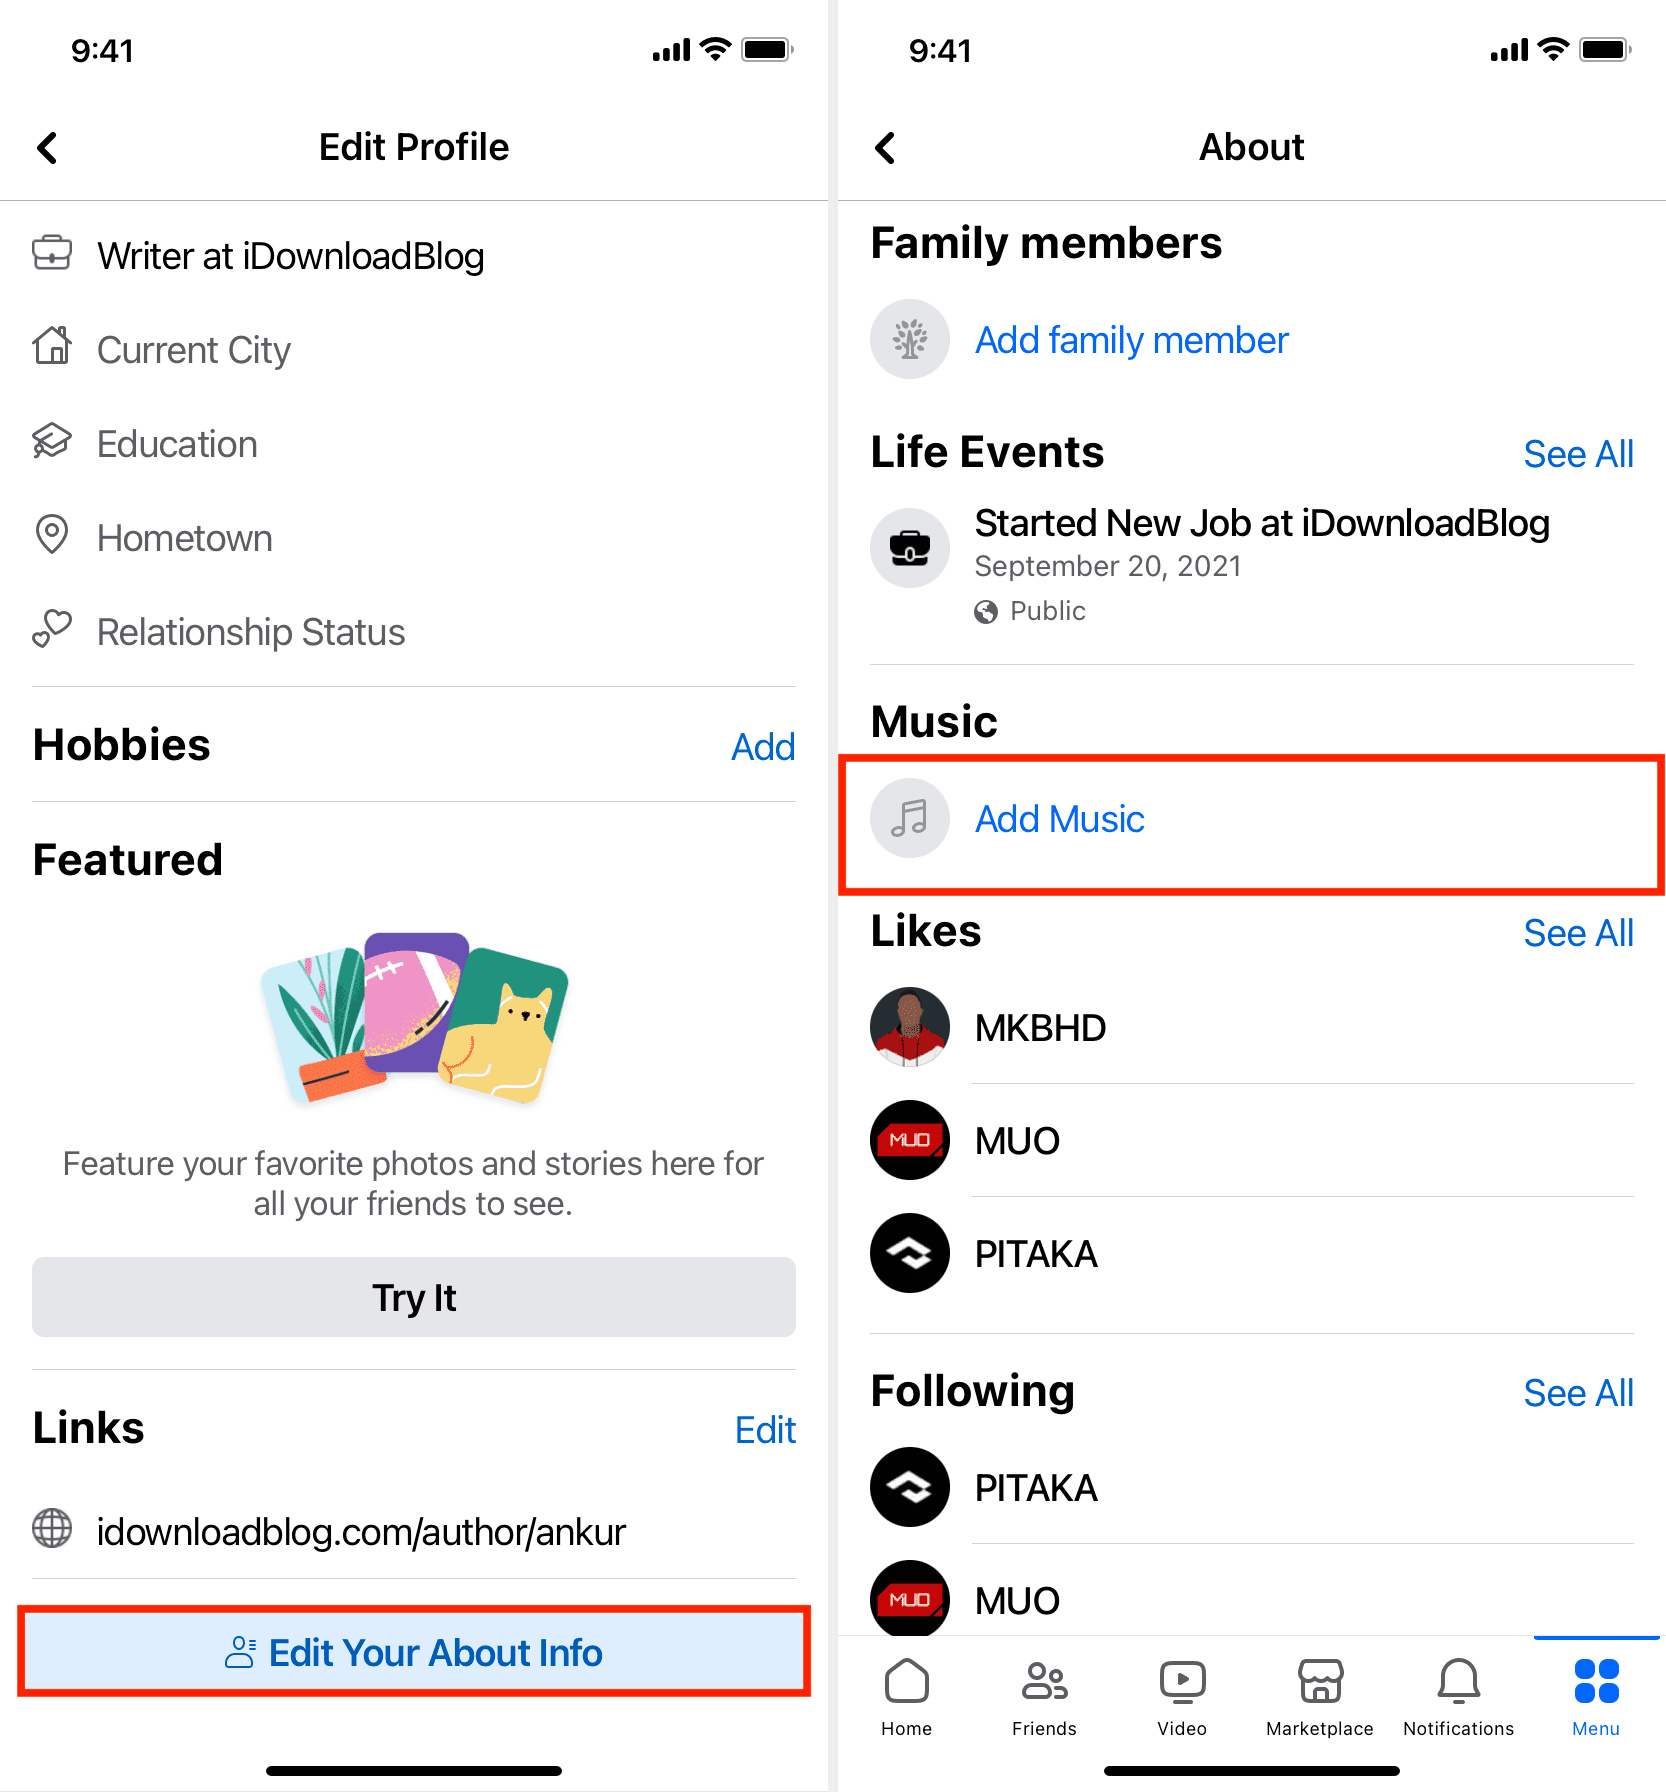
- Access the Music Section: Scroll down and look for the “Music” section. You might find it under the ‘More’ tab if it’s not immediately visible.
- Adding Songs: Once in the music section, tap on “Add Music.” Use the search bar to find the songs you want to add to your profile.
- Preview and Select: You can listen to a short preview of the song by tapping on it. If it’s the right one, tap “Add” to include it in your profile.
Summary:
This method instantly spruces up your profile, offering visitors a taste of your musical preferences. It showcases your personality and can serve as an icebreaker or conversation starter. The downside is that it can be distracting if someone is visiting your profile with a different intent, and not everyone has the same taste in music.
Custom Playlist
With the playlist feature on Facebook, you don’t have to settle for one song. You can compile a list that captures various aspects of your personality or set the mood you want to convey on your profile.
Detailed Steps:
- Repeat Steps 1 to 3: Follow the same first steps as in the ‘Personalized Soundtrack’ section to access the ‘Music’ tab on your Facebook profile.
- Create A Playlist: In the music section, you’ll find an option to create a playlist. Tap on it.
- Name Your Playlist: Give your playlist a catchy name that reflects the theme or mood you’re going for.
- Search and Add Tracks: Just like adding a single song, search for music and press “Add” to put them into your playlist.
Summary:
Creating a custom playlist offers a curated experience for visitors, letting them scroll through a selection of your chosen tracks. It’s a dynamic way to share more about who you are. On the downside, maintaining the playlist involves effort, as you might want to update it regularly.
Music on Stories
Sharing music on Facebook Stories is a temporary yet impactful way to share your music tastes with friends. It’s a snapshot of what you’re currently into, without the permanence of profile music or playlists.
Detailed Steps:
- Open the Story Feature: On your Facebook home page, tap on ‘Add to Story.’
- Capture or Select Content: Either take a new photo/video or choose one from your gallery.
- Add Music Sticker: Once you’ve got your content, tap on the sticker icon and then select the ‘Music’ sticker.
- Choose and Preview Songs: Search for the song and select the perfect segment for your story.
- Post Your Story: Add any further stickers or text if you like, then post your story.
Summary:
Music in stories is perfect for those who appreciate music as a daily soundtrack that changes with their mood. It’s great for engagement but is only visible for 24 hours, and the chosen song segment might not fully represent the song’s essence.
Musical Bio
You can also mention your favorite music in your Facebook bio, as a more static form of expressing your musical identity.
Detailed Steps:
- Go to Profile>Edit Profile: Click on ‘Edit Profile’ right under your profile picture.
- Edit Bio: Find the bio section and tap to add a short description.
- Mention Favorite Music: Include your favorite artists, songs, or genres in a witty or straightforward way.
Summary:
This is a subtle nod to your musical preferences for anyone taking the time to read your bio. It’s not as interactive as adding actual music tracks, but it’s simple and gets the message across to like-minded individuals.
Facebook Watch Party
A watch party allows you and your friends to listen and react to music videos together in real time.
Detailed Steps:
- Go to Your News Feed: Click on the ‘Watch Party’ option (you may find it under ‘Create Post’).
- Choose Videos to Watch: Search for music videos by your favorite artists and add them to the queue.
- Start Watching: Invite friends and start watching together. You can interact via comments and reactions.
Summary:
Watch parties are a great way to have a shared listening experience on Facebook. However, coordinating time with friends can be challenging, and it may not appeal to everyone you wish to share music with.
Sharing Links
You can share song and album links directly on your Facebook timeline from various music streaming platforms.
Detailed Steps:
- Choose a Song on a Streaming Platform: Open your preferred app like Spotify or Apple Music.
- Get Shareable Link: Find the share option in the song or album menu and copy the link.
- Create a New Facebook Post: Go back to Facebook and paste the link into your post box.
- Add Some Thoughts: Write something about why you love this song or album.
- Post It: Share the post with your friends and network.
Summary:
Link sharing is one of the easiest ways to share music. It allows your friends to listen to full songs and discover new music. However, not everyone will take the time to listen to the song outside of Facebook.
Music Page Likes
Liking and following your favorite artists’ and bands’ pages on Facebook is another way to affiliate with music.
Detailed Steps:
- Search for the Artist/Band Page: Use the search bar to find the official page of the artist or band.
- Like and Follow: Hit the ‘Like’ and ‘Follow’ buttons to get updates from them directly in your news feed.
Summary:
Engaging with artists’ pages is an easy way to show your musical taste and get the latest music content. The downside is that not all artists are active on Facebook, limiting this option.
Facebook Music Groups
Joining music-focused Facebook groups is an interactive way to discuss and share music.
Detailed Steps:
- Search for Music Groups: Use the search bar to find groups that match your musical interests.
- Request to Join: Some groups are public, while others may require permission to join.
- Participate and Share: Once in the group, share songs, discuss with others, and discover new music.
Summary:
Groups are excellent for community engagement and discovering new music. The community aspect can be very enriching, but it might expose you to differing opinions and debates.
Sharing Music Memories
Reminisce about concerts or events by sharing past music experiences on your timeline.
Detailed Steps:
- Find the Throwback: Look through your photos and find ones tied to music memories like concerts.
- Post with Context: Share the photo with a story or memory attached to it.
- Tag the Artist or Event: If applicable, tag the artist’s page or the event for greater reach.
Summary:
Posting music memories can be a very personal and nostalgic way to connect with others. It might not directly share current musical preferences but it adds depth to your musical journey on your profile.
Supporting Music by Commenting
Actively commenting on music content or interacting with music-related posts shares your interest indirectly.
Detailed Steps:
- Engage with Content: When you see a music post that resonates with you, leave a comment.
- Use Facebook Reactions: Use the reaction buttons to express what you feel about the post.
- Post About Music Events: If you attend a music event, share your experience in a post.
Summary:
This method relies on spontaneous interaction and might be unnoticed by many. It’s a more passive approach but genuine when done authentically.
Conclusion
Injecting music into your Facebook profile is a multi-faceted experience that can be as diverse and unique as your music taste. Whether it’s through stories, posts, watch parties, or simply mentioning your favorite tunes in your bio, each method enhances your social media narrative. The key is to find the mix that feels right for you and resonates with your circle on Facebook, allowing your profile to hit all the right notes.
FAQs
How do I remove a song from my Facebook profile?
To remove a song from your Facebook profile, go to your profile, tap on the ‘Music’ section, find the song you want to remove, and then tap the three dots next to it. Select ‘Remove Song’ from the menu.
Can I add music to my Facebook profile on a desktop computer?
Currently, adding music to your Facebook profile is a feature primarily available on mobile devices.
Is the music I add to my Facebook profile visible to everyone?
The visibility of your profile music depends on your privacy settings. You can adjust who sees your music by changing the privacy settings in the ‘Music’ section of your profile.