If you’re someone who loves having your most-used applications or files at your fingertips, the Quick Launch toolbar in Windows 10 can be a handy feature. It grants easy access to your favorite programs without cluttering the desktop or having to navigate through the Start menu. This guide will walk you through the various ways to add and customize the Quick Launch toolbar to enhance your efficiency and streamline your workflow. Let’s get started on making your computer work best for you.
Displaying Quick Launch by Using Taskbar Settings
Windows 10 hides the Quick Launch toolbar by default, but you can bring it back using taskbar settings.
Steps:
- Right-click on an empty area of the taskbar. Ensure that it is not locked by seeing if there is a checkmark beside “Lock the taskbar.” If it is checked, click it to unlock.
- Choose “Toolbars” from the menu, and then select “New toolbar…”
- In the folder selection dialog that opens, enter the following path into the folder field:
%AppData%MicrosoftInternet ExplorerQuick Launch - Click “Select Folder” after you’ve entered the path.
Summary:
Enabling Quick Launch through taskbar settings is straightforward and restores a familiar feature from previous versions of Windows. It allows immediate access to important programs but might take up space on your taskbar.
Customizing Quick Launch Icons
Once you’ve added the Quick Launch toolbar, you can customize it by adding or removing icons.
Steps:
- To add an icon, drag any shortcut from your desktop or from a folder directly onto the Quick Launch bar.
- To remove icons, right-click on the icon you wish to remove on the Quick Launch bar and select “Delete.”
Summary:
Customizing your Quick Launch toolbar helps you maintain a clean workspace. However, over-customizing can lead to confusion if icons look similar or shortcuts become outdated.
Using Small Icons for a Cleaner Look
Using small icons on the Quick Launch toolbar saves space, allowing for more icons on the taskbar.
Steps:
- Right-click on an empty area on the taskbar.
- Choose “View” and then select “Small icons.”
Summary:
Small icons maximize taskbar space and allow for a neater look. However, users with vision impairments or preference for larger icons may find this less beneficial.
Adding Spacer to Organize Quick Launch Icons
To improve visibility, you could add an invisible spacer between icons on your Quick Launch toolbar.
Steps:
- Right-click on the taskbar and uncheck “Lock the taskbar” if necessary.
- Create a new folder anywhere on your PC for storing the spacers.
- Create a shortcut in this folder and name it “Spacer1” or as you like.
- Drag this shortcut to the Quick Launch bar where you want a space.
Summary:
Spacers can help organize your Quick Launch toolbar, but too many might look like missing icons and could be confusing for some users.
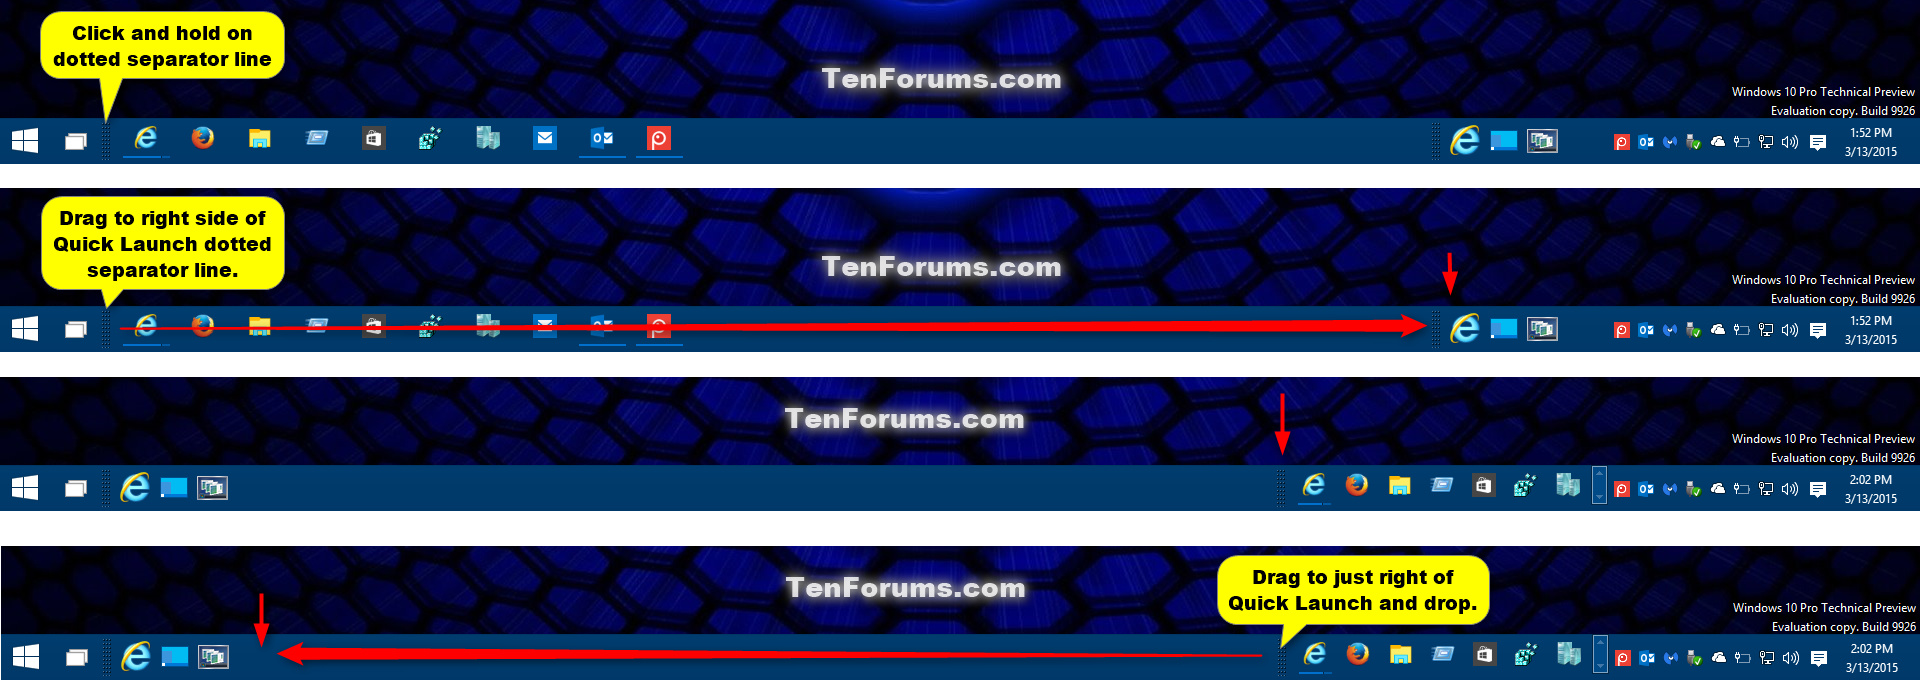
Moving Quick Launch to a Different Position
The position of the Quick Launch toolbar can be changed to suit your preference.
Steps:
- Right-click the taskbar and uncheck “Lock the taskbar” if it is checked.
- Click and drag the dotted lines that mark the Quick Launch toolbar to move it left or right on your taskbar.
Summary:
Moving the toolbar can help in personalizing your desktop but may require some adjustment as you get used to the new position.
Re-adding Default Quick Launch Icons
If you remove a default quick launch icon, you might want to re-add it later.
Steps:
- Open the Quick Launch folder by pasting
%AppData%MicrosoftInternet ExplorerQuick Launchinto the File Explorer address bar. - Right-click within the folder and select “New” and then “Shortcut.”
- Browse your way to the application or file you want to add and select it.
Summary:
Adding default icons provides familiarity and convenience. However, be aware that adding too many icons can clutter the space.
Keyboard Shortcuts for Quick Launch
Use keyboard shortcuts to open your Quick Launch programs without reaching for the mouse.
Steps:
- Press the Windows key + a number (1, 2, 3,…) corresponding to the position of the icon on the Quick Launch bar. For example, Windows key + 1 would launch the first item.
Summary:
Keyboard shortcuts offer speed and efficiency when working on the computer, ideal for users who prefer keyboard navigation over mouse usage.
Adjusting Quick Launch Icon Size
Adjust the icon size for better visibility or to fit more icons on your toolbar.
Steps:
- Right-click an empty area on the taskbar.
- Hover over “View” and then choose either “Large icons” or “Small icons.”
Summary:
Adjusting the icon size can help those who want larger icons for better visibility, but larger icons take up more space.
Quick Launch Auto-Hide for More Space
Auto-hide your taskbar to have the Quick Launch only when you need it.
Steps:
- Right-click the taskbar and select “Taskbar settings.”
- Scroll and switch the “Automatically hide the taskbar in desktop mode” toggle to “On.”
Summary:
Auto-hiding the taskbar with Quick Launch provides a clean desktop appearance, but it may disrupt workflow for those who require fast, persistent access to the toolbar.
Regular Maintenance of Quick Launch Toolbar
Keeping the toolbar organized and up-to-date ensures it remains a useful tool.
Steps:
- Periodically review the icons on your Quick Launch toolbar.
- Remove any programs you no longer use by right-clicking and selecting “Delete.”
Summary:
Regular maintenance prevents clutter but might result in accidentally removing frequently used programs if you’re not careful.
In Conclusion
The Quick Launch toolbar is a versatile and powerful tool in Windows 10 that can help to streamline your computer usage and keep essential programs and files at close reach. With the steps above, you can easily activate the Quick Launch toolbar, tailor it to your specific needs, and navigate your computer with quicker and more intuitive actions. Remember to keep your toolbar organized and tailored to your needs to make the most out of this feature.
Now that you understand how to add and manage the Quick Launch toolbar in Windows 10, you can enjoy the benefits of having quick access to your most-used applications and tools.
Frequently Asked Questions
Can I add folders to the Quick Launch toolbar?
Yes, you can drag and drop any folder onto the Quick Launch toolbar to add a quick access link to it.
What should I do if my Quick Launch toolbar disappears?
Verify that the toolbar is not simply hidden by unlocking the taskbar and dragging the boundaries to reveal it. If it’s missing, you might need to re-enable it by following the steps to display Quick Launch using Taskbar settings.
How many icons can I add to the Quick Launch toolbar?
There’s no strict limit to the number of icons; however, the practicality of the toolbar decreases if it becomes too cluttered. Keep only the most essential shortcuts for efficiency.


