Printing documents in monochrome, or black and white, can be a simple way to save on color ink in your printer, thus reducing costs, and can also give a professional look to your documents when color is not necessary. Microsoft Word offers a range of ways to print documents in black and white, whether you’re preparing a draft, formal documents, or simply prefer the simplicity of grayscale text.
Change Printer Properties
Before sending your Word document to the printer, you can adjust your printer settings to print in black and white. This change is made outside of the Word application but affects the print job once you execute it.
Detailed Steps:
- Open your document in Microsoft Word.
- Click on ‘File’ in the top left corner, and then select ‘Print’ to bring up the print menu.
- In the print menu, find and select your printer.
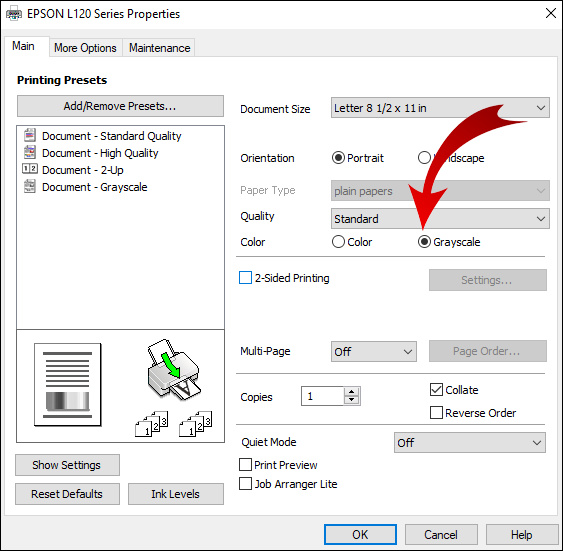
- Click on ‘Printer Properties,’ ‘Preferences,’ or ‘Settings’ (the name may vary depending on your printer model).
- Within the printer properties, look for an option to print in grayscale or black and white. This may be under the ‘Color’ tab, or within ‘Advanced’ settings.
- Select the ‘Black & White’ or ‘Grayscale’ option.
- Press ‘OK’ to save the setting.
- Click ‘Print’ in the Word document to print the document with your new settings.
Summary:
This method ensures that all documents sent to the printer will be in black and white, which can be beneficial for those wanting to conserve color ink. The downside is that it’s a setting that applies to all documents until you change it back, so you’ll need to remember to revert to color printing if needed.
Using Word Document Formatting
You can format the text in your Word document to print in black and white by changing the font color to black and removing any colored elements.
Detailed Steps:
- Highlight the text in your Word document that you want to print.
- Go to the ‘Home’ tab.
- Click on the font color button in the toolbar – it usually appears as a letter ‘A’ with a colored line beneath it.
- Select ‘Black’ as the color option.
- If your document includes colored images, click on each image, then select ‘Format’ and look for ‘Recolor’ or a similar option. Choose a grayscale or black and white option.
- Once you’ve formatted all elements, go to ‘File’ and then ‘Print’ to print as usual.
Summary:
This solution is document-specific, which means it won’t affect your other print jobs. However, it can be time-consuming to manually change each element, and it may not convert all elements perfectly to grayscale, particularly images.
Print in Grayscale
If you only need to print in black and white occasionally, you can use Word’s feature to print in grayscale, which converts the entire document to black and white for the printing session.
Detailed Steps:
- Open the document you want to print in Microsoft Word.
- Click on ‘File’ and then ‘Print’.
- In the print menu, find your printer and select ‘Printer Properties’.
- Look for a ‘Color’ tab or option, and within it, find the ‘Print in Grayscale’ dropdown.
- Choose ‘Black and White’ in the ‘Print in Grayscale’ options.
- Click ‘OK’, and then click ‘Print’ in the Word document.
Summary:
The ‘Print in Grayscale’ feature is great for one-off black and white print jobs. There are no permanent changes to your document or printer settings, but like with changing printer properties, this needs to be done each time you want to print in black and white.
Set Up Printing Defaults on Your Computer
You can change the printing defaults on your computer so that every document you print from Word will be in black and white.
Detailed Steps:
- Go to the ‘Control Panel’ on your PC, and then ‘Devices and Printers’.
- Right-click on your printer and select ‘Printing Preferences’.
- Change the default color setting to black and white or grayscale.
- Save the changes.
Summary:
By setting up printing defaults, you won’t need to change settings every time. However, this option may not be ideal if you frequently switch between color and black and white printing, as you’ll have to go back into the settings to change back to color.
Convert your Word Document to PDF
Converting your Word document to a PDF may also offer more consistent printing results in black and white.
Detailed Steps:
- With your Word document open, click on ‘File’, then ‘Save As’.
- Choose ‘PDF’ as the file format.
- Once the file is converted, open the PDF in Adobe Reader.
- Press ‘Ctrl+P’ to open the print dialog.
- Under ‘Printer’ settings, choose ‘Black & White’.
Summary:
While this method involves extra steps, PDFs are often better for preserving the layout. However, this may not be the most straightforward option for those unfamiliar with converting file types.
Using Microsoft Word’s Black and White Mode
You can use Word’s built-in ‘Black and White’ printing mode which is designed for reviewing documents before printing in full color.
Detailed Steps:
- Click ‘File’, then ‘Print’.
- Under ‘Settings’, select ‘Black and White’.
- Print your document.
Summary:
This is an easy method directly within Word that can be used for temporary changes to printing color. It’s not a permanent setting and won’t affect how the document is displayed on the screen.
Adjusting Display Settings
While adjusting the display settings doesn’t change how the document prints, it can help you visualize what the document will look like in black and white.
Detailed Steps:
- In Word, select ‘File’ then ‘Options’.
- Under ‘General’, find ‘Personalize your copy of Microsoft Office’.
- Change the ‘Office Theme’ to ‘Black and White’.
Summary:
This method doesn’t actually print your document in black and white but can be useful for visualizing the final product. Remember, you’ll need to use one of the other methods to actually print in black and white.
Creating a Black and White Template
If you regularly print documents in black and white, consider creating a template with predefined black and white settings.
Detailed Steps:
- Open a new Word document.
- Format all text and images in black and white using the steps from the ‘Using Word Document Formatting’ section.
- Save this document as a template by clicking ‘File’, then ‘Save As’, and select ‘Word Template’ in the ‘Save as type’ dropdown.
Summary:
A template saves time for future documents but is not useful for documents already created.
Check Your Printer’s User Manual
Different printer models may have specific instructions for setting black and white printing defaults.
Detailed Steps:
- Refer to your printer’s user manual for instructions on setting it to print in black and white.
Summary:
A printer-specific guide is beneficial for using all features efficiently, but not all users may have access to their printer’s user manual.
Seek Additional Help
If you’re still having trouble, consider seeking help from a friend, family member, or a professional who has more technical experience with printers and Microsoft Word.
Summary:
Getting help ensures the job gets done but might not be immediately available.
In conclusion, Microsoft Word and your printer offer various ways to print documents in black and white. Whether you’re adjusting settings for a single print job or changing default preferences, there’s an option that fits your needs. Remember, the choice depends on whether you prioritize ease of use, consistency across all print jobs, or document-specific settings.
FAQs
How do I save my black and white print settings for future use in Microsoft Word?
You can save your settings by setting your printer preferences to black and white within your computer’s devices and printer settings, or by creating and using a black and white Word template.
Can I make my document appear in black and white on the screen as well as in print?
Yes, you can adjust your display settings in Word under ‘Options’ to view your document in black and white, but remember, these settings do not affect the print color.
Why do my images still print in color even though I’ve set Word to print in black and white?
This may occur if the settings are only applied to the text. Ensure you’ve set your printer properties correctly, or format images to grayscale in the ‘Format’ picture tools within Word.


