With the advent of digital communication, managing emails effectively is crucial for staying on top of information and tasks. Whether you’re an individual looking to share information immediately or a business aiming to distribute emails among team members, Gmail’s auto-forwarding feature can be a game-changer. It allows you to automatically send incoming emails to one or more email addresses, ensuring nothing slips through the cracks. This guide will walk you through the steps to set this up within Gmail, making the process seamless even for those who aren’t tech-savvy.
Using Gmail Filters
Gmail’s filters are powerful tools that can help manage your email more effectively. By creating a filter, you can automate the forwarding of incoming emails based on specific criteria such as sender, subject line, or keywords.
Detailed Steps:
- Log into your Gmail account.
- Click on the gear icon in the upper right corner to access Settings.
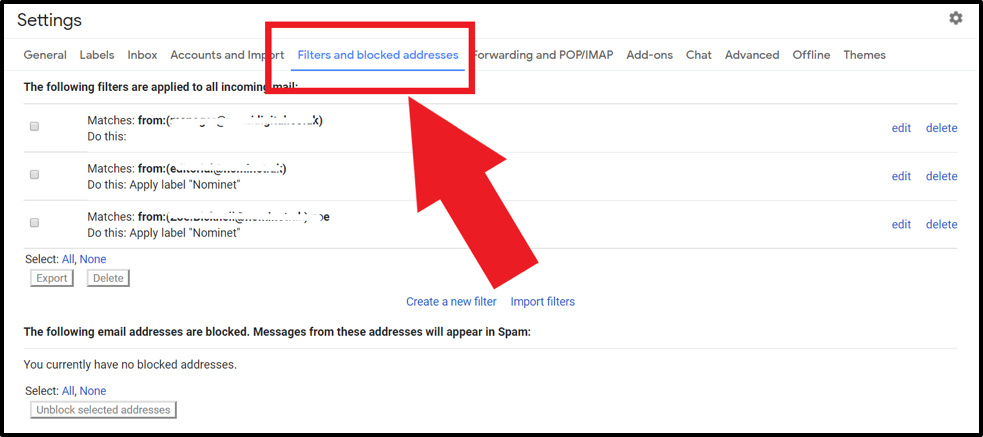
- Go to the ‘Filters and Blocked Addresses’ tab.
- Click on ‘Create a new filter’.
- Enter your criteria for the emails you want to forward (e.g., all emails from a particular email address).
- Click on ‘Create filter with this search’.
- In the box that appears, check ‘Forward it to:’ and click ‘Add a forwarding address’.
- Enter the email address to which you want to forward emails and click ‘Next’ > ‘Proceed’ > ‘OK’.
- A verification email will be sent to that address. Ask the recipient to click the verification link.
- Repeat steps 7-9 for each additional email address, up to the maximum allowed by Gmail.
- Once verified, go back to your filter and check the ‘Forward it to:’ option again, this time selecting the confirmed address from the drop-down menu.
- Finally, click ‘Create filter’ to activate the auto-forwarding.
Summary:
Using Gmail filters for auto-forwarding emails can help you stay organized and responsive. The main benefit is the ability to tailor the forwarding process to specific emails based on your set criteria. However, keep in mind that Gmail may have a limit on the number of forwarding addresses you can set up.
Google Scripts
For a more advanced approach that bypasses Gmail’s forwarding limits, you could use Google Scripts.
Detailed Steps:
- Go to Google Drive and click on ‘New’ > ‘More’ > ‘Google Apps Script’.
- Name your new project.
- In the script editor, paste a pre-written script designed to forward emails (scripts can be found online or you can write your own if you have coding knowledge).
- Customize the script with the email addresses to which you wish to forward messages.
- Save and run the script to authorize it.
- Set up a trigger within the script editor to run the script automatically at your preferred intervals.
Summary:
Google Scripts provide a robust way to manage email forwarding to multiple addresses. This method offers more flexibility and control over the forwarding process. However, it requires a basic understanding of scripting and may not be as straightforward for users unfamiliar with programming.
Using Third-Party Services
There are numerous third-party services that offer more sophisticated email forwarding options.
Detailed Steps:
- Choose a reputable third-party email forwarding service.
- Sign up for an account and connect it with your Gmail account following their instructions.
- Set up forwarding rules within the service’s interface to direct emails to multiple addresses.
- Apply any additional filtering or automation features offered by the service.
Summary:
Third-party services can greatly expand your email forwarding capabilities, often supporting a larger number of addresses and complex rules. However, they may require a subscription fee, and you need to trust the service with access to your emails.
Creating a Distribution List
For internal team communications, a distribution list (or group email) might be more convenient.
Detailed Steps:
- Go to Google Groups at groups.google.com.
- Click ‘Create Group’ and set up your group with the designated email addresses.
- Within your Gmail settings, set up a filter to forward specific emails to the group address.
Summary:
Distribution lists simplify the process of sending emails to multiple people within an organization. This method keeps everyone on the same page and minimizes the administrative effort. However, it’s limited to recipients who are willing to join the group.
The Multi-Forward Chrome Extension
Chrome extensions like Multi-Forward for Gmail can provide an intuitive way to forward multiple emails at once.
Detailed Steps:
- Install the ‘Multi-Forward for Gmail’ extension from the Chrome Web Store.
- Open your Gmail account and select the emails you want to forward.
- Click the ‘Multi-Forward’ icon in your Gmail toolbar.
- Enter the addresses you want to forward emails to and click ‘Multi-Forward’.
Summary:
Chrome extensions are user-friendly and are a good option for those who are not technically inclined. They are also useful for one-time forwarding. However, extensions can raise security concerns, and they only work in the Chrome browser.
Auto Forwarding to One Address and Redistributing
Sometimes, the simplest method to forward to multiple addresses is to send everything to a single intermediary address, which then redistribits the emails.
Detailed Steps:
- Go to Gmail Settings and set up forwarding to one primary secondary email address.
- On the secondary email account, set up rules or filters to distribute the emails to other recipients.
Summary:
This method focuses on rerouting emails through a central hub. It’s a quick fix but can be cumbersome for the secondary email account manager and can create a single point of failure.
Using Inbox Categories and Labels
Leverage Gmail’s labeling and categorization features to automatically sort emails for easier manual forwarding.
Detailed Steps:
- Create labels in Gmail for different categories or recipients.
- Use filters to automatically apply these labels to incoming emails.
- Manually forward emails from each label to the appropriate recipients.
Summary:
Labels and categories help with organization and make manual forwarding a breeze. This approach is hands-on and doesn’t offer automation but provides precise control over which emails are forwarded.
Smartphone Apps
Some smartphone email apps have built-in forwarding features that can complement or offer alternatives to Gmail’s web-based options.
Detailed Steps:
- Download and install a reputable email management app on your smartphone.
- Connect your Gmail account according to the app’s setup process.
- Explore the app’s forwarding settings and configure them as needed.
Summary:
Smartphone apps provide convenience for managing email on-the-go. While this method is portable and accessible, the range of features may vary by app, and it requires comfort with mobile email management.
Utilizing Multiple Email Clients
Using an alternative email client like Outlook or Thunderbird could give you additional forwarding functionalities.
Detailed Steps:
- Install and set up the preferred email client software on your computer.
- Add your Gmail account to the software.
- Utilize the client’s rules or forwarding options to manage email distribution.
Summary:
Third-party email clients can offer robust forwarding options. This approach however requires installation of software and potentially a learning curve for new users.
Delegate Access
Consider giving a trusted person delegate access to your Gmail account to manage forwarding.
Detailed Steps:
- Go to Gmail account settings and select ‘Accounts and Import’.
- Under ‘Grant access to your account’, add the email address of the person you wish to authorize.
- The delegate can access your email and use the forwarding features on your behalf.
Summary:
Delegating access is an excellent way to manage email if you have an assistant or team member you trust. It does, however, pose potential privacy and security risks if the delegate is not entirely trustworthy.
Now let’s consolidate our understanding.
As we’ve explored, Gmail provides several methods to auto-forward your emails, from creating filters and using Google Scripts to employing third-party services and extensions. Each method offers its advantages depending on your need for automation, control, and simplicity. However, it’s essential to be mindful of potential privacy concerns and ensure secure practices when sharing sensitive information.
In conclusion, mastering the art of auto-forwarding in Gmail can significantly streamline your email management and ensure critical information is delivered promptly to your team or other recipients. We hope this guide has given you the confidence to utilize Gmail’s forwarding features with ease and enhance your digital communication workflow.
FAQs:
-
Can I auto-forward to more than one address in Gmail?
Yes, you can, by setting up multiple filters or using Google Scripts to bypass the forwarding address limit imposed by Gmail. -
Is it safe to use third-party services for email forwarding?
It can be, as long as you choose reputable services with strong privacy policies. Always read reviews and terms to ensure your data stays secure. -
Do all these methods work with the Gmail app on smartphones?
Not all methods may be available on the Gmail smartphone app directly. Some require browser action, while others (like using additional email clients or smartphone apps) can provide alternatives on mobile devices.


