Crafting well-written content requires a keen eye not only for grammatical accuracy but also for the tone and structure of our writing. One such structure that often flies under the radar is passive voice—a style where the subject of the sentence has an action done to it, rather than performing the action itself. Microsoft Word, a widely used word processing tool, comes equipped with features that can help identify when you’ve slipped into this voice. By utilizing Word’s robust capabilities, we can polish our writing, making it clearer and more engaging.
Enable Grammar Check
Microsoft Word has a built-in grammar checking tool that can detect passive voice as part of its review functions. This feature scrutinizes your document for any grammatical issues, including passive constructions.
Detailed Steps:
- Open your Microsoft Word document.
- Click on the ‘File’ tab in the top left corner of the window.
- Select ‘Options’ towards the bottom of the sidebar.
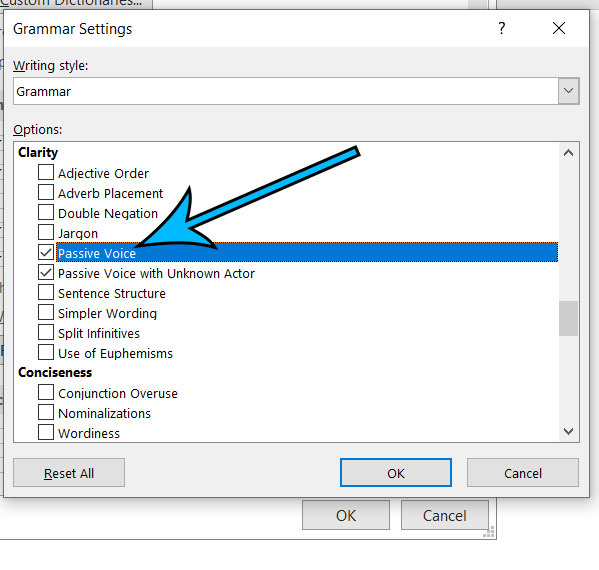
- In the Word Options dialog box, click on ‘Proofing’.
- Under the ‘When correcting spelling and grammar in Word’ section, make sure the ‘Check grammar with spelling’ box is checked.
- Click on ‘Settings’ next to Writing Style.
- Ensure that grammar checking is set to ‘Grammar & Refinements’ or ‘Grammar only’.
- Scroll through the list of grammar settings and check the box for ‘Passive sentences’.
- Click ‘OK’ to save your settings, then click ‘OK’ again in the Word Options dialog box.
Summary:
Enabling the grammar check is an efficient way to catch passive voice as you write or during a review of your document. It’s an automated, integrated solution within Word that doesn’t require installation of additional software. However, it might not catch every passive sentence, and sometimes it may flag sentences as passive when they are not, which can confuse users unfamiliar with grammatical nuances.
Review Using Editor Pane
The Editor pane in Microsoft Word offers a comprehensive review of your document, including insights into passive voice usage. It goes beyond the basic grammar check to provide more detailed suggestions.
Detailed Steps:
- Click on the ‘Review’ tab in Word’s ribbon.
- In the ‘Proofing’ group, select ‘Editor’.
- The Editor pane will appear on the right-hand side of your document.
- Look for the section labeled ‘Clarity and Conciseness’ or ‘Grammar’.
- If passive sentences are found, they’ll be highlighted here.
- Click on the suggestions, and Word will take you to each passive sentence in your document.
- Consider the suggestions and make edits as needed.
Summary:
The Editor pane offers a thorough check against poor writing habits, including the use of passive voice. It provides context and alternatives, which can be very educational for writers. However, because it can sometimes provide suggestions that may alter the intended meaning of your sentence, it requires careful consideration before accepting changes.
Use Find Feature
Word’s Find feature can help you locate passive constructions by searching for keywords commonly associated with passive voice, like “was” or "were followed by a past participle.
Detailed Steps:
- Press
Ctrl + Fon your keyboard to open the navigation pane. - In the search box, type the word “was” or “were” and press Enter.
- Word will highlight these words throughout your document.
- Manually check each highlighted case to determine if it is part of a passive sentence and requires revision.
Summary:
Using the Find feature can be helpful in identifying some passive sentences, but it’s a manual process and not as sophisticated as other methods. It will not detect all passives, especially those that don’t include common keywords, and it requires a good understanding of passive voice to be effective.
Readability Statistics
After performing a spell check, Word can display readability statistics that include passive sentences count.
Detailed Steps:
- Follow the first five steps from the ‘Enable Grammar Check’.
- In the ‘Proofing’ options, check the box for ‘Show readability statistics’.
- Click ‘OK’ to save your settings.
- Now run a spell check by clicking ‘Review’ on the ribbon, then ‘Spelling & Grammar’.
- Once the check is complete, a readability statistics window will pop up, showing you the percentage of passive sentences among other data.
Summary:
Readability statistics provide a snapshot of your writing, including passive voice usage. It’s a quick way to assess your document after reviewing spelling and grammar, but it offers no direct solutions to fix the passives and can be overlooked if you don’t carefully check statistics after the spell check.
Third-Party Add-ins
Numerous third-party add-ins designed specifically for Microsoft Word can assist in detecting passive voice.
Detailed Steps:
- Research and select a reliable grammar add-in compatible with Microsoft Word, such as Grammarly or ProWritingAid.
- Download and install the add-in according to the provider’s instructions.
- Open the add-in within Word and scan your document.
- Review the suggestions provided by the add-in and make necessary changes.
Summary:
Third-party add-ins often provide a more advanced level of grammar checking and can be customizable to your writing style. While powerful, these tools sometimes come with a cost and require a separate download and installation process which might be a hurdle for some users.
Watching Out for “To Be” Verbs
Passive voice often involves “to be” verbs. Learn to recognize and check sentences that contain “is,” “are,” “was,” “were,” “be,” or “been” followed by a past participle (usually a verb ending in -ed).
Detailed Steps:
- Use the ‘Find’ feature (Ctrl + F) to search for “to be” verbs.
- Review each highlighted sentence to see if it’s passive.
- If a sentence is passive, consider rewriting it in the active voice.
Summary:
This method puts the onus on the writer to understand and identify passive constructions, which can be a great learning tool. However, it’s time-consuming and less reliable for those not well-versed in grammatical rules.
Using Clear Language
Active voice tends to use clearer, more direct language compared to the often-vague passive voice. Focusing on clarity can inadvertently reduce your use of passive voice.
Detailed Steps:
- Write with the subject performing the action.
- Keep sentences short and to the point.
- Review your writing to ensure subjects and verbs are clear.
Summary:
While writing clearly is always a good practice, relying on this method solely to detect passive voice may result in inconsistent detection, especially for complex sentences.
Peer Review
Sometimes, another set of eyes can catch what you’ve missed. Consider asking a colleague or friend to review your document for passive voice.
Detailed Steps:
- Share your document with a peer.
- Request specific feedback on voice and tone.
- Review their suggestions and make changes accordingly.
Summary:
Peer review can provide personalized feedback and often catch nuances that automated checks might miss. The downside is that it relies on the availability and expertise of others.
Focused Revisions
Dedicate one of your revision rounds solely to addressing voice, ensuring you catch and rectify instances of passive writing.
Detailed Steps:
- During your revision, focus only on identifying passive sentences.
- Rewrite these sentences in the active voice, where appropriate.
- Read your document aloud to help spot awkward or unclear phrasing.
Summary:
This strategy promotes a stronger understanding and control over your writing style. However, it can be time-intensive and may require a deep understanding of passive vs. active voice.
Instructional Videos and Workshops
Online resources such as videos or writing workshops can provide valuable education on recognizing and addressing passive voice in your writing.
Detailed Steps:
- Search online for resources about passive and active voice.
- Watch videos or attend workshops.
- Apply what you’ve learned to your writing.
Summary:
This educational approach builds your skills for long-term improvement but requires additional time and commitment outside of writing your document.
In conclusion, while Microsoft Word provides several tools and features to detect passive voice, each comes with its pros and cons. Users should understand their own writing habits and needs to choose the methods that best suit them. Learning to write in an active voice is a skill that requires ongoing practice, but with the help of Word’s features coupled with dedication, it’s one that can be mastered, leading to clearer and more engaging written communication.
FAQs:
1. Can Microsoft Word automatically correct passive voice to active voice?
While Word can detect instances of passive voice and provide suggestions, it does not automatically change passive sentences to active ones without user intervention. You will need to review each suggestion and apply changes manually.
2. Is using passive voice always incorrect?
No, passive voice is not always incorrect; there are situations where passive voice is appropriate or even necessary. However, using active voice is generally preferred in writing because it tends to be clearer and more direct.
3. How can I learn to recognize passive voice without relying on Word’s tools?
You can improve your ability to recognize passive voice by understanding its construction—usually a form of “to be” verb + past participle—and practice writing and identifying passive sentences. Instructional materials, courses, and practice can help strengthen this skill.


