When eager to dive into the latest game, a slow download speed can feel like an unscalable wall between you and your adventure. The excitement of playing new titles or updating your favorite games on Blizzard’s Battle.net can quickly turn to frustration when downloads crawl at a snail’s pace. Understanding that there’s nothing quite as disappointing as being forced to wait, we’ve compiled a list of methods to troubleshoot and improve your download speeds on Windows, ensuring you’re back in the game as swiftly as possible.
Check Internet Connection
Before delving into more complex solutions, it’s essential to start with the basics by examining your internet connection. A simple issue with your network could be the culprit behind slow download speeds.
- Test your network speed using an online speed test tool.
- Compare the results with the speed promised by your ISP.
- If the results are significantly lower, restart your router by unplugging it for 30 seconds.
- For wireless connections, move closer to the router or try connecting via an Ethernet cable for a more stable connection.
- If issues persist, contact your Internet Service Provider for assistance.
Summary: This step ensures your internet speed itself isn’t the issue, which is a common and easily overlooked problem. By testing your internet connection first, you can save time troubleshooting more complex issues. However, this won’t help if the problem lies within Battle.net or your PC itself.
Update Network Drivers
Outdated network drivers can lead to poor internet performance. Keeping your drivers updated might be the key to faster downloads.
- Press the Windows key + X and select “Device Manager”.
- Expand the “Network adapters” section.
- Right-click on your network device and select “Update driver”.
- Choose “Search automatically for updated driver software”.
- Follow the prompts to install any available updates.
Summary: Updating your network drivers can lead to a more stable connection and potentially faster download speeds. The drawback is that incorrect drivers might cause more problems, so it’s critical to follow the prompts carefully.
Close Background Applications
Programs running in the background can hog your bandwidth and slow down Battle.net downloads.
- Press Ctrl + Shift + Esc to open the Task Manager.
- Click on the “Processes” tab.
- Look for high network usage applications.
- Right-click on each and select "End task” for anything not essential.
Summary: This can free up bandwidth, ensuring that Battle.net gets more resources for downloads. However, closing programs can disrupt ongoing tasks, so make sure to save any work before you start closing applications.
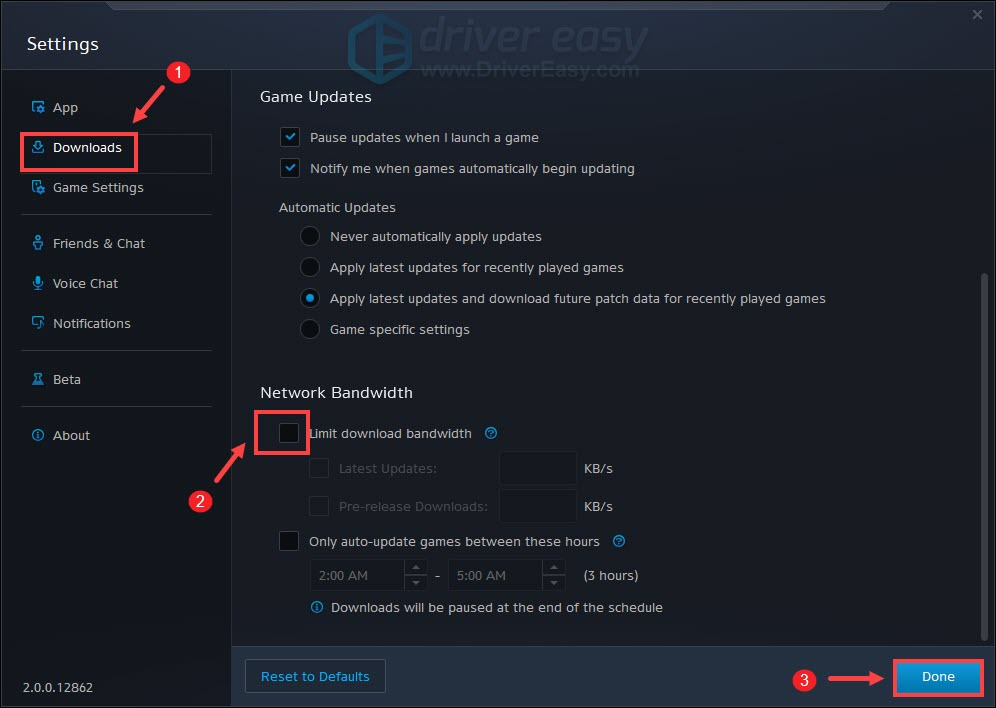
Adjust Battle.net Bandwidth Settings
Limiting bandwidth in Battle.net‘s settings can inadvertently throttle your download speeds.
- Open the Battle.net application and click the Blizzard logo at the top left.
- Select “Settings” and then “Game Install/Update”.
- Scroll to “Network Bandwidth” settings.
- Adjust the “Latest updates” and “Future patch data” settings to 0 (zero), which sets them to unlimited.
- Click “Done” to save the changes.
Summary: This could maximize your download speed on Battle.net. The downside is that it might affect browsing or streaming if the bandwidth used by Battle.net is too high.
Disable Firewall and Antivirus Temporarily
Sometimes firewall and antivirus software can interfere with your download speeds.
- Type “Windows Defender Firewall” in the start menu and select it.
- Click on “Turn Windows Defender Firewall on or off”.
- Select “Turn off Windows Defender Firewall” for both private and public network settings.
- Repeat similar steps to disable any third-party antivirus temporarily.
Summary: Disabling these can increase download speeds if they were blocking Battle.net, but it’s not recommended to leave your system unprotected for a long time, so remember to re-enable them after downloading.
Flush DNS Cache
Clearing the DNS cache removes any outdated or corrupt files that could slow down your internet connection.
- Type “Command Prompt” in the start menu, right-click it, and select “Run as administrator”.
- Type
ipconfig /flushdnsand press Enter. - Wait for the confirmation message before closing the window.
Summary: This often resolves connection issues with minimal effort. However, it’s a temporary fix and doesn’t address the root cause of the DNS issues, should there be any.
Change DNS Servers
Switching to a faster DNS server can improve your internet speed.
- Open Control Panel, then go to “Network and Internet” > “Network and Sharing Center” > “Change adapter settings”.
- Right-click your network and select “Properties”.
- Click on “Internet Protocol Version 4 (TCP/IPv4)” and then “Properties”.
- Select “Use the following DNS server addresses” and input the addresses of a faster DNS, like Google’s 8.8.8.8 and 8.8.4.4.
- Click “OK” to save changes.
Summary: A faster DNS server can speed up your internet connection, which could improve download speeds. However, if the issue wasn’t DNS-related, this will have little effect.
Repair Battle.net Files
Corrupted Battle.net files might slow down the download speed.
- Open the Battle.net app.
- Click the Blizzard logo and select “Settings”.
- Under the “Game Install/Update”, find the “Scan and Repair” section.
- Click “Begin Scan” and allow the app to rectify any issues.
Summary: Repairing files ensures that any corrupted data isn’t hindering download speeds. This process is safe, but it might take some time to complete.
Reinstall Battle.net
As a last resort, reinstalling Battle.net may resolve download speed issues.
- Uninstall Battle.net through the Control Panel.
- Download the latest version from the official website.
- Install the app following the on-screen instructions.
Summary: This can fix any underlying issues with the app itself and potentially speed up downloads. The downside is the time taken to reinstall and the risk of losing local game data if not backed up properly.
Contact Customer Support
If all else fails, seeking assistance from the professionals might get you the answer.
- Visit the official Battle.net support page.
- Navigate through the help topics or use the search to find specific guidance.
- If necessary, contact support through the provided channels.
Summary: Getting help from customer support can be very beneficial, especially for complex issues. However, it might take time to get a response and it doesn’t guarantee an immediate fix.
In conclusion, a slow download speed on Battle.net can have a variety of causes, but by methodically following these steps, you can often diagnose and fix the issue on your own. From checking your internet connection to tweaking Battle.net‘s settings and even reinstalling the platform, each of these solutions has the potential to get your downloads moving at full speed. Remember that maintaining the health of your PC and regularly updating your software are ongoing tasks that can help prevent these issues from cropping up in the first place.
FAQs:
Q: Can my internet service provider be the reason for slow download speeds?
A: Yes, if your ISP is experiencing slow speeds or technical issues, it can affect your download performance. Comparing your actual internet speeds with the advertised speeds can be a helpful first step in troubleshooting.
Q: Could my computer’s hardware impact my download speeds?
A: While it’s less likely, outdated or failing hardware, like an old network card or a router not designed for high-speed internet, can impact download speeds.
Q: What should I do if none of these solutions fix my slow download speed?
A: If none of the above solutions work, it may be helpful to check for wider issues with Battle.net‘s servers or contact their customer support for personalized troubleshooting.