Hand whistling is an intriguing form of making music or calling attention using nothing but your own hands and breath. It’s a skill that, with a bit of practice, can be a delightful party trick, or even a way to enjoy tunes when no instruments are around. Below are carefully curated instructions on mastering this unique ability. Each section will guide you through the critical steps to get you hand whistling in no time, accompanied by helpful tips and tricks to perfect your sound.
Finding the Right Hand Position
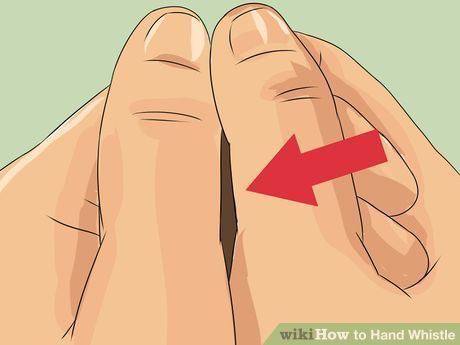
Before you attempt to make sound with a hand whistle, it is crucial to find a hand position that works for you. This involves shaping your hands to create an airtight chamber.
- Cup your hands: Place your hands together, palm-to-palm, with a slight cup shape to each hand.
- Leave a small opening: Ensure there’s a small gap between your thumbs. This is where the sound will come out from.
- Seal around edges: Press the sides of your hands and fingers tightly together to prevent air from escaping.
Summary: The right hand position is the cornerstone of hand whistling. It may take some time to find the perfect seal, but it’s essential for producing a clear tone. The downside is that it might be frustrating initially, as slight variations can make a significant difference.
Blowing Techniques
The manner you blow air into your hand chamber determines the sound’s pitch and quality.
- Angle your thumbs: Position the opening between your thumbs at a 45-degree angle to your mouth.
- Blow gently: Direct a steady stream of air across the top edge of the thumb opening.
- Adjust the flow: Experiment with the strength of your breath; a stronger blow will produce a higher pitch.
Summary: A controlled blow is fundamental to getting a good sound. The benefits are a more tuneful whistle, and the potential downside is you might get light-headed from practicing too vigorously at first.
Tuning Your Pitch
Altering the pitch of your hand whistle involves minute adjustments to the size of the hand chamber and the angle of your blowing.
- Change hand curvature: Tighten or loosen the curvature of your hands to make the internal chamber smaller or larger.
- Adjust thumb position: Move your thumbs closer together or further apart to fine-tune the pitch.
- Practice consistency: Try to maintain a consistent pitch before moving on to others.
Summary: Tuning your pitch gives control over the melody you can play. However, achieving pitch precision takes practice and can be a slow process.
Practicing Scales
Playing scales is a practical method for gaining control over your hand whistle.
- Start simple: Begin with a basic scale such as C major.
- Go step by step: Whistle each note of the scale, ensuring clarity and correct pitch.
- Increase difficulty: As you get comfortable, try more complex scales or melodies.
Summary: Practicing scales helps in strengthening muscle memory and pitch control. It can be repetitive but is essential for improvement.
Modulating Volume
Managing the volume of your hand whistle is just as important as controlling the pitch.
- Gauge your breath strength: Use a softer breath for lower volume and a more forceful one for higher volume.
- Adjust hand chamber size: A smaller chamber can make the sound more pronounced, while a larger one can soften it.
- Be mindful of surroundings: Practice modulating volume in different settings to see what works best.
Summary: Volume control allows for expressiveness in your hand whistling. The downside is that it’s easy to slip out of tune while focusing on volume.
Maintaining Rhythm
Keeping a steady rhythm ensures your hand whistling sounds musical and not erratic.
- Tap your foot: Use your foot to keep time as you whistle.
- Count beats: Mentally or audibly count the beats in each measure.
- Use a metronome: If available, practice with a metronome to help maintain a consistent rhythm.
Summary: Rhythm is key to musicality. It may seem challenging at first, but with practice, keeping a steady rhythm will become second nature.
Breathing Control
Proper breathing techniques will ensure you can sustain longer notes and passages.
- Take deep breaths: Use diaphragmatic breathing to maximize air intake.
- Blow steadily: Avoid sudden exhales; let the air flow consistently.
- Practice breath control exercises: Do breathing exercises apart from hand whistling to improve lung capacity.
Summary: Good breath control is crucial for sustained and even whistling. It could take time to build up stamina, which can be frustrating for beginners.
Hand Whistling Songs
Putting your skills to test by whistling songs can make practice enjoyable.
- Choose simple melodies: Start with tunes that you know well and are simple.
- Learn in sections: Break down the song into manageable segments.
- Combine segments: Once secure, start linking segments together.
Summary: Learning songs enhances your repertoire and makes practice rewarding, though it might be tough to get complex songs right initially.
Advanced Techniques
For those looking to go further, exploring advanced techniques can bring about versatility in hand whistling.
- Vibrato: Gently shake your hands while whistling to produce a vibrato effect.
- Dynamics: Practice varying the volume within a single breath for emotional expression.
- Articulation: Use your tongue to start and stop notes crisply, mimicking staccato, or legato styles.
Summary: Exploring advanced techniques can greatly improve the sophistication of your hand whistling. However, these techniques require a solid foundation in the basics first.
Health and Safety Tips
Ensuring you’re in good health and mindful of your surroundings is paramount.
- Stay hydrated: Keep your mouth and lips moist to prevent dryness.
- Take breaks: Whistling for too long can lead to dizziness; rest as needed.
- Mind the volume: Be cautious not to whistle too loudly, especially indoors, to avoid hearing damage for you and others.
Summary: Keeping health and safety in mind maximizes the enjoyment and longevity of hand whistling, with the main downside being the need to take frequent breaks impacting continuous practice sessions.
Hand whistling is an art that requires patience and practice. As you work through these steps, remember that each small milestone brings you closer to mastering this unique musical expression. It’s a journey as much about enjoying the process as it is about the end result.
Conclusion
Whether you’re looking to entertain friends, enjoy a personal music experience, or simply challenge yourself to learn a new skill, hand whistling is a fascinating pursuit. As with any skill, practice and patience are your best allies. Follow these steps closely, embrace the subtleties of the technique, and with time, you’ll find harmony at your fingertips—quite literally!
FAQs
Q: How long does it take to learn how to hand whistle?
A: The time it takes to learn hand whistling varies greatly from person to person. Some might get a sound out on their first try, while others might take a few days or weeks to produce a consistent tone.
Q: Can anyone learn to hand whistle?
A: While most people can learn to hand whistle with practice, some might find it more challenging than others due to different hand shapes, sizes, and levels of breath control.
Q: Is hand whistling loud enough to be heard in a noisy environment?
A: Yes, with practice, hand whistling can be quite loud and can be heard over moderate background noise. However, extremely loud environments may still overpower the whistle.


