In the enchanting realm of Minecraft, concocting potions is a magical and essential skill for any aspiring adventurer or alchemist. Among the various brews available in this blocky world, the poison potion stands out for its potent effects against foes. Crafting such a potion from scratch can seem daunting for players new to the art of alchemy, but fear not, for this guide will unveil the mystical process, one clear step at a time, ensuring even the greenest of apprentices can master this dark brew.
Gathering Ingredients
Before diving into the world of potion making in Minecraft, let’s first find out what you’ll need. The poison potion, like any other potion, requires specific ingredients and a brewing stand to concoct. It’s a treacherous brew that uses a venomous spider’s eye at its core.
Detailed Steps:
-
Find a Brewing Stand: Start your journey by locating a brewing stand, which can be created or found in a village or a structure like an igloo basement. To make one, blaze a powder (from a blaze rod obtained from the Nether) and three cobblestones are needed.
-
Collect Water Bottles: Fill up to three glass bottles with water by right-clicking on a water source or cauldron with the bottles in hand.
-
Gather Nether Wart: Head to the Nether to obtain Nether Wart, a plant found in Nether fortresses, which will serve as the base for your potion.
-
Obtain Spider Eye: Slay some spiders to get a spider eye, the key ingredient in the poison potion.
Summary:
The preparation phase is vital for potion brewing. The ease of access to a brewing stand allows rapid potion production for emergencies. Nether wart, a universal potion base, and spider eyes, sourced through combat, are simple yet crucial components. However, venturing into the Nether can be perilous for the unprepared.
Brewing a Basic Potion
Detailed Steps:
-
Power Up the Brewing Stand: Place blaze powder in the leftmost slot to activate the brewing stand.
-
Add Ingredients to Stand: Insert the water bottles into the bottom three slots.
-
Initiate Potion Base: Place the Nether Wart in the top central slot, beginning the brewing process to create an Awkward Potion – the foundation for most potions.
Summary:
These basic steps set the stage for an effective potion-making session. An active brewing stand with water bottles and Nether Wart transforms plain water into the potent base of the Awkward potion. While the process demands Nether exploration, most players consider the brewing of base potions a low-risk but essential stage.
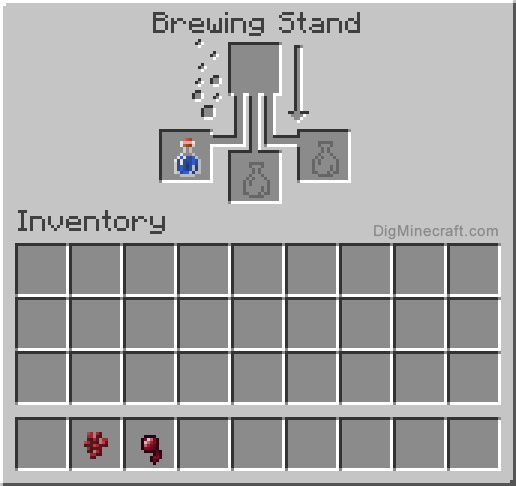
Crafting Poison Potion
Detailed Steps:
-
Combine Ingredients: With the Awkward Potions in place, swap the Nether Wart in the central slot for a spider eye.
-
Watch the Magic Happen: Witness the concoction bubble and brew; once the process completes, you’ll have a standard poison potion.
Summary:
In this step, alchemy comes to life as the venom of a spider transmutes into a weaponized form within the potion. This transformation is not only thrilling but empowering for a player, although mistakes here could waste your ingredients.
Enhancing the Potion
Detailed Steps:
-
Add Redstone or Glowstone: To increase the poison potion’s duration, add redstone to the mix; for a stronger effect, use glowstone instead.
-
Observe Additional Brewing: The potion will brew a second time, and once complete, the enhancement is done.
Summary:
Players seeking a tactical edge find this step appealing, as tweaking potion effects allows for customization based on their needs. The drawback lies in choosing one enhancement; you can’t have both increased potency and duration.
Making a Splash
To turn your poison potion into a throwable weapon, the brew needs to be altered by adding another ingredient – gunpowder. This will transform it into a splash potion, expanding its tactical uses in combat by allowing you to affect multiple targets or strategically place it during battles.
Detailed Steps:
-
Add Gunpowder: Put the gunpowder in the slot where the Nether Wart or spider eye was previously.
-
Final Brewing: With the addition of gunpowder, your potion will undergo its final transformation.
Summary:
The conversion to a splash potion brings a new layer of versatility, allowing for area effects in combat. It’s a simple enhancement with a substantial impact, although once thrown, these cannot be recollected, which demands strategic usage.
Storing Potions Properly
Detailed Steps:
-
Get Organized: Create labeled chests near your brewing stand.
-
Potion Segregation: Sort your potions by type and effect for quick access when needed.
Summary:
Effective storage ensures readiness for any Minecraft adventure. This systematic approach mitigates the frustration of disorganization but requires an investment of time and space for setup.
Brewing En Masse
Batch brewing saves time and resources, especially when preparing for prolonged expeditions or battles. Create multiple poison potions simultaneously by utilizing all three slots of the brewing stand. This method maximizes efficiency and ensures you’re well-stocked for future endeavors.
Summary:
Batch brewing is an economically savvy and time-efficient method for seasoned potion masters and novices alike, though it comes with the cost of upfront resource investment.
Potion Identification
Without a clear label, potions can become easily confused. Upon completing your potions, hover your cursor over them in your inventory to see their effects. This prevents any accidental self-poisoning or misuse in critical moments.
Summary:
Knowing your potions at a glance is critical, particularly in high-pressure situations where time is of the essence. Small details can have big impacts, though this also means needing to pause, potentially exposing you to enemy attacks.
Potion Farming Efficiencies
Detailed Steps:
-
Create a Farm: Grow Nether Wart and gather spider eyes by setting up a spider farm.
-
Implement Auto-Brewer: Consider building an automated brewing system to streamline potion production.
Summary:
Long-term potion crafting benefits immensely from farming and automation, which result in a virtually unlimited supply of ingredients. The initial time and resource outlay might be steep for some, but it pays dividends in the long-term efficiency of your potion-making endeavors.
Experimenting with Potions
Detailed Steps:
-
Test and Combine: Experiment with different ingredients to create a variety of potions.
-
Note Results: Keep a written log of ingredient combinations and potion effects for reference.
Summary:
Experimentation can lead to powerful discoveries and a deeper understanding of Minecraft’s alchemy system. Yet, this curiosity-driven approach can also lead to resource wastage and potentially harmful potions if you’re not cautious.
Evading Potion Mistakes
Detailed Steps:
-
Use Caution: Always double-check ingredients before adding them to the brewing stand.
-
Backup Resources: Keep spare ingredients in case of a misbrew.
Summary:
Attention to detail when brewing can prevent resource-draining mistakes. Backup resources offer a safety net but can also lead to hoarding behavior that might overwhelm your storage.
In the potion-brewing journey, adventurers and alchemists alike can tap into the potent magic of the Minecraft world. Craft poison potions to gain an upper hand against your enemies, enhance your strategic gameplay, or perhaps just dabble in the rich complexity of alchemy that the game offers. While the initial foray into potion making requires resourcefulness and caution, these liquid concoctions quickly become a brewmaster’s best friend and an indispensable tool in any Minecraft endeavor.
FAQs
Q: Can I turn a splash potion back into a regular potion?
A: No, once a potion has been converted into a splash potion, it cannot be reverted back to its drinkable form.
Q: Do I need to brew one potion at a time?
A: No, you can brew up to three potions at once, provided you have water bottles filled and ready to go in each of the bottom slots of the brewing stand.
Q: How do I make sure I don’t accidentally drink the poison potion?
A: Keep your poison potions separated from healing potions and always double-check their effects by hovering over them in your inventory before use. Creating a dedicated storage system can also help prevent accidental usage.


