Introduction
Netflix is an incredibly popular streaming platform that offers a vast array of movies, TV shows, and documentaries. As you binge-watch your favorite series or explore different genres, Netflix keeps a history of everything you’ve watched. This can be useful if you want to rewatch a favorite episode or remind yourself where you left off in a series. Whether you’re simply curious or need to manage your viewing activities, seeing your Netflix history is simple. This guide will walk you through several methods and additional tips for accessing and understanding your viewing history on Netflix.
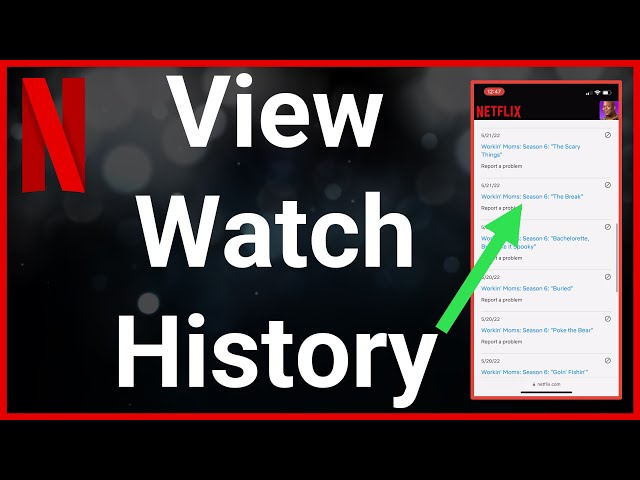
Viewing Activity
When it comes to tracking what you’ve watched on Netflix, the most straightforward method is through your Viewing Activity.
- Detailed Introduction: Netflix’s Viewing Activity feature allows you to see a comprehensive list of everything you’ve watched on your account. This feature is easily accessible from the account settings and it helps users keep track of their viewing habits or remove certain titles from their watch history.
- Detailed Steps:
- Sign in to your Netflix account using a web browser on a computer or mobile device.
- Hover over your profile icon in the top right corner and select ‘Account’ from the dropdown menu.
- Scroll down to ‘Profile & Parental Controls’ and select the profile you wish to view the history for.
- Next to ‘Viewing activity’, click on ‘View’.
- Your viewing history should now appear, showing a list of all the shows and movies you’ve watched, sorted by date.
- Discuss its benefits and any potential downsides: The Viewing Activity feature is beneficial for keeping track of all the content you’ve consumed. It’s also helpful for parents to monitor what their children are watching. However, if multiple people use the same profile, the history may become cluttered, making it hard to find specific titles.
Download Reports
For a more detailed look at your viewing history, including additional data, you can download comprehensive reports directly from Netflix.
- Detailed Introduction: Aside from just displaying your watched titles, Netflix allows you to download a report containing an extensive view of your interactions with the service. This report includes viewing history, ratings given to titles, and more.
- Detailed Steps:
- Sign into your Netflix account on a web browser.
- Click on the profile icon and select ‘Account’.
- Scroll down to ‘Settings’ and click on ‘Download your personal information’.
- Netflix will then guide you through the process to request this report, which will be sent to the email address associated with your account.
- Discuss its benefits and any potential downsides: Downloading your Netflix report is a great way to obtain a comprehensive record of your usage. However, it can take a few days to process this request, and the report may contain more technical data than some users are comfortable with.
Mobile App History
If you often watch Netflix on mobile devices, accessing your history through the app is quite convenient.
- Detailed Introduction: The Netflix mobile app is designed for convenience, allowing you to easily check your viewing history while on the go. Although the app doesn’t offer a direct watch history button, you can find your recent views through the Continue Watching section.
- Detailed Steps:
- Open the Netflix app on your mobile device and sign in.
- Scroll down on the main screen to find the ‘Continue Watching’ section, which displays the titles you’ve recently been watching.
- Tap on any title to continue watching or to find more details about the show or movie.
- Discuss its benefits and any potential downsides: Watching through the mobile app is quick and it conveniently displays what you’ve been watching recently. However, it is not as comprehensive as the Viewing Activity feature on the web and does not show a complete history.
Clearing Viewing History
Sometimes you might want to remove a title from your history for various reasons.
- Detailed Introduction: Clearing your viewing history can be useful if you’re looking to start fresh or want to remove an embarrassing or accidental play from your profile.
- Detailed Steps:
- Access your Viewing Activity as previously outlined.
- Find the title you want to remove from your history.
- Click on the ‘No’ symbol (a circle with a line through it) to the right of the report to hide the title from your viewing history.
- Discuss its benefits and any potential downsides: Clearing your history helps maintain your privacy and the relevancy of your recommendations. The downside is that Netflix’s algorithm may take some time to adjust recommendations after titles are removed, and deleted history can’t be recovered.
Separate Profiles
Creating distinct profiles on your account ensures personalized viewing histories.
- Detailed Introduction: Separate profiles for each user can keep histories from overlapping and ensure that recommendations are tailored to individual viewing preferences.
- Detailed Steps:
- From the Netflix homepage, hover over or tap on the profile icon.
- Select ‘Add Profile’, then enter a name and select a profile icon.
- Click ‘Continue’ and begin using the new profile for a fresh viewing history.
- Discuss its benefits and any potential downsides: Separate profiles can keep recommendations relevant and allow for personal monitoring of viewing history. However, sharing profiles can still lead to mixed histories and might require family or friends to switch profiles every time they watch Netflix.
Child Profiles
Setting up profiles for children helps parents control and monitor content.
- Detailed Introduction: Child profiles restrict the content available to watch based on maturity ratings and provides parents insight into their children’s viewing habits.
- Detailed Steps:
- Create a new profile and mark it as a ‘Kids’ profile.
- Manage the profile’s viewing restrictions within the account settings.
- Discuss its benefits and any potential downsides: Creating a child profile filters out inappropriate content and allows for easy tracking of what your child watches, but may limit the selection of available shows and movies more than you or your child would prefer.
Profile Locks
You can prevent others from accessing your profile by setting a profile lock.
- Detailed Introduction: A profile lock secures your profile with a PIN, keeping your viewing history private and preventing others from adding content to it.
- Detailed Steps:
- Go to your Account page and select the profile you wish to lock.
- Select ‘Profile Lock’ and enter your Netflix account password when prompted.
- Create a four-digit PIN and save changes.
- Discuss its benefits and any potential downsides: This feature boosts privacy and ensures that others cannot influence your viewing history or recommendations. However, forgetting the PIN can lead to temporary inconvenience until the issue is resolved through recovery steps.
Watch History for Recommendations
Netflix uses your history to curate tailored recommendations, which is a key benefit of the service.
- Detailed Introduction: Your watch history is crucial in shaping the suggestions Netflix provides, enhancing your browsing experience.
- Discuss its benefits and any potential downsides: This personalization means you’re more likely to discover shows and movies you’ll enjoy without extensive searching. However, if your history includes titles you didn’t enjoy, they may skew your recommendations until the algorithm adjusts.
Checking Other Devices
Accessing Netflix through different devices might offer insights into your viewing habits.
- Detailed Introduction: Each device that you use to watch Netflix keeps a record of your viewing habits, which might differ slightly from your main account history.
- Discuss its benefits and any potential downsides: Looking at your history on various devices can provide a more complete picture of your viewing habits, especially if you share your account. The downside is that this method may be less convenient and more time-consuming.
Customer Service
If you’re having trouble accessing your viewing history, Netflix customer service can help.
- Detailed Introduction: Sometimes technical issues may prevent you from seeing your history. Contacting Netflix support can resolve these problems.
- Discuss its benefits and any potential downsides: Customer service is there to help with account and technical issues, offering a solution when you can’t view your history. However, it might take time to get your issue resolved, and not all details might be recoverable depending on the issue.
Conclusion
Viewing your Netflix history is straightforward and can be done in multiple ways to suit your preferences. Whether you’re looking to reminisce about a show you’ve enjoyed in the past or ensure your recommendations stay precise, understanding how to access and manage your history enhances your streaming experience. When in doubt, remember that Netflix customer service is always there to assist with any difficulties.
FAQs
1. Can I see my Netflix history on my TV?
Yes, most smart TVs with the Netflix app allow you to access and view your history directly through the app.
2. Does Netflix history reset automatically after a certain period?
No, your Netflix history does not reset automatically. It’s a cumulative record of all you’ve watched unless titles are manually removed.
3. How long does Netflix keep my viewing history?
Netflix retains your viewing history indefinitely unless you choose to delete it or hide specific titles in your Viewing Activity.