Gaming on the Nintendo Switch is an exciting experience that comes to life when you can share it with others. Whether you’re coordinating in a team game or just chatting with friends, clear communication is key. Fortunately, the addition of a microphone can make your online interactions much more engaging. Setting up a microphone with your Nintendo Switch might seem complicated if you’re not familiar with gaming hardware, but fear not! This guide will take you through the process step-by-step, ensuring that you can chat with your friends and fellow gamers in no time.
USB Headset Connection
Setting up a USB headset with a microphone on your Nintendo Switch can enhance your gaming experience by providing clear audio communication. This is particularly useful for games that require teamwork and strategy.
- Connect the USB Headset: Insert the USB connector of your headset into an available USB port on the Nintendo Switch dock.
- Adjust System Settings: Turn on your Nintendo Switch and go to the System Settings menu. Navigate to “Sound,” and set the “Output Device” to “USB Headset.”
- Test the Microphone: Launch a game with voice chat support and enter a voice chat room to test if others can hear you clearly.
- Adjust Microphone Settings: If necessary, adjust the microphone level by going back to System Settings, under “Sound,” to ensure your voice is neither too loud nor too soft.
Summary: By following these steps, you’ll be able to use a USB headset with your Nintendo Switch, providing a more immersive gaming experience. A potential downside is that you’re restricted to using the microphone only when the console is docked.
Bluetooth Wireless Headset Pairing
Using a Bluetooth wireless headset with your Nintendo Switch can offer the convenience of no cords, allowing for greater freedom of movement.
- Ensure Compatibility: First, make sure your wireless headset is compatible with the Nintendo Switch.
- Go to System Settings: On your Switch console, select “System Settings” from the HOME Menu.
- Enable Bluetooth Pairing: Scroll to and select “Bluetooth Audio,” then “Pair Device.”
- Initiate Pairing on Headset: Put your headset into pairing mode following the manufacturer’s instructions.
- Complete Pairing: Select your headset from the list of available devices on the Switch screen to pair them.
Summary: A Bluetooth headset offers cord-free convenience and ease of movement; however, some might experience a slight audio delay, and traditionally, only one Bluetooth audio device can be connected at a time.
Using the Nintendo Switch Online App
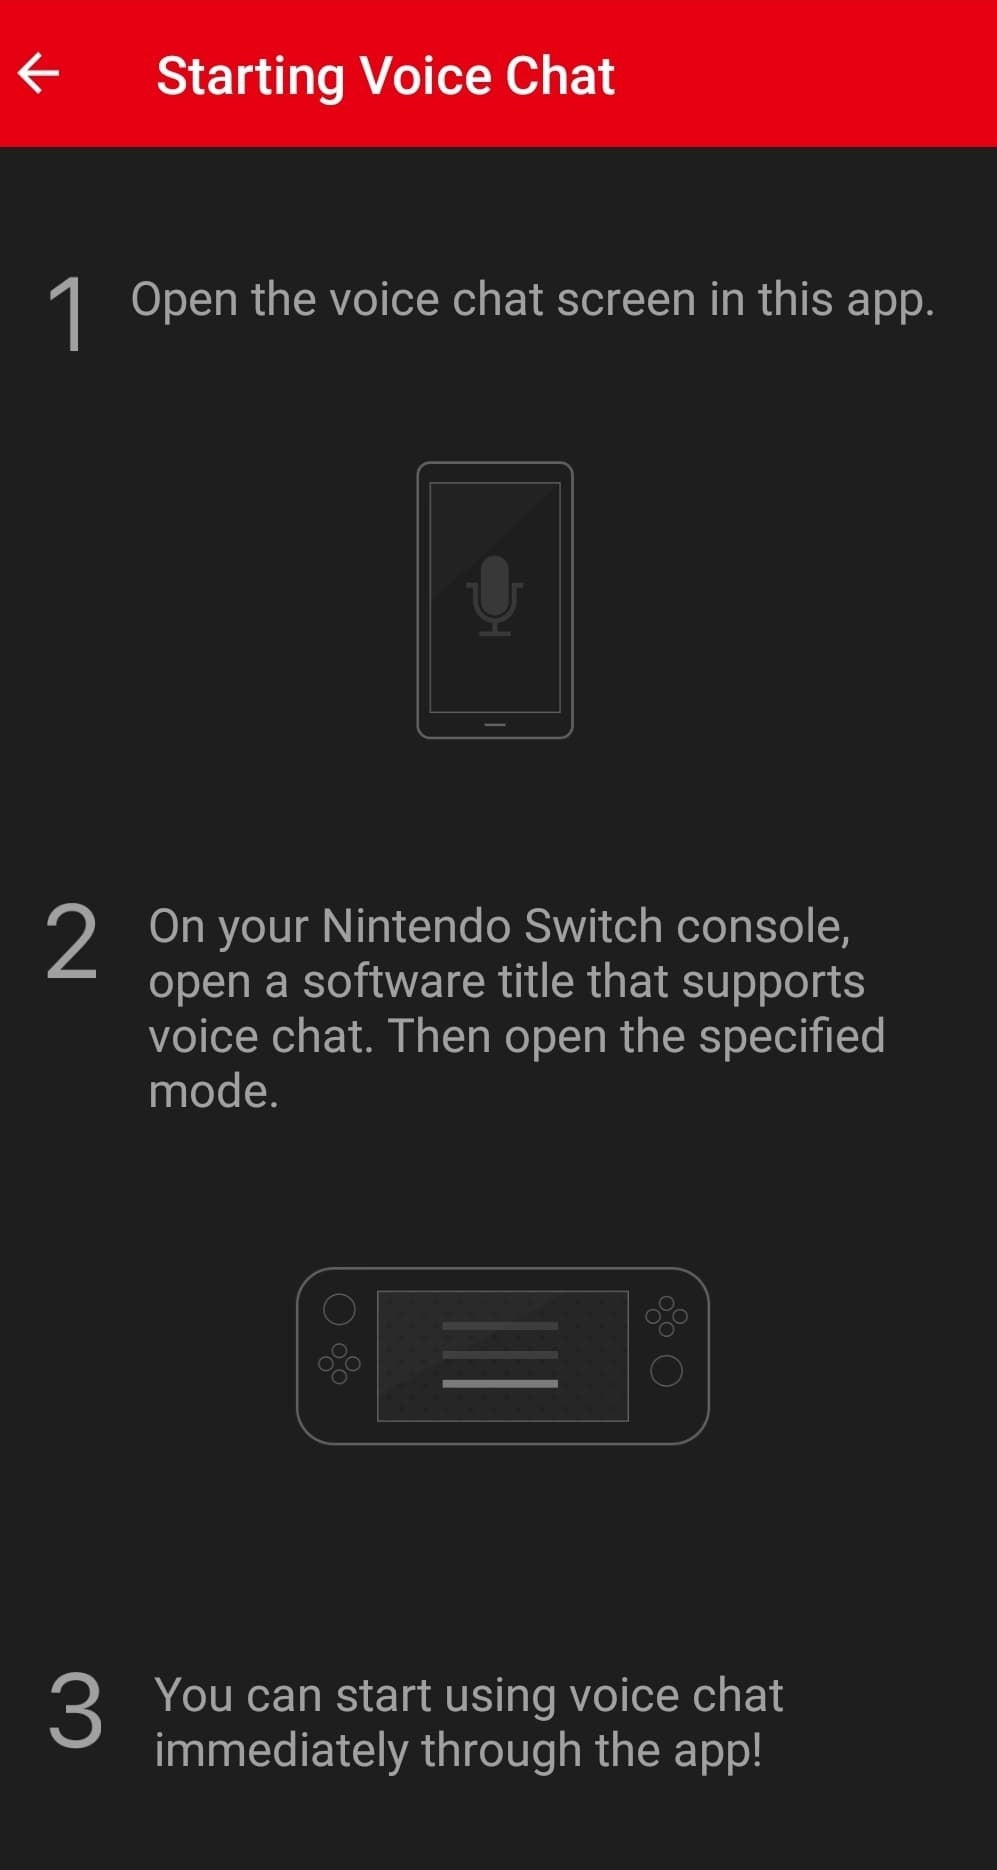
The Nintendo Switch Online App allows you to use your smartphone as a microphone, which is a handy workaround to the lack of native voice chat on the console for certain games.
- Download the App: Install the Nintendo Switch Online App from the App Store or Google Play on your smartphone.
- Sign In: Open the app and sign in with your Nintendo Account.
- Connect to Your Game: Select the game you want to voice chat in and connect to it through the app.
- Start a Voice Chat: Join a voice chat room within the app to start talking with friends.
Summary: The app is user-friendly and turns your smartphone into an instant microphone; however, this solution requires handling multiple devices and the supported games list is limited.
Adjusting In-Game Settings
Many games have their own settings for audio, and adjusting these can improve your microphone experience on the Nintendo Switch.
- Access the Game’s Settings: Open the game you want to play and go to its audio settings menu.
- Adjust Microphone Levels: Look for microphone or voice chat settings and adjust the input levels accordingly to ensure you’re heard clearly.
- Test In-Game: Try speaking into the mic during gameplay to test out the changes you’ve made.
Summary: Customizing in-game settings provides an optimized audio experience, but it requires going through this process for each new game you play.
Noise-Canceling Microphones
Investing in a noise-canceling microphone can greatly enhance the audio quality of your voice chats, reducing background noise.
- Choose a Noise-Canceling Mic: Purchase a headset with built-in noise-canceling features compatible with the Nintendo Switch.
- Connect the Mic: Plug your headset into the Switch’s headphone jack or pair it via Bluetooth if it’s wireless.
- Test the Mic: Test the microphone in a noisy environment to ensure that it’s canceling out unwanted background noise effectively.
Summary: The improved audio clarity is beneficial, especially in noisy environments, but noise-canceling microphones can be more expensive.
Checking Microphone Access Permissions
Some games and apps require permission to use the microphone. Ensure your game has access to your mic in the system settings.
- Go to System Settings: Select “System Settings” from the HOME screen of your Nintendo Switch.
- Navigate to Microphone Settings: Look for any settings specific to microphone access and make sure your game is allowed to use the microphone.
Summary: Adjusting permissions can resolve issues where the mic isn’t working, but it can be tedious to manage permissions for each game.
Maintaining Firmware Updates
Ensure that both your Nintendo Switch and your accessories are running the latest firmware versions for optimal performance.
- Update the Switch: Connect your Switch to the internet and follow the prompts to download any available system updates.
- Update Accessories: Check for firmware updates for your headset or other microphone peripherals and apply them according to the manufacturer’s instructions.
Summary: Keeping everything updated can improve functionality but requires regular checking.
Wired Headset Considerations
Using a wired headset eliminates concerns about battery life or wireless interference but comes with the limitation of being tethered to the device.
- Connect the Wired Headset: Insert the headset’s plug into the headphone jack on the Switch or the controllers.
- Adjust the Cable: Organize the cable to avoid accidentally pulling it or tripping over it during gameplay.
- Test the Microphone: Ensure the microphone is picking up sound properly by asking friends if they can hear you well.
Summary: Wired headsets provide a reliable connection, but the physical cable can be restrictive.
Alternative Microphone Options
External microphones that can be clipped onto clothing or placed on a surface near you offer another solution.
- Select an External Mic: Choose a microphone designed for use with the Nintendo Switch.
- Connect the Mic: Follow the instructions to connect the external mic to your Switch console.
- Place the Microphone: Position the mic close to your mouth for the best audio pick-up without it being in the way.
Summary: External microphones might give better audio quality, but they can be less convenient than integrated headset microphones.
Using Voice Chat Responsibly
Regardless of the microphone setup, it’s important to use voice chat responsibly.
- Familiarize Yourself With Etiquette: Learn the etiquette of voice chat within the gaming community to ensure a positive experience.
- Set Boundaries: Use mute and block functions as needed to manage who you interact with.
- Monitor Volume: Keep your voice at a reasonable volume to be considerate of other players and those around you.
Summary: Responsible use enhances the gaming experience for everyone but requires understanding and following community guidelines.
In conclusion, while it might initially seem daunting, setting up a microphone for your Nintendo Switch can be a straightforward process with the right guidance. By selecting the right equipment and configuring it properly, you’ll be ready to communicate with others and take your gaming to a whole new level of fun. This guide has walked you through the necessary steps and offered tips to ensure that your voice chat experience is as smooth as possible.
FAQs
Can I use any Bluetooth headset with my Nintendo Switch for voice chat?
- Not all Bluetooth headsets are guaranteed to work with the Nintendo Switch. It’s important to ensure compatibility beforehand. Recent updates to the Switch firmware have increased the range of compatible devices, but there may still be limitations on support and functionality.
Do I need the Nintendo Switch Online app for voice chat?
- For certain games, voice chat functionality is only available through the Nintendo Switch Online companion app for smartphones. For other games, you might be able to use a headset directly connected to the console.
What should I do if my microphone isn’t working with my Nintendo Switch?
- Start by checking that your headset is properly connected and recognized by the console. Ensure your headset is compatible with the Switch, verify that the microphone is not muted, check in-game settings, and confirm that you have the latest system updates. If problems persist, consult the headset’s manufacturer or Nintendo’s support resources.